
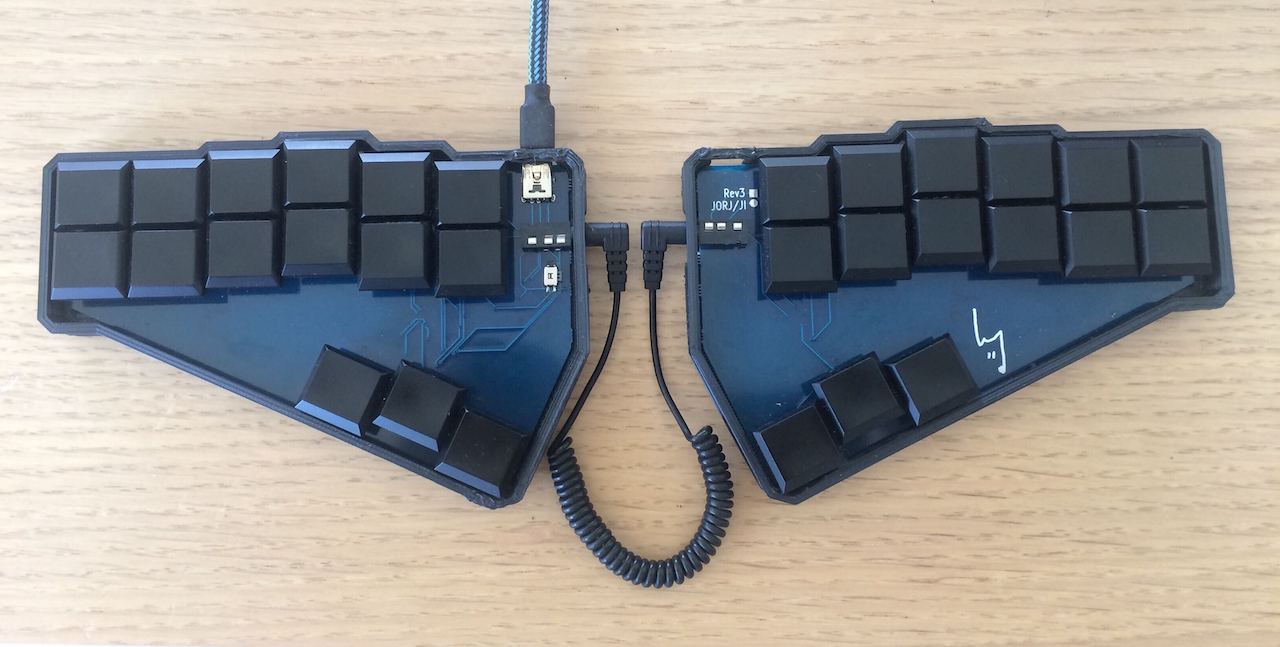
So, you have had your Georgi keyboard for a while, done lots of Plover stenography practice, and are now thinking about making some changes to its keymap layout because you want it to do something that it currently does not.
This will require you to generate some Quantum Mechanical Keyboard (QMK)-based firmware for the Georgi, and then flash the device to overwrite the one that is currently there.
See a previous blog post I wrote, Escape the defaults and Control your keyboard with QMK, for more information about using QMK: some general, some more Ergodox EZ-focused.
QMK has a web-based configurator, which enables you to create firmware files for a multitude of keyboards that QMK supports, without having to touch any C code. But, in the configurator1…
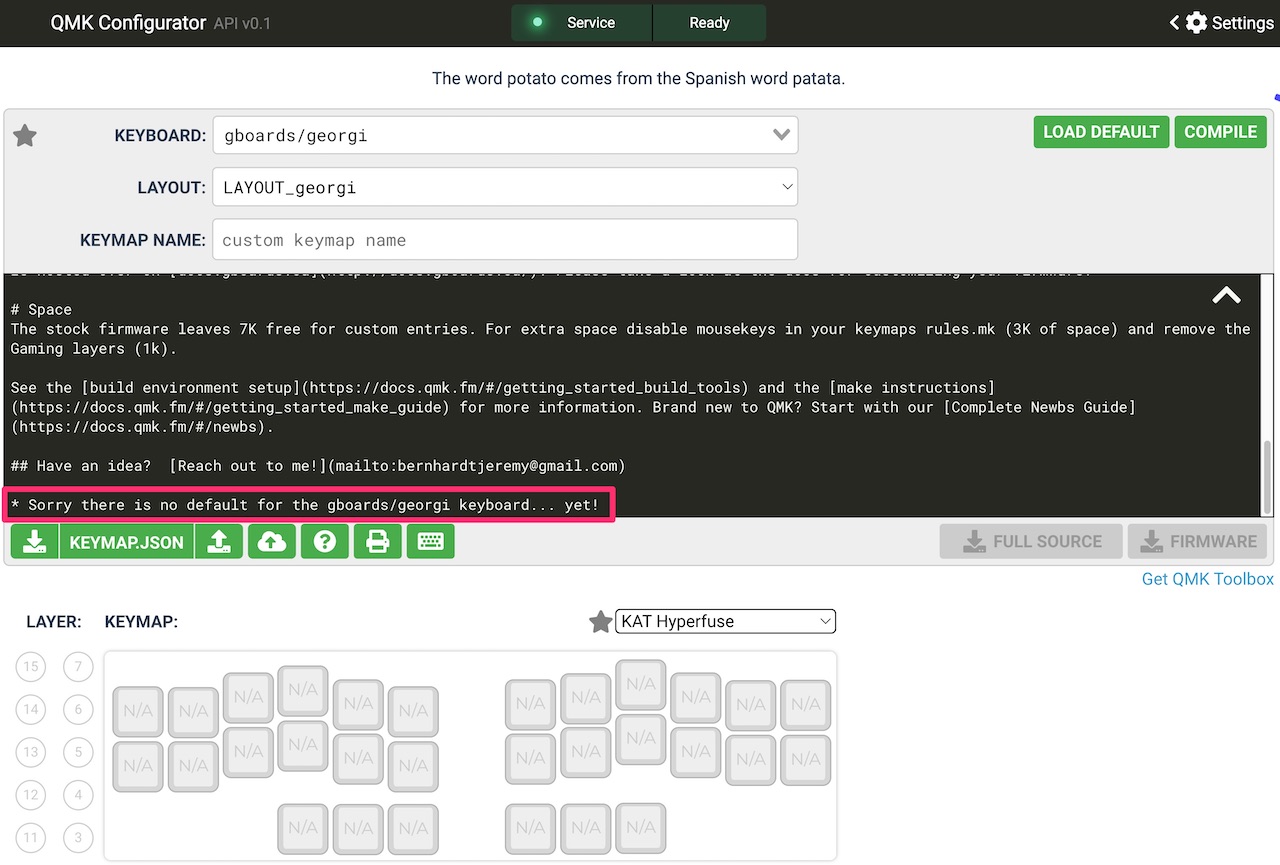
- Compilation of the Georgi layout is not yet supported
- Stenography keycodes are not yet available to assign to keys
If you still want to make any changes, steel yourself for hard mode, because we are going to have to get technical.
Before we even think about firmware customisation, though, we will want to make sure that you can compile the default Georgi firmware locally on your computer, and flash your Georgi successfully with it. Then, we will get our hands dirty with some code by creating an example firmware customisation, compiling it, and then flash the Georgi again to apply it.
If you have not already, I would recommend familiarising yourself, at least a little bit, with some of the Georgi-related gBoards documentation, to provide some context on what we will be doing. Specifically:
- Unboxing Georgi - we will use the Gaming mode in the example customisation later on
- Configuring Georgi - in particular Triggers, one of which we will change
- Hacking Georgi - here, just note that we will be working with the
cChordbit field
Ready? Let’s get hacking!
Compile Default Georgi Firmware
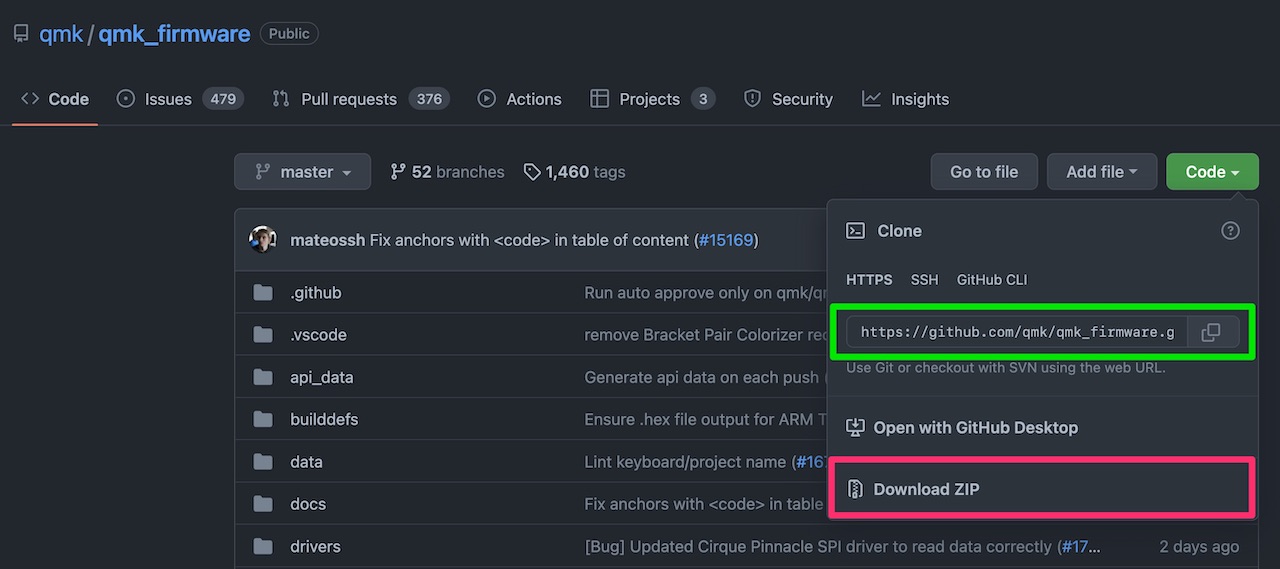
Download the QMK firmware from its GitHub repository. Pick a convenient directory to start in (I will use ~/Desktop here, but you can pick one appropriate for your operating system), and either use Git to get the source code (recommended), or download its ZIP file.
Example commands:
cd ~/Desktop
git clone https://github.com/qmk/qmk_firmware.git
cd qmk_firmware
Next, follow the Setting Up Your QMK Environment instructions from the QMK documentation and install the qmk command line interface (CLI) application.
In the Prerequisites, it says installation of the QMK Toolbox is optional, but we will be using it soon, so either download the latest release, or, if you are on macOS, use Homebrew to install it:
brew install qmk-toolbox
Now, use the qmk CLI to compile the default Georgi firmware with the following command:
qmk compile -kb georgi -km default
You may get an error running this command the first time, and be prompted to run a command like
make git-submodule. Follow any error message instructions, and then try compiling again.
If the command runs successfully, the end of all of the compilation output should look something like this:
...
Creating load file for flashing: .build/gboards_georgi_default.hex          [OK]
Copying gboards_georgi_default.hex to qmk_firmware folder                   [OK]
Checking file size of gboards_georgi_default.hex                            [OK]
If you check in your qmk_firmware directory, you will see that a HEX file named gboards_georgi_default.hex has been generated, which we will use to flash the Georgi.
Flash Georgi Firmware
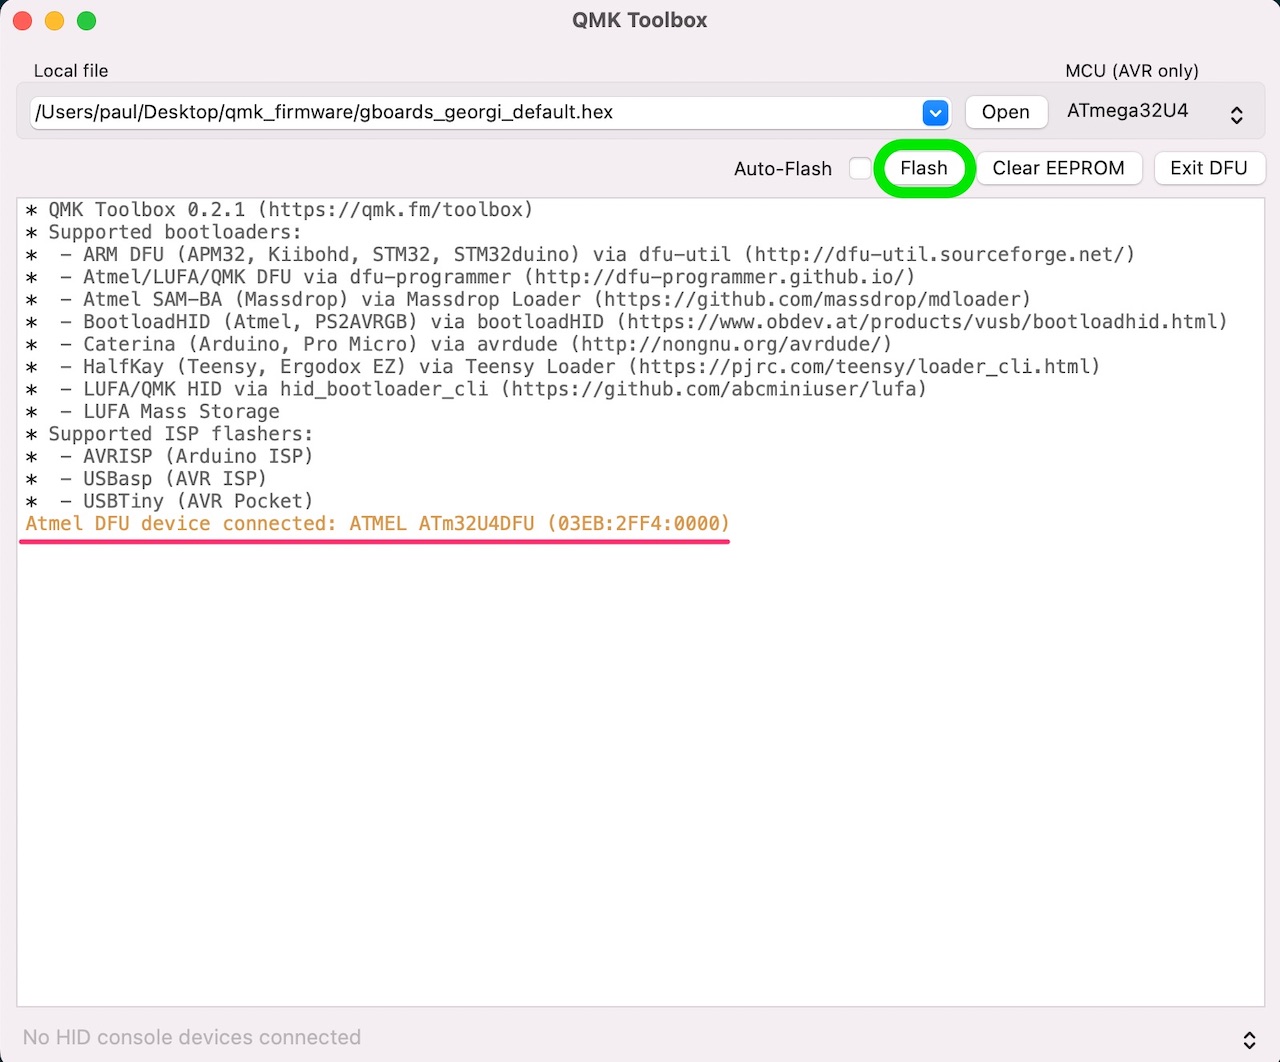
Open up the QMK Toolbox application, press the “Open” button, and select the generated HEX file.
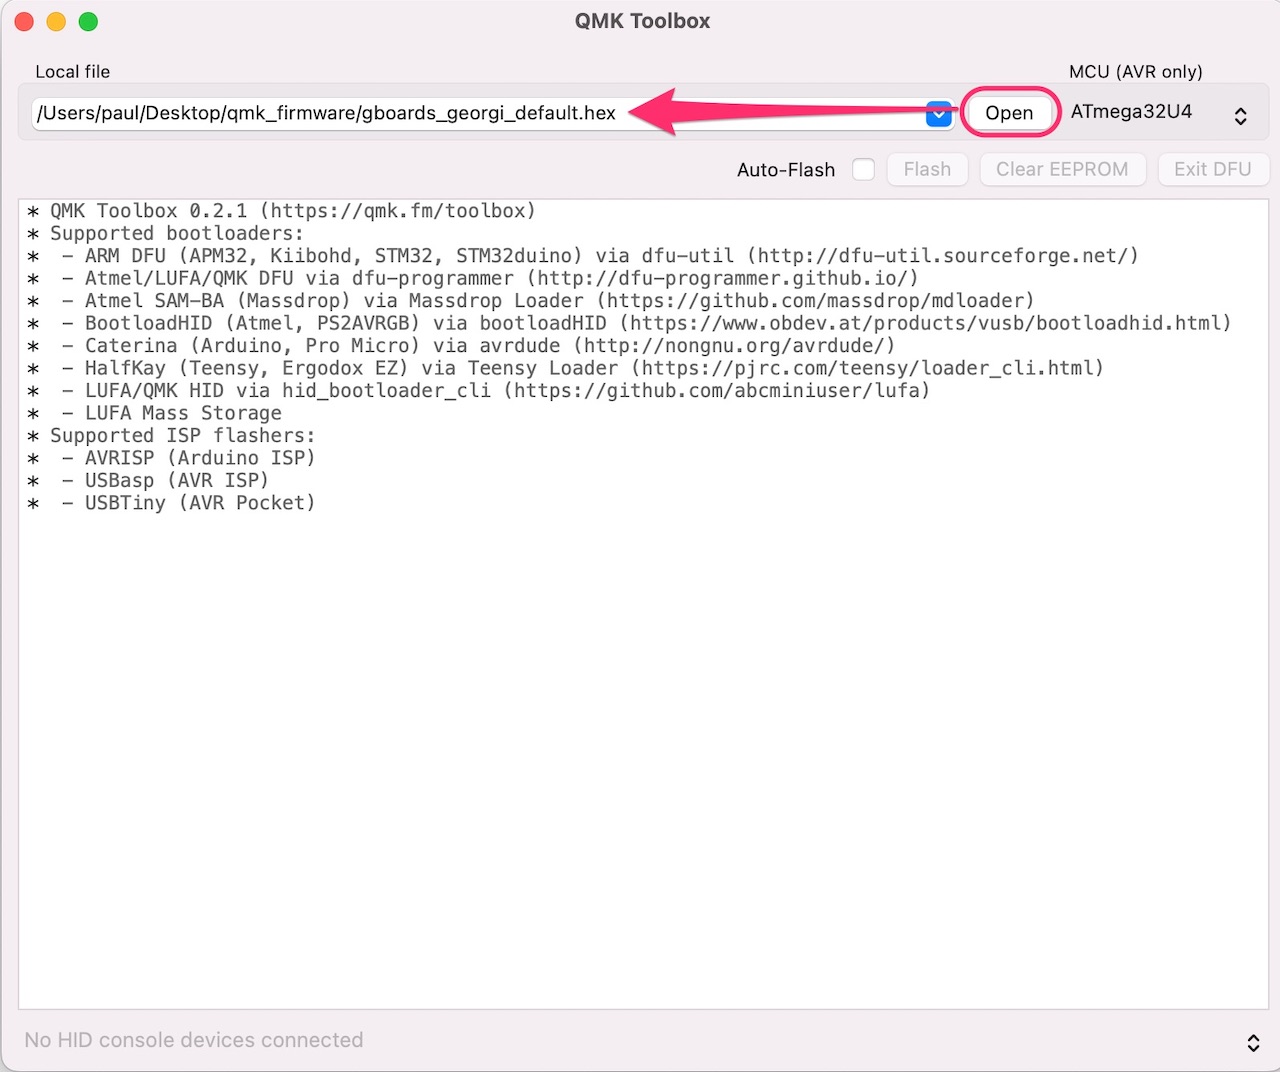
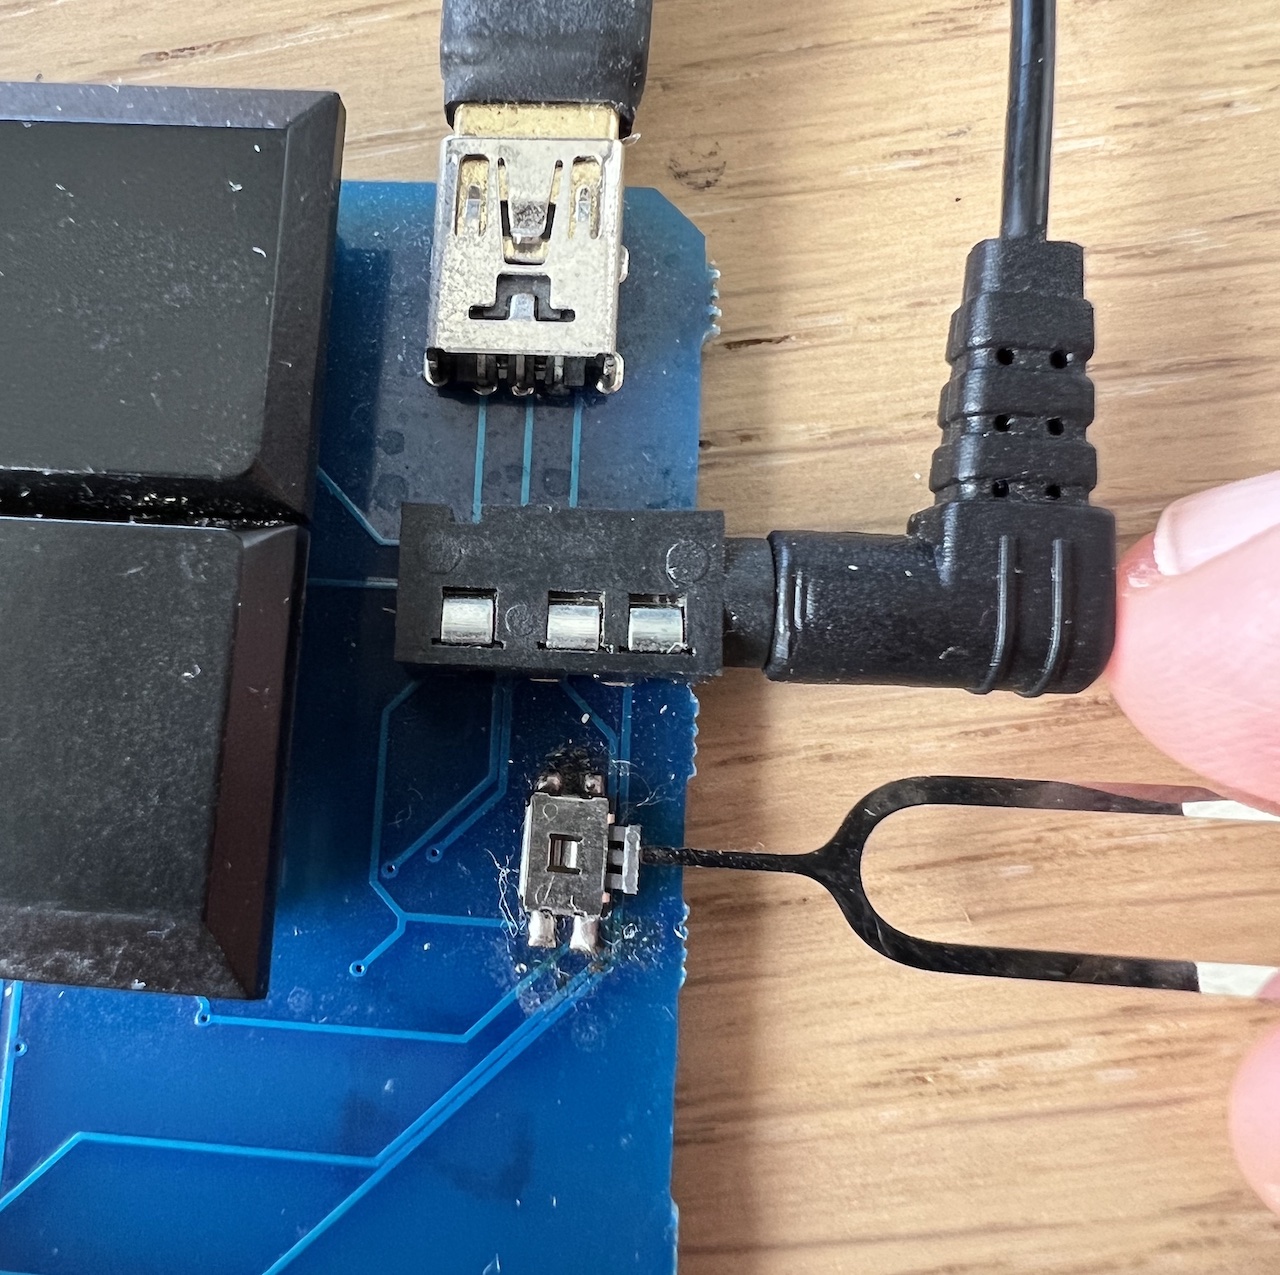
You will notice that the “Flash” button is currently not selectable. This is because the Georgi is not currently in Device Firmware Upgrade (DFU) mode. To get in DFU mode, and allow the Georgi to receive firmware, you need to press the tiny button on the left half of the keyboard, just below the TRRS cable plug. I use a paperclip or a SIM card tray ejector tool for this delicate job.
Once the button has been pressed, QMK Toolbox will show you a message letting you know that you have successfully connected a device in DFU mode, and the “Flash” button will become pressable:
Press the “Flash” button, and if everything goes well, you should see output that looks something like this:
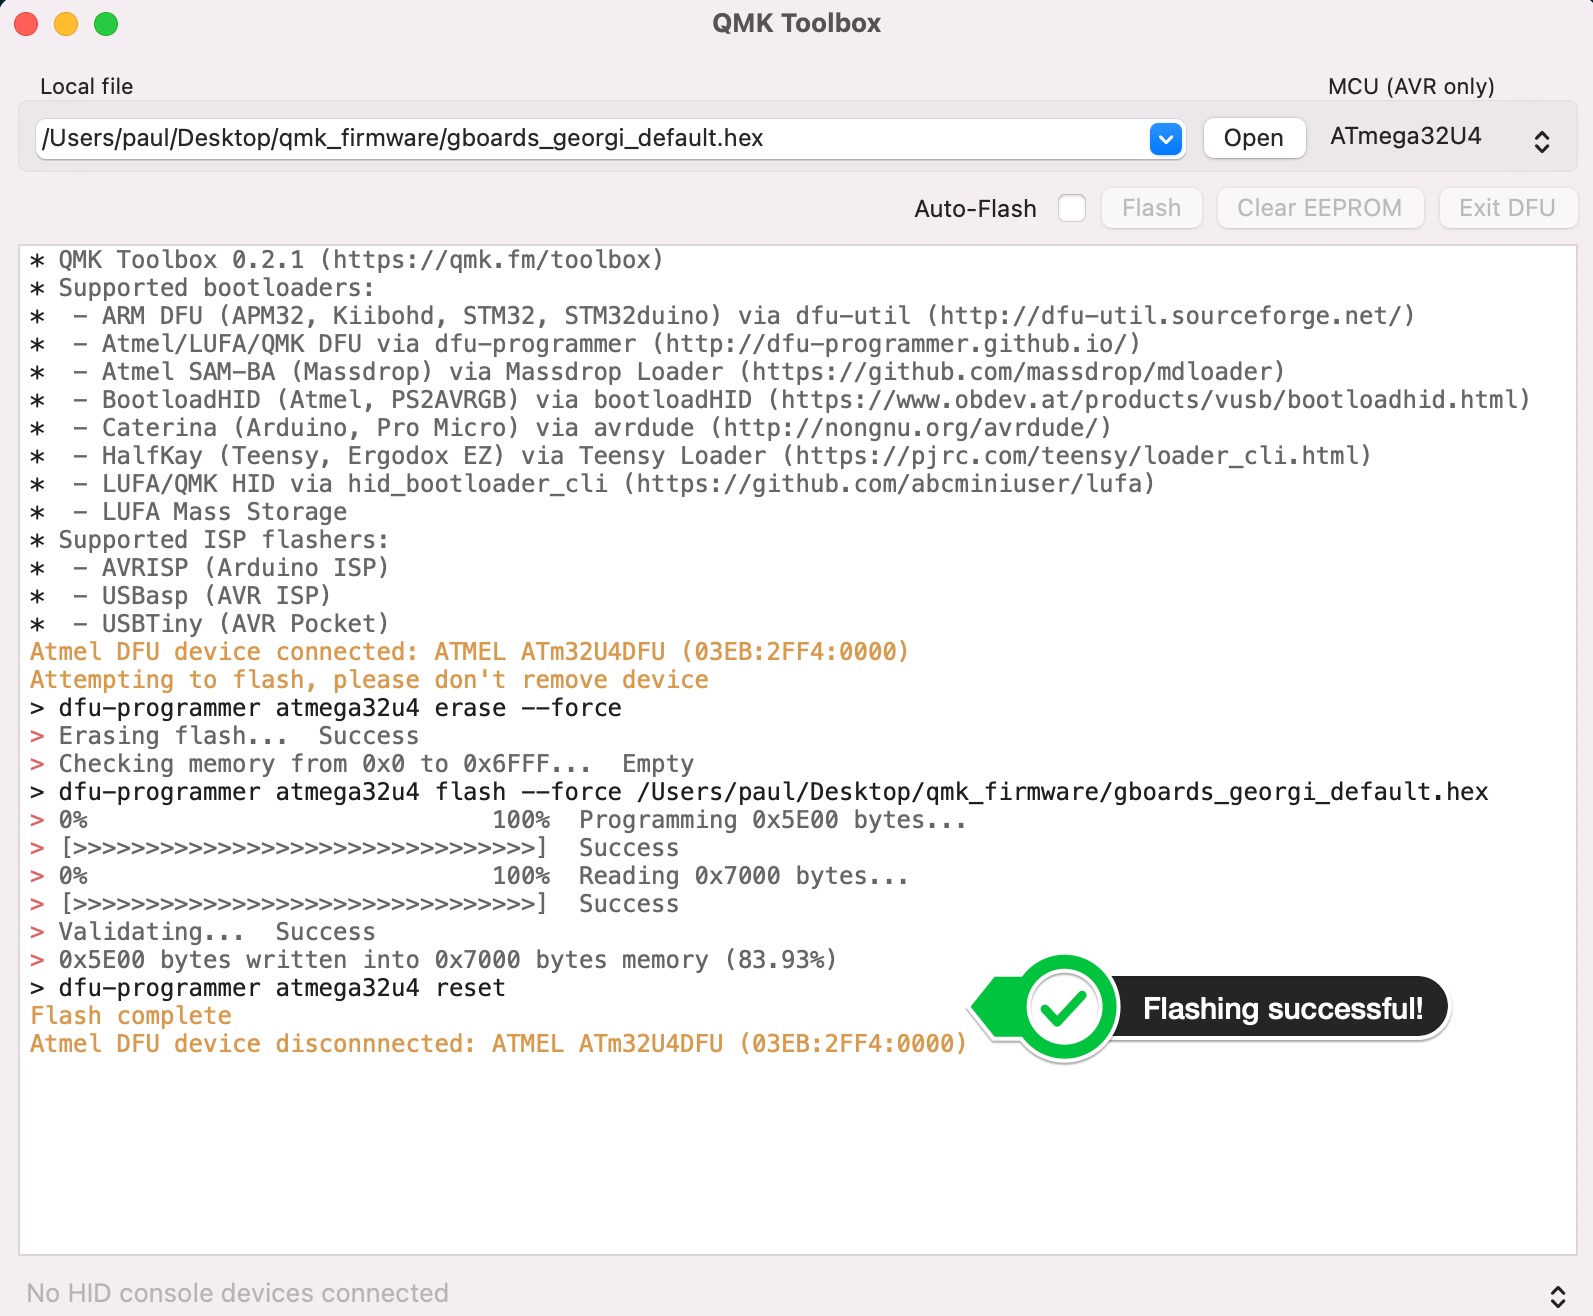
The Georgi has now been taken out of DFU mode, and can be reconnected to Plover.

/dev/cu.usbmodem14202 in Plover's connection list, but yours might look something like COM6 if you use Windows. If you are able to stroke steno chords again (and it seems like nothing has changed), congratulations, you have just completed a full keyboard flashing process! You will get another chance to do this again, but before that, let’s actually go and make some firmware changes!
Customising the Firmware
Before diving straight into the code, allow me to provide some context around the reasons for even wanting to make the changes we will use in the customisation example.
The Problem
I have been experimenting with Georgi’s Gaming mode, which switches you to a separate keyboard layer that “acts like a traditional keyboard, as opposed to stenotype”, in the way it sends information to your computer.
This is different to Georgi’s QWERTY and Symbol modes, which still both act like a stenotype, and actually only exist as “pseudo-layers” within the main steno keymap layer.
Open any game you may have that involves moving a character around a screen, and attempt to do so using Georgi’s QWERTY mode. You will most likely be unable to, due to this keyboard/stenotype difference (details of which are not important for this post).
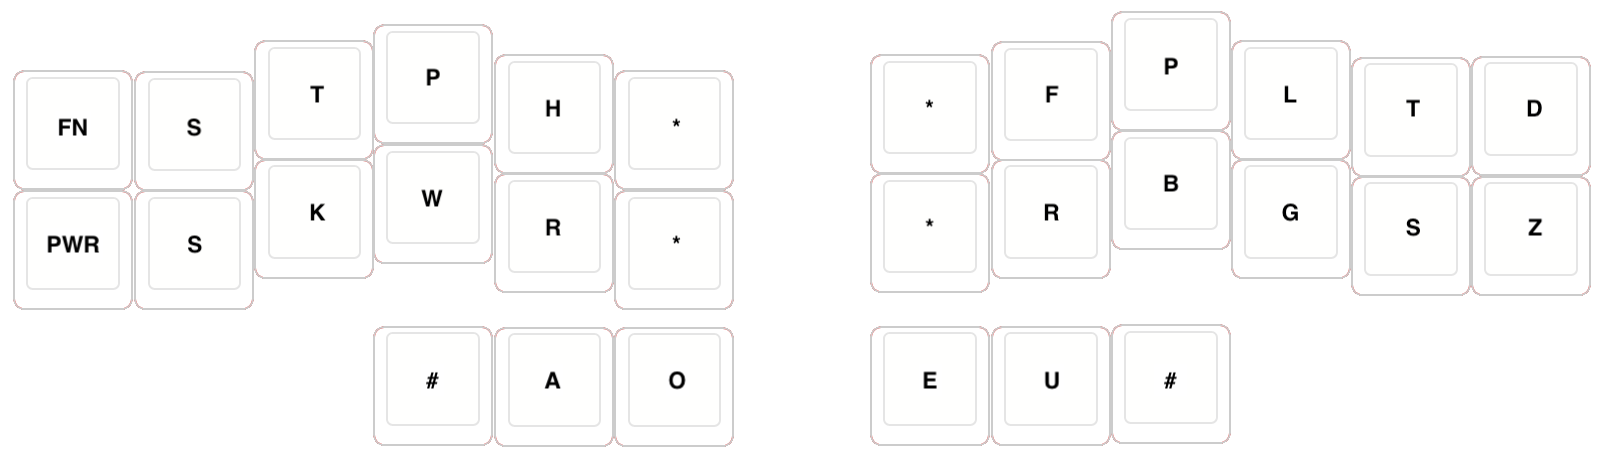
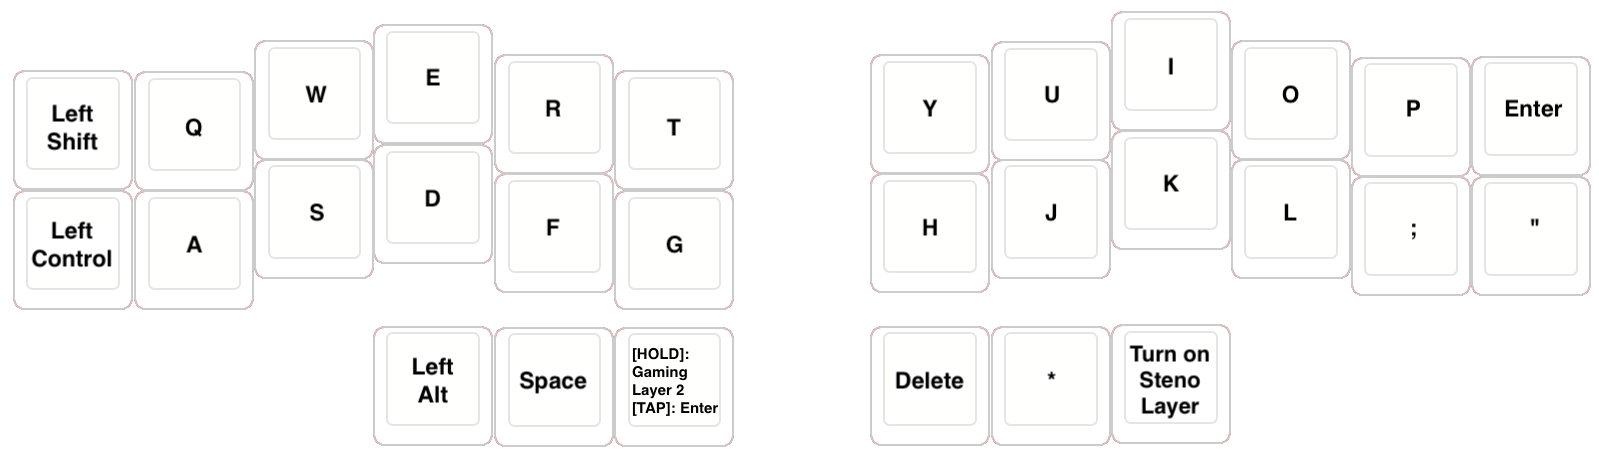
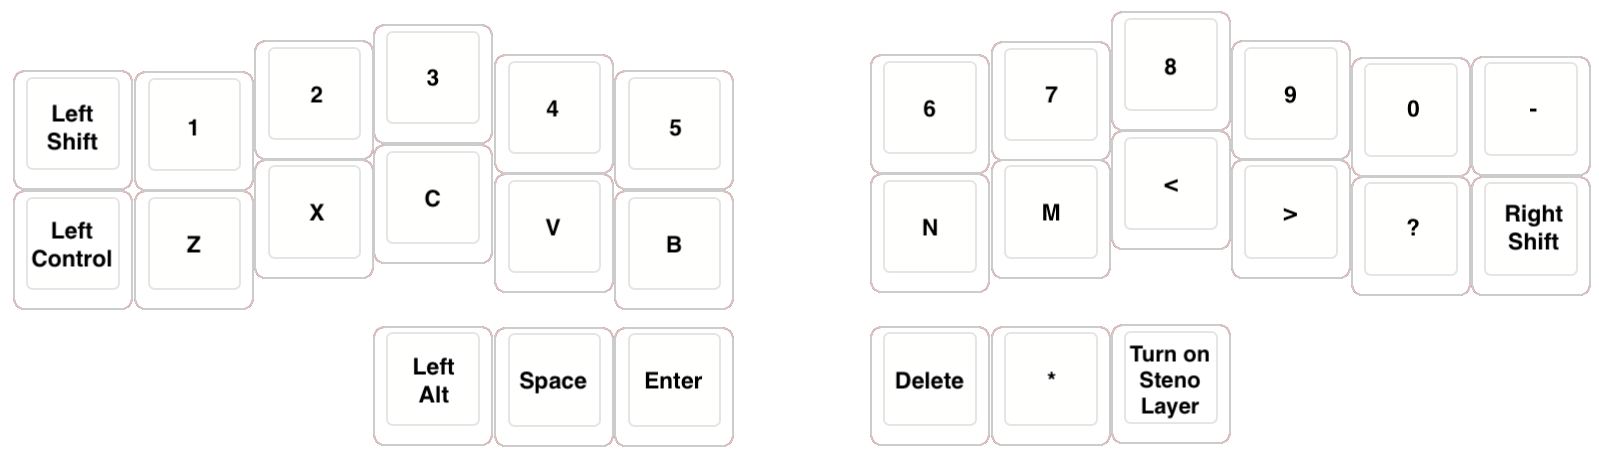
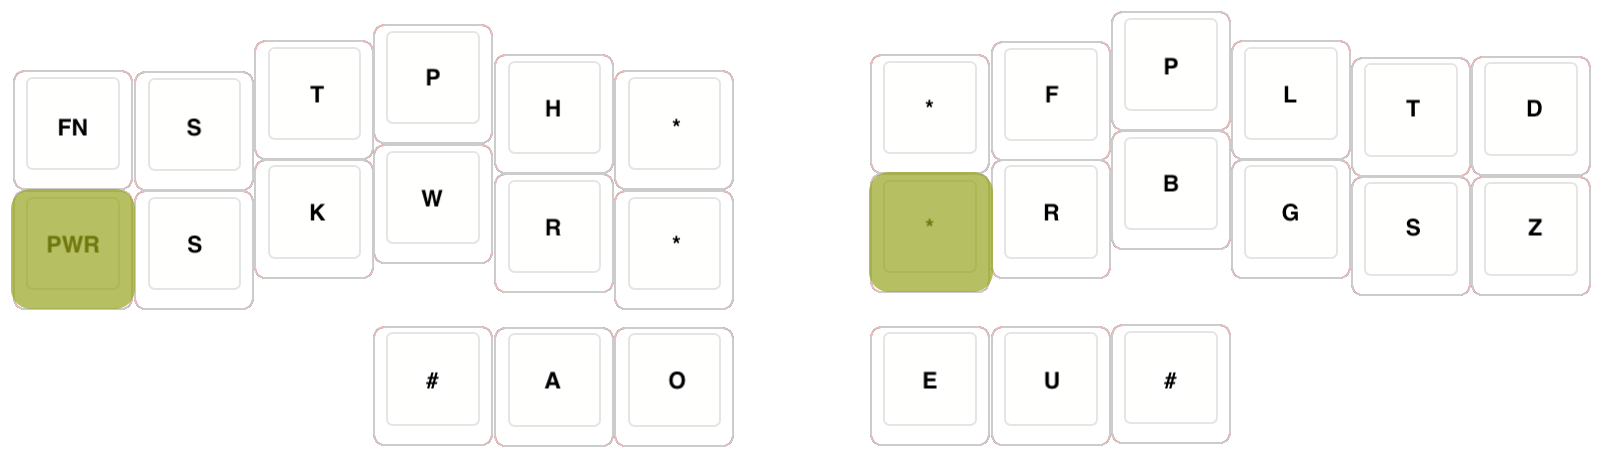
If you have a look at the code for the Georgi default keymap layers, you will actually see only three layers, which have the following layouts:
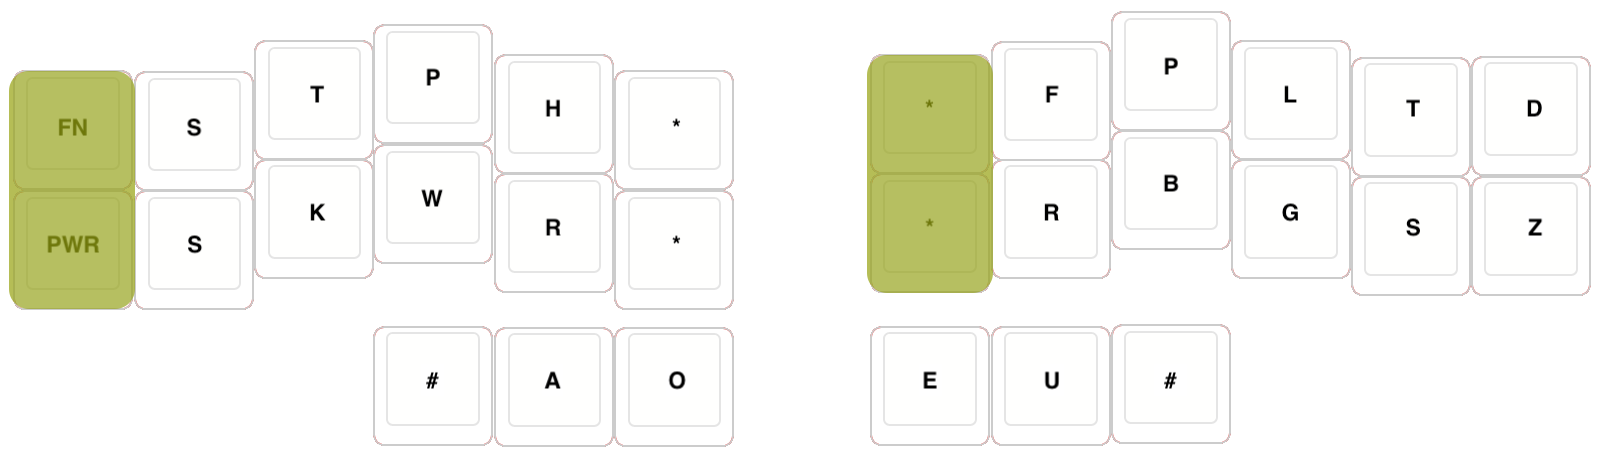
In order to change from the Steno layer to Gaming layer 1, the default chord is:
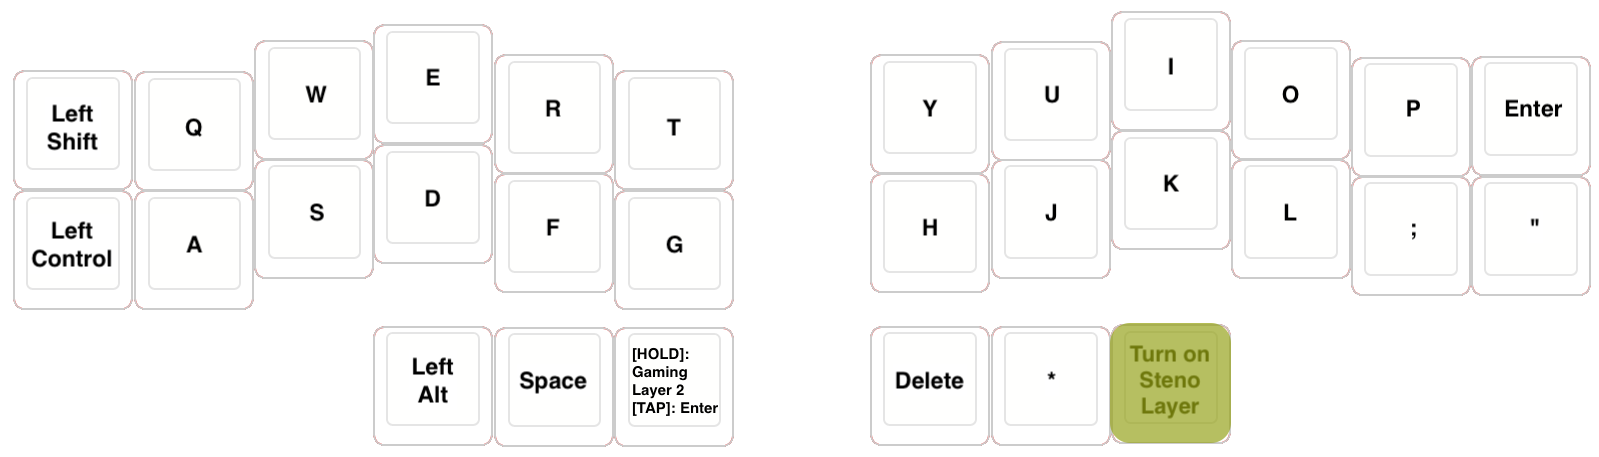
In order to change from a Gaming layer to the Steno layer, the default keystroke is:
My brain sees this as stroking a complex chord to change to Gaming Mode, yet pressing a completely different singular key to change back to Steno Mode. I would prefer to:
- have a single chord that that would feel like a “toggle” between Steno and Gaming modes
- make that chord a little bit simpler than the one above
The Solution
I do not want to risk any dictionary-level outline conflicts, so the chord has to include a Georgi-specific key (FN or PWR). Therefore, I am thinking a PWR | ST4 (“Star 4”) combination will be a good candidate:
The plan of attack to implement this toggle chord will be twofold:
- Change the hardcoded Georgi Gaming layer trigger on the Steno layer to be
PWR | ST4 - Create an equivalent QMK Combo shape (read: chord for a QWERTY keyboard) on the Gaming layer that returns to the Steno layer, using the “Left Control” and “H” keys
Let’s give it a try!
Change Gaming Layer Trigger
You will find all the logic for the triggers related to layer switching in Georgi’s sten.c file. Inside the send_steno_chord_user function, you can see that the chord for the gaming toggle is currently hardcoded to (PWR | FN | ST4 | ST3), as per the keymap above:
qmk_firmware/keyboards/gboards/georgi/sten.c
// All processing done at chordUp goes through here
bool send_steno_chord_user(steno_mode_t mode, uint8_t chord[6]) {
    // ...
    // Handle Gaming Toggle,
    if (cChord == (PWR | FN | ST4 | ST3) && keymapsCount > 1) {
        // ...
        layer_on(1);
        goto out;
    }
    // ...
}
All we need to do here is change the chord that cChord is checked against from (PWR | FN | ST4 | ST3) to (PWR | ST4):
qmk_firmware/keyboards/gboards/georgi/sten.c
// All processing done at chordUp goes through here
bool send_steno_chord_user(steno_mode_t mode, uint8_t chord[6]) {
    // ...
    // Handle Gaming Toggle,
    if (cChord == (PWR | ST4) && keymapsCount > 1) {
        // ...
        layer_on(1);
        goto out;
    }
    // ...
}
Made the change? Great! That wasn’t too scary, right? Now to move out of Georgi’s core firmware logic, and into the keymap logic, where most customisation typically occurs.
Create Steno Layer Combo
Although we could not avoid changing core Georgi firmware logic in the previous step, the general rule when you create your own personal keymap customisations is to make a copy of the keymap directory you intend to change (in this case Georgi’s default keymap), and give it a unique name (in this case, I’ll name it my_keymap: unique, yet uncreative [feel free to name it as you wish]).
You can create the new directory via your file manager user interface, or by the command line:
cp -r keyboards/gboards/georgi/keymaps/default/ keyboards/gboards/georgi/keymaps/my_keymap/
Now, open up the keymap.c file in the new my_keymap directory. Just above the keymap definitions, add the following code to define a new QMK Combo, which will mimic the Steno layer (PWR | ST4) chord we saw earlier, using the “Left Control” and “H” keys:
qmk_firmware/keyboards/gboards/georgi/keymaps/my_keymap/keymap.c
// ...
enum combos {
  GOTO_STENO_LAYER
};

// NOTE: This combo is meant to mirror the chord used to switch to the gaming
// layer in `sten.c`.
const uint16_t PROGMEM goto_steno_layer_combo[] = {
    KC_LEFT_CTRL, KC_H, COMBO_END
};

combo_t key_combos[COMBO_COUNT] = {
    [GOTO_STENO_LAYER] = COMBO(goto_steno_layer_combo, TO(STENO_LAYER)),
};

// ..
const uint16_t PROGMEM keymaps[][MATRIX_ROWS][MATRIX_COLS] = {
    // ..
};
If you need a primer on QMK Combos, I wrote about them in excruciating detail in another blog post, Chording QWERTY with QMK Combos. Most of the information in there should still be current as of this writing.
What we are doing here at a high level is:
- Giving a name to the chord, in the form of an enumerated type, that indicates what it does:
GOTO_STENO_LAYER - Defining what keys the combo should consist of: the
KC_LEFT_CTRL, andKC_Hkeys - Defining what should happen when the chord is pressed: in this case
TO(STENO_LAYER), meaning to “turn on” the Steno layer
Next, we need to provide a definition for COMBO_COUNT above, which will need to be put inside a new config.h file within the keymap directory, so create that now:
qmk_firmware/keyboards/gboards/georgi/keymaps/my_keymap/config.h
#include "../../config.h"

#define COMBO_COUNT 1
If you add or remove combos in the future, you will also need to change this number accordingly.
Finally, we need to actually enable the use of combos in our layout, otherwise we will get compilation errors for using things like combo_t and COMBO_END above. Just add the following line of configuration to the keymap rules.mk file:
qmk_firmware/keyboards/gboards/georgi/keymaps/my_keymap/rules.mk
# ...
COMBO_ENABLE = yes
You have now done everything needed to implement the Gaming layer “toggle” chord! Time to make sure everything compiles correctly:
qmk compile -kb georgi -km my_keymap
Now, if you check in your qmk_firmware directory, you will see a newly created HEX file named gboards_georgi_my_keymap.hex for you to use when flashing. Different keymap compilations generate a separate firmware file.
If you get any errors, trace back and see if you may have missed a step, or perhaps made a mistake in the code. If you get similar output to when you compiled the default keymap, then you are ready to flash your Georgi again. Repeat the firmware flashing steps from above, and give it a test!
If you want to see what other customisations can be made with Georgi Gaming layers, feel free to use my Georgi keymap as a reference for any potential additions you may like to make to your own keymaps.
If you do create your own custom layers, please share them publicly so every other Georgi owner can benefit from them as well! Good luck with your adventures in firmware!
-
As of QMK Configurator API v0.1 ↩


Leave a comment