Jekyll2025-01-05T13:50:23+11:00https://www.paulfioravanti.com/feed.xmlFloor and VarnishThe permanent drafts folder for brain dumps of Paul FioravantiPaul Fioravantipaul@paulfioravanti.comhttps://www.paulfioravanti.com3.112024-03-11T09:15:00+11:002024-03-11T09:15:00+11:00https://www.paulfioravanti.com/blog/3-11 Posted on Facebook, March 11, 2011 14:57 JST
On this day in 2011, I was leaving my office in Yūrakuchō, Tokyo, for a dreaded afternoon meeting with a big systems integrator company. As I walked past the reception desk in the lobby and towards the elevators, I glanced up at a TV screen and saw a map of Japan with a big red X to its northeast.
Anyone who has lived in Japan is intimately familiar with these images. They are broadcast every time a “significant” quake occurs, but hardly anyone blinks due to complete confidence in modern building construction codes. You enjoy (or ignore) the rumble when it arrives, and then continue on with your day without giving it a second thought.
A couple of seconds later, though, this particular X made its presence known. No rocking cradles or light shivers this time: the violent shaking literally knocked everyone off their feet, with people screaming in terror as we grasped for walls in futile attempts to balance ourselves. The huge building I was in suddenly did not feel so stable; I honestly thought it would topple over, flinging me through the huge office kitchen windows, and out over the tracks of Yūrakuchō station.
Fortunately, those construction codes held up, and after a few of the most intense minutes of my life, the still upright building’s emergency systems kicked into gear. Elevators were disabled, so we hurriedly descended down the stairs from the twelfth floor in hopes of getting to ground before any potential aftershocks hit.
The streets were full of calm but confused people. Mobile phone networks were jammed, leading to massive, but orderly, queues outside public phone booths. 3G internet was still usable, though, so social media (Facebook only for me at the time) became the only usable method for real-time communication.
After confirming our colleagues were out of the building, we all agreed that work time was over, and we should make sure our homes and loved ones were safe. So, at least I got out of attending that wretched meeting…
However, trains had stopped, bus stop queues were longer than those for phone booths, and roads were at a complete standstill. All normal traffic rules had been disregarded, as streets became pedestrian footpaths, and I merged in with them for my long walk home across Tokyo.
As I passed Shimbashi Station, I joined a huge crowd of people that had gathered around a big TV screen broadcasting the news, and could not believe what I was seeing.
Footage of crowds at Shimbashi Station, soon after the earthquake
The images of a tsunami barreling through rural northern Japan and annihilating everything in its path felt surreal. It took a moment to process that this was indeed reality, and not a scene from Deep Impact or The Day After Tomorrow. After a few minutes, I snapped out of my stupor, picked my jaw up off the ground, and continued walking.
My partner, Naoko, was out with friends for the day, and did not use newfangled social media, so getting in direct contact with her was not possible. After a couple hours walk, I managed to find a lonely public phone without a queue, and called her mother on the other side of the country. If Nao reached out there, I wanted her to know that I was safe, and that we should just try and meet back at our apartment.
We had not planned for a natural disaster scenario of this magnitude, and hence did not have emergency kits or food rations on-hand. I wagered we had enough supplies to last us a week (maybe…? I had never had to judge that before…), but just to make sure, I stopped by several convenience stores and supermarkets, only to be greeted by rows of empty shelves. The city had already been cleaned out.
I arrived home to discover my bicycle discarded in the park opposite. Someone had tried to steal it (first time ever), but the cheap lock had been enough security to move them on. Given the circumstances, I would not have minded if they succeeded.
My apartment building was still standing, and inside, no damage at all. All I could do now was wait: wait for the phone network to come back online, wait for Nao to get home, wait for news about what was going on…
The next couple of days were punctuated by constant aftershocks. The haunting chimes from the Earthquake Early Warning system gave us a few seconds notice to brace ourselves before another round of ground turbulence. It would have been a luxury if another huge earthquake was the only thing we had to worry about, but all the news about problems at nuclear power plants had us anxious about whether we were actually witnessing the literal end of Japan.
The chimes of incoming doom
At the very least, the possibility we would have to flee from Tokyo felt very real, so we packed some bags full of basic necessities, and left them by our front door, ready to go should we need to leave quickly.
When images of Fukushima Daiichi’s Unit 3 Reactor hydrogen explosion flashed across our screen on the afternoon of March 14, we felt the overwhelming need to go. It was too late to get on a shinkansen, so we left first thing in the morning to just head west, and away from it all.
Footage of Unit 3 Reactor's hydrogen explosion
The strangest thing about going to the station and catching a train was just how normal it felt. A literal explosion occurred at a nuclear power plant just hours before, and there were not hordes of people cramming the carriages to get out of the city. Were we overreacting…?
The air of calm certainly gave me some pause, but if the situation got worse to the point of everyone in Tokyo/eastern Japan actually needing to evacuate, a scenario that seemed less far-fetched with every passing moment, I felt we would not get a second chance at such a smooth run out of the city.
Arriving in Kōchi was like entering a different universe, where the earthquake had not happened, supermarket shelves were still full, and life was peaceful. It was impossible to permanently ignore reality, of course, and we were glued to all media for any morsels of information about the crisis.
I recall television just constantly playing strange cartoons, pushed by Ad Council Japan, that extolled the value of greetings and other Japanese virtues using animal puns, and thinking it to be a strange panic mitigation/population distraction strategy. Oh, you wanted actual news about the current existential threat? Nope, here’s literally that same cartoon again. And again and again.
Want to trigger someone who lived through this event? Play them the following video.
These Ad Council Japan commercials were on infinite loop after the quake.
The next week was mostly a blur, but as it gradually became apparent that the worst case scenario probably would not happen immediately, my employer’s gentle hints about considering getting back to work in the Tokyo office became concrete orders to return. So, we begrudgingly left our rural retreat, hoping for the best.
Essentials in the city were still in short supply, as efforts and resources were deservedly redirected to the areas up north directly affected by the disaster. I remember bottled water was impossible to find (and it was uncertain how drinkable Tokyo’s water was), so we had to get it shipped from Kōchi. This worked for a while, until everyone else with family outside Tokyo followed the same strategy, contributing to more supply shortages country-wide. But, obviously, put into perspective, we managed just fine.
The earthquakes/aftershocks had not dissipated during the week we were away, and you can bet every warning that flashed up on the screen now got our full attention.
We now viscerally understood that although we may have to worry about how to deal with the immediate consequences of a large earthquake, we would also have to consider whether it is also a harbinger of further quakes to come.
For example, just two days before the big one hit…
Oh, you sweet summer child…you would not believe what’s in store next…
Naoko and I ended up leaving Japan permanently at the end of 2011, as we were definitely ready to try something new. But, living through this period certainly instilled in us a newfound respect for the indifferent destructive forces of nature, and the impermanence of physical things.
We still love visiting Japan, and go back regularly. But, if we ever end up living there again, we like to think we will be much better prepared for disasters, and certainly provide our full attention to all the inevitable earthquake warnings.
]]>Paul Fioravantipaul@paulfioravanti.comhttps://www.paulfioravanti.comAmazon Prime’s Localisation Fail2024-02-21T15:30:00+11:002024-02-29T10:33:00+11:00https://www.paulfioravanti.com/blog/amazon-prime-localisation-failDuring my last trip to Japan, I watched my Japanese sister-in-law flick through her Amazon Prime account, looking for something to watch.
When she opened the page for THE LEGEND & BUTTERFLY, I commented that it looks like Amazon has a localisation problem:
She looked puzzled and was not sure what I meant. If you are a Japanese speaker, can you see something that does not seem quite right?
Let’s see the English version as well, because it has the same problem:
The context here is that we are physically in Japan, using Amazon Prime’s Japanese site, to view information about a Japanese-language movie that was made in Japan, with a Japanese cast…
…And yet, the film is tagged as being “International” (or, more blatantly, a “foreign film”, as per “外国映画” [gaikoku eiga], the Japanese translation of the tag1).
No, Amazon, it is not an international film. From where we were sitting, it is about as local as you can get.
So, what is Amazon’s definition of “international” media? I am wagering you can already guess, but let’s go through the motions and do some searching anyway, for science!
Let’s start in the immediate area from Japan with Korean drama Death’s Game:
Looks like we are still in international waters. Let’s assume that Asia is out, and head to Europe: is Italian comedy series LOL: Chi ride è fuori international?
Sure is. Maybe Amazon thinks “international” means “language”…? Let’s try some English only titles. What does it say about long running Australian soap opera Neighbours?
Hmm…well, I guess Aussies can be hard to understand with our strange accents. Maybe Amazon means some English accents are international, and some not…? How about something from the United Kingdom, birthplace of English and home of Received Pronunciation? Let’s look at Father Brown:
*Gasp*! A show using the most English of Englishes is still considered to be “international”? How can this be…?
To the surprise of no one, I am sure, no media on Amazon Prime originating from the United States (at least that I have been able to find) is tagged as being “international”. This can be seen as a codification of Amazon’s identity as a US company: everything from the United States is “local” and everything from outside the United States is “international”. Amazon may currently operate on a global scale, but true to its origins, it still seems to keep that US-centric viewpoint, and that is reflected in its systems.
“When we think about launching in a new country, we really want to make sure that we bring a truly local feel to it. So, we’re trying to be very thoughtful when we enter a new region to make sure that we’re not only bringing all of these amazing global series and tentpoles, but that we really do it right, locally.”
I would posit that the Prime interface can probably do a bit better on the “truly local feel” aspect. To be fair, though, I did find titles from non-US countries on Amazon Prime that are not specifically tagged with “International”, but there is no way to know whether its absence is intentional, and indicative of some active effort to change.
Regardless, I think the solutions are to either:
just remove the “International” tag altogether, because from a global standpoint, it is meaningless. I am sure that in the metadata of each piece of media is its “country of origin” and “spoken language”, and that is probably enough to cover “show me something foreign/different” use cases that viewers may have
if it must still exist, have the “International” tag become a kind of virtual tag. Rather than be tied directly to media, relate it to a user and their location/language preferences etc, and only display it when they view content that is different to those preferences
This whole post may be about making a mountain out of a tag-shaped molehill that it seems most people do not notice or care about. But, it goes to show that internationalisation/localisation is hard, and even for huge companies with lots of resources like Amazon, there is always room for improvement.
Unfortunately, this Japanese translation itself is inappropriate, since it contains the word “film/movie” in it (“映画”), and the tag is also being applied to media that are not classified as films, like TV series. For artistic works, I would think that “海外作品” (kaigai sakuhin; overseas [artistic] works) is a better fit. ↩
]]>Paul Fioravantipaul@paulfioravanti.comhttps://www.paulfioravanti.comCreating Plover Plugins with Python2024-02-04T21:35:00+11:002024-02-08T15:18:00+11:00https://www.paulfioravanti.com/blog/creating-plover-plugins-pythonPlover stenography enables anyone to write text and perform keyboard shortcuts faster than they could on a traditional keyboard. Its open system architecture also allows you to tap into many of its core functionalities, expanding the possibilities of what you can do with steno, limited only by your imagination!
It does this through the use of plugins, created with Python, the programming language in which Plover itself is written. There are a eight different types of plugins that Plover currently supports, but this post will focus on three specific plugin types that can allow us to use Python to perform some kind of task:
One of the best things about creating plugins is being able to share them with fellow Plover users, so we will also go through the steps get them to appear inside everyone’s Plover Plugin Manager.
Basically, this post is intended to be the Plover plugin development guide I wish existed when I first started, and hopefully it can be of some reference if you decide to build your own plugins. It is long, and fairly technical in nature, so a basic knowledge of Python or computer programming (or a desire to learn!), is recommended in order to follow along.
Python Environment
Since we are building something that is meant to run inside Plover’s environment, in order to avoid any unexpected errors during development, we need to make sure the code we write is compatible with it.
As of this writing, when you download the Plover application, it comes bundled with Python version 3.91. Therefore, in order to ensure maximum compatibility with Plover, a good choice would be to set your local Python version to use the latest patch version of Python 3.9, which is currently Python 3.9.182.
In order to change your Python version, I would recommend installing a version manager. This will enable you to easily use Plover’s Python version while developing the plugin, but use the latest (or any other) Python version with other projects.
When you have chosen, installed, and set up a version manager to work with Python (this may take a bit of time, but you will only do it once, and it is worth doing right), you will be ready to fire up your text editor and move on to some coding.
Setup Plugin Project
We are going to create a plugin project called “Plover Practice Plugin”, using the Initial Setup directions in the official Plover Plugin Guide as our main reference.
Create a directory on your computer called plover-practice-plugin4, and then add the following files underneath it (we will use a package-based structure for the files5):
The __init__.py file is blank, but it needs to be present within the plover_practice_plugin directory so we can use it like a regular package.
README.md is a Markdown document containing information about the plugin. We will get the Plover Plugin Manager to read in information from here and display it. For now, just give it the bare minimum of a simple heading:
plover-practice-plugin/README.md
# Plover Practice Plugin
The setup.cfg configuration file is used by Setuptools, the packaging library that Plover’s plugin system is built on top of. It defines a package’s metadata, including external library dependencies (which, in our case, include Plover itself). For now, we will specify just enough for our needs during development:
plover-practice-plugin/setup.cfg
[metadata]name=plover_practice_plugindescription=Plover practice pluginlong_description=file: README.mdlong_description_content_type=text/markdownkeywords=plover plover_pluginversion=0.0.1[options]zip_safe=Trueinstall_requires=plover>=4.0.0.dev12setup_requires=setuptools>=69.0.0packages=plover_practice_plugin[options.entry_points]
The final heading above refers to Setuptools’ concept of entry points, that “allow a package to open its functionalities for customization via plugins”. Many of Plover’s core functionalities are, themselves, exposed as entry points, and we will hook into them when we develop our own plugin types, and specify entry points for them under the [options.entry_points] heading.
Finally, Plover needs a minimal setup.py file in order to help read in the configuration we have in setup.cfg, run Setuptools for us when our plugin is installed, and consequently allow the plugin to be included properly in the Plugins Manager6:
Initial setup is now complete, so this is probably a good time to put this project under version control with Git. Once you have installed it, create a .gitignore file in the project to make sure no Python-generated files, or any other computer cruft, finds its way into your repository:
Since this code will eventually find its way to GitHub, it is definitely worth familarising yourself with some of the core commands of Git itself (if you are not already). Check out the Git reference documentation when you come across an unfamiliar command.
Okay, we are now ready to start coding our first plugin!
Command Plugin
Commands are “fire and forget” functions that do not output any text, nor return any value. They enable you to:
Interact with Plover to perform an action that is not possible, or easily doable, via its user interface7
Leverage Python to perform some action
We are going to build a command plugin that opens a given URL in your default web browser, in the style of the Plover Open URL plugin.
In dictionary entries, the command will look like this:
Within curly parentheses, and separated by colons, we define the following:
COMMAND - The keyword that tells Plover the outline is a command8
OPEN_URL - The name of the command function to run
https://www.openstenoproject.org/ - The argument to pass to the command function. In this case, it is the Open Steno Project URL we want to open, but we should be able to give the same command in other dictionary entries any URL we would like
Now we know what the command should look like, we need to tell Plover where to find it when we invoke it. So, let’s add our first entry point to the setup.cfg file under the [options.entry_points] heading:
Command functions are implemented as receiving two parameters:
a StenoEngineengine, which is provided automatically by Plover. We have marked it with an underscore to signal that we are ignoring it, since we do not need it to open URLs
an optional argument, which in this case contains the URL string that gets specified in the command outline
We leverage Python’s webbrowser library to do all the browser-related heavy lifting, and simply pass the URL argument to its open function, effectively creating a wrapper function around it.
Now that our first plugin is complete, let’s deploy it to Plover! Open your terminal, and from inside your project directory, run the following command11:
The plover command will likely error out for you if you are running it for the first time. Follow the instructions in the Invoke Plover from the command line wiki page for your operating system to get it working12.
You should see output that looks something like the following:
I have overridden Plover’s *URL outline here, but use whatever outline you would like.
Now, try chording the outline with your keyboard, and your default web browser should open to the Open Steno Project page!
Want to see if it works for other web pages? We can use the plover command to to do just that, without needing to add another dictionary entry, by sending commands directly to our Plover application. Run the following command in your terminal, and the Plover GitHub page should open:
Our first plugin is now complete. It is a very minimal implementation, but it works13! Let’s make an entry for it in our git repository before moving forward:
Now, let’s turn our focus to creating a plugin that will help us output some text that we could not just define in a steno dictionary entry.
Meta Plugin
Metas are functions whose primary purpose is to output new text14. You would likely be used to creating your own steno dictionary entries that output text of some kind, but we are going to justify needing a plugin by outputting text that we would be unable to specify in a standard dictionary entry.
Specifically, we are going to build a meta plugin that outputs a random number between 1 and 100.
In dictionary entries, the meta will look like this:
"{:RANDOM_NUMBER:1:100}"
Here, we define the following:
RANDOM_NUMBER - The name of the meta function to run
1:100 - The argument to pass to the meta function. In this case, it actually represents two arguments: our low and high number boundaries. It seems to be Plover convention to have all arguments in outlines separated by colons, so we will maintain this for our own parameters as well
Like with the command plugin, let’s first create a new random_number entry point in the setup.cfg file underneath the existing command entry:
Meta functions are implemented as receiving two parameters:
a Context ctx, which is provided automatically by Plover. We use it primarily to generate what Plover calls an “action”, which you can think of as a container for the text we want to output15
an optional argument, which in this case we split in two, converting each into integers with int(), in order to get the low and high boundaries16
We leverage Python’s random library to generate a random number17 by passing the boundary numbers into its randint function. From there, we generate a new action from the context provided by Plover, assign the random number to its text property after converting it to a string (using str()), and return it.
Since we have made some new changes, we need to let Plover know about them by running the Plover plugin install script again:
Restart your Plover application, and then create a temporary entry in one of your steno dictionaries that looks something like this “rand” outline:
"RA*PBD":"{:RANDOM_NUMBER:1:100}"
Now, try chording the outline, and you should see a different number between 1 and 100 output every time you stroke RA*PBD! Let’s celebrate the addition of this new plugin by making a repository entry for it:
git add .
git commit --message="Add meta plugin"
Since there is no equivalent of the plover --script plover_send_command command for testing metas, if you wanted to try using different boundary number parameters, just create some more temporary steno dictionary entries that do so.
Next, let’s create our final plugin, that will give us maximum flexibility within Plover’s environment, and do more than just perform one-off actions.
Extension Plugin
Extensions are classes (as opposed to our other function-based plugins) that can:
These features can seem a bit obtuse or abstract, especially if you are not overly familiar with computer programming, and it can initially seem difficult to understand what benefits an extension plugin can provide over, say, a command or meta plugin.
So, we are going to start with the creation of a new meta plugin, surface some of the pain points around it, and then migrate it over to be an extension plugin to relieve the pain.
Note that the incantations we will use to get the environment variables are macOS/Linux-focused. If you are following along using Windows, you will likely need to make small changes to your code around $VAR/$Env:VAR/%VAR% usage, as well as the echo shell command that gets executed. I’m sorry…computers are hard, and I do not have a Windows machine to test on…
In dictionary entries, the meta will look like this:
"{:GET_ENV_VAR:$USER}"
Like the previous plugin, let’s start with the definition of a new meta plugin entry point:
We leverage Python’s os module to do the following:
get Plover’s $SHELL environment variable using getenv
get the argument’s environment variable value from the computer user’s environment using popen18
Then, just like the random number meta plugin, we create a new action from the provided Plover context, assign the env_var value to its text, and then return it.
Run the Plover plugin install script again to apply the changes in Plover:
Restart your Plover application, and then create a temporary entry in one of your steno dictionaries that looks something like this:
"AO*URS":"{:GET_ENV_VAR:$USER}"
I have overridden Plover’s AO*URS outline here, but use whatever outline you would like.
Now, try chording the outline, and you should see your computer user name output! This working state seems like a good place to add a repository commit, so let’s do so:
git add .
git commit --message="Add env var meta plugin"
Migrate to Extension
If you chord the outline a few times, though, you will see that there is a noticeable time gap between your chording and the output appearing. This is because making a call out to the shell every time is computationally expensive enough for us to notice the lag. The value in the $USER env var will change rarely, if ever, so making this call out every time just to get back the same information is inefficient (and annoying cause we are all about speed with steno, right?).
Migrating over to an extension plugin can enable us to eliminate the lag, and get this functionality feeling snappy. We can begin that process by removing the get_env_var meta entry point, and replacing it with a plover_practice_plugin extension entry point:
It would seem that entry point names for extensions tend to be named the same as the project itself, so that convention is followed here.
Next, let’s go and create a PracticePlugin class in a new extension.py module file. It gets initialized with a StenoEngineengine (provided by Plover), which we just need to assign to an internal property (we will use it later on…). It also implements two callback functions, start and stop, which get run when the extension is enabled and disabled respectively.
Within the start function, we use the Plover Plugin Registry to register a new meta plugin called "get_env_var" (the exact same name as the original meta), whose implementation we will find in a private instance method called _get_env_var (note the underscore prefix). That method contains the code we originally had in the get_env_var meta function (so we do not need the original function anymore, and it can be safely deleted). We do not currently need to do anything when the plugin stops (yet!), so we simply provide the stop function a pass.
Let’s do a quick sanity check to confirm that the initial migration has worked, and run the Plover plugin install script:
Restart your Plover application, open the Configure screen, and under the Plugins tab, confirm that plover_practice_plugin is in the list, and that its Enabled box is checked.
Open Configure > Plugins and confirm that the Enabled box is checked
Now, try chording the "{:GET_ENV_VAR:$USER}" outline again, and if it still works exactly the same as before (including lag), then the meta-to-extension migration has been successful! Let’s quickly make a commit entry before moving forward:
git add .
git commit --message="Migrate env var meta to extension plugin"
Env Var Cache
The first optimisation we want to make is adding a cache, in the form of a Python dictionary, to store environment variable names and values after we fetch them the first time. This will mean we only get lag the first time we fetch the env var, but subsequent fetches will use the cached value, and hence output the text faster. Code-wise, we want to be able to do the following:
Initialise an empty dictionary to store the env vars when plugin starts
When attempting to get an env var value, check the cache first for the env var name, and return its value if present
If no entry is present, run the command to get the env var, and store its name and value in the dictionary
You should find that the first env var retrieval is slow, but subsequent look ups will use the cached version in the dictionary, so the text will output much faster. Chalk up our first optimisation win!
Clearing the Cache
Now, it is nice to use a cache, but what if the value of an env var value changes? The extension will keep using the same cached (and now obsolete) value as long as the env var name is the same. It would be nice to have a way to clear the cache when we want to read in new env var values: say, by pushing the Plover GUI “Reconnect” button.
When you press the “Reconnect” GUI button, the engine state changes to Stopped, then Initializing, then either Connected or Disconnected, depending on whether Plover can find your steno machine. We can use the machine_state_changed engine hook to check the machine status every time it changes, and if it’s Connected, reset the env var cache:
Here we are use the steno engine’s hook_connect and hook_disconnect functions to have our new _machine_state_changed private method run every time Plover’s "machine_state_changed" event occurs. The machine_type and machine_state parameters are provided to us by Plover when the event occurs, but we only care about the machine state, and whether it has changed to be Connected (STATE_RUNNING). If it has, empty the cache.
Let’s check and see if cache emptying works. Run the Plover plugin install script again and restart Plover:
Like before, the first retrieval of the env var should have a lag, but subsequent retrievals should be fast. Now, press the Plover “Reconnect” button, and try the same outline again. You should find that since there is no longer a cache present, the lag will have returned since the env var value is directly fetched again via the command line. However, subsequent retrievals should be fast again as expected. Great, no more stale data for us!
Eradicate Lag with Config
Time to address the final hanging thread in the optimisation story: that initial env var retrieval speed hit. It would be nice to have output of env var values be fast all the time, and we can do this by prefetching them when the plugin starts. This will take the form of:
using a JSON configuration file to store the names of the env vars whose values we want to cache
when the extension starts, read in config file, fetch all the env var values, and initialise the dictionary cache for them
when we encounter an env var that is not in the cache, after fetching its value and adding it to the cache, also add its name to the config file
where we previously cleared the cache by pressing the “Reconnect” button, instead we will now re-read in the config file and refresh the cache
The JSON config file will live in Plover’s designated configuration directory (CONFIG_DIR), which is platform dependent. We will call it “practice_plugin.json”, and it will be created, read, and written to automatically, so it is not something that should need to be edited manually. Its format will look like this:
Here, we have made a small refactor by extracting out os-related code into an _expand method (we will reference it again soon), and then added another _save_config method that creates a new dictionary containing the sorted"env_var_names", and uses Python’s json library to output (dump) it to a JSON config file. We call _save_config after we add any new env var entry to the cache, so we know to read it in again when the plugin starts.
Speaking of that, let’s now add the code that loads in the config, not just when the plugin starts, but also when we want to refresh the env var cache:
Here, you can see that we call a _load_config method when the plugin starts, and when the Plover “Reconnect” button is pressed. It reads in the config file (load), extracts its "env_var_names" list, expands them all, and returns the now-initialised env_vars dictionary cache20.
For completeness’ sake, and for those following along, this is what the full finished extension code looks like:
Now, try chording the "{:GET_ENV_VAR:$USER}" outline. Like before, there will be an initial lag on the first output, with faster subsequent outputs. But! Go and open up your Plover configuration directory, and you should find a practice_plugin.json file with the following contents:
{"env_var_names":["$USER"]}
Config file in the Plover configuration directory (macOS)
The plugin now knows that it should go and prefetch the value of the $USER env var. So, if you restart the Plover application now, and try chording the "{:GET_ENV_VAR:$USER}" outline, there should be no lag at all! Try pressing the Plover “Reconnect” button to refresh the cache, and you should still see no output lag.
Looks like we have ourselves a finished extension plugin21, so let’s check our new additions into Git:
After showcasing three different examples of Plover plugin types, I think we can put a pin in our project and say that it is “done”. Now, let’s see what is involved in getting this code public, and into the hands of other Plover users.
How to Share
Plover does have a Publishing Plugins page, and I do think it should be your first point of call for official guidance on this topic. However, as of this writing, I needed extra steps to make everything work in an automated and frictionless manner, so consider this a supplementary guide.
I found there were three main steps to complete in order to get plugin code into the Plover ecosystem:
During the course of development, we have been making commits to a local Git repository on our computer, that can only be seen by us. To share our code with others, we need a public repository where others can access it.
GitHub is probably the most well known code sharing platform22, so we will use it to publish our codebase. If you do not have a GitHub account yet, sign up for one, create a new repository, and name it plover-practice-plugin. No need to worry about any of the optional fields, but just ensure that the repository is set to be Public.
Since we already have a local Git repository, we can follow GitHub’s directions to “push an existing repository from the command line”. They will be personal to your account, and look something like:
git remote add origin git@github.com:<your_username>/plover-practice-plugin.git
git branch -M main
git push -u origin main
Once you have followed your instructions, you should be able to see your plugin code up on GitHub at https://github.com/<your_username>/plover-practice-plugin (you can see mine here).
Based on some information in that guide, some information in the PyPI publish GitHub action documentation, and some experimentation on my part, the following is my guide to automate publishing of a Plover plugin to PyPI from GitHub.
The goal is to be able to perform a git push up to GitHub, and then have a GitHub action handle publishing to PyPI without any further interaction from us. The GitHub action should also be smart enough to only publish to PyPI when we explicitly specify a new version of the plugin (via a git tag), since not all code pushes need to be published immediately.
Create Trusted Publisher
Before going further with code, though, create an account on PyPI if you don’t already have one. Next, in order to allow a GitHub action to publish to PyPI on your behalf, you need to set up a trusted publisher. Open your Publishing page, scroll down to the “Add a new pending publisher” form, and fill it with information similar to this:
Fill in this form to allow GitHub actions to publish to PyPI
If you have been building your own plover-practice-plugin while reading this post, and are intending to publish to PyPI, you will have to change the “PyPI Project Name” to something else, since plover-practice-plugin will already be taken by me :) Maybe try plover-practice-plugin-<your-name>.
The “Owner” and “Repository name” fields come from your plugin GitHub repo
The information in the “Workflow name” and “Environment” fields are something we will specify soon in the GitHub action configuration. “Release” seems to be a good default name for these, but feel free to choose something else
Once you have added the publisher correctly, it should show up as a “Pending Publisher” on the Publishing page, meaning we are ready to create our GitHub action workflow.
Create GitHub Action WorkFlow
The following is what I consider to be a minimum viable GitHub action workflow configuration for publishing a Plover plugin to PyPI. As per the trusted publisher config above, we will name the workflow file release.yml, and add it to the project in the following specific location:
name:PyPI Releaseon:push:branches:-maintags:-"*"jobs:# Adapted from: https://github.com/pypa/gh-action-pypi-publish#usagepypi-publish:if:${{ startsWith(github.ref, 'refs/tags') }}name:Build, Release to PyPIruns-on:ubuntu-latestenvironment:name:releaseurl:https://pypi.org/project/plover-practice-plugin/permissions:id-token:writesteps:-name:Clone Repositoryuses:actions/checkout@v3-name:Set up Pythonuses:actions/setup-python@v4with:python-version:3.9-name:Install Buildrun:python -m pip install --upgrade build-name:Buildrun:python -m build-name:Publish to PyPIuses:pypa/gh-action-pypi-publish@release/v1
As per the trusted publisher config, we have specified that the name of the environment this workflow should use is release, and that its url points to the “PyPI Project Name” we specified
As per Plover’s Python version, we make sure to set up the workflow’s environment with python-version: 3.9
All GitHub action jobs that use pypa/gh-action-pypi-publishmust use runs-on: ubuntu-latest, and no other operating system23
The conditional if: ${{ startsWith(github.ref, 'refs/tags') }} statement is where we say to only run the pypi-publishjob if the current git commit reference (github.ref) startsWith a tag (refs/tags)24
Before moving forward, let’s add a commit for this new config:
You can find further information about the details about this config in the PyPI publish GitHub Action documentation, but aside from what is mentioned above, you should be able to just copy and paste this config into your own plugin project to use as-is.
Update Project Details
Remember at the beginning of this project when we specified a minimal set of project metadata? Now that we are nearly at the point of publishing to PyPI, let’s flesh it out a bit more so we can have more information show up on our project’s PyPI page (feel free to add more and customise as you please. Also, the ordering of this config does not matter; I just used alphabetical here):
plover-practice-plugin/setup.cfg
author=Paul Fioravantiauthor_email=paul@paulfioravanti.comclassifiers=DevelopmentStatus::4-BetaEnvironment::PluginsIntendedAudience::EndUsers/DesktopOperatingSystem::OSIndependentProgrammingLanguage::Python::3ProgrammingLanguage::Python::3.9description=Plover practice pluginkeywords=plover plover_pluginlicense=GNU General Public License v3 or later (GPLv3+)long_description=file: README.mdlong_description_content_type=text/markdownname=plover_practice_pluginurl=https://github.com/paulfioravanti/plover-practice-pluginversion=0.0.1# ...
Since we have specified a license in the metadata (in this case the GPLv3+, similar to Plover’s license), let’s also create a plover-practice-plugin/LICENSE.txt file, and copy-paste the contents from the license link in there. Finally, since we only put minimal content in the README.md, now would also be a good time to update that with more information. You can see what I added in my project GitHub repo.
Let’s now commit all those changes, and push them to GitHub:
Now, if you open your plugin GitHub page, you should see a green check mark next to that last commit, indicating that a GitHub action workflow was run successfully:
You can watch the job in action or check the status of any past jobs on the repo’s Actions page (see mine).
However, if you click that check mark, you will see that although the workflow was run, the job inside the workflow (pypi-publish) was skipped:
This is what we want! We are now free to push code to the repo, and only publish to PyPI when we are ready…which, at this point, we definitely are.
Our setup.cfg metadata already has a version entry marked as 0.0.1, so let’s tag the repo’s current commit as being v0.0.125. We will then push that tag up to GitHub, where the GitHub action will run, and publish the plugin out to PyPI for us:
git tag v0.0.1
git push origin v0.0.1
When you check the job status this time (for the same commit, since you only pushed up a tag), you should see that it has been successful:
Then, you can open your new plugin page on PyPI to confirm that you are published (for reference, here is Plover Practice Plugin’s PyPI page). When you are ready to release a new version, remember to update both the version number in the setup.cfg file and add a new git tag!
Add to Plover Plugin Registry
We are now down to the last step in this guide. Congratulations for making it this far! The final small (but important!) barrier between your plugin, and making it available in everyone’s Plover application, is its inclusion in the Plover Plugin Registry list. Follow the instructions on the repo README file, and create a pull request that adds the name of your plugin to the registry.json file.
Since the Plover Practice Plugin is only for educational purposes, it does not belong in the registry, and hence we will not be making a pull request for it. However, here is an example of the pull request that added the Plover Q&A plugin to the registry; you would create a similar one for your own plugin.
It can sometimes take a while for pull requests to be approved, so do not get disheartened! As long as your plugin code is in a public git repo, people that really want it immediately can download it from there and install it manually, just like we did during development. So, I would recommend adding instructions on how to do that in your README.md file until your plugin makes it into the registry (example).
When your pull request gets merged, your plugin will appear in everyone’s Plover Plugin list. Well done, and thanks for contributing to Plover’s ecosystem!
Conclusion
My first Plover plugin was Plover Q&A, and it was a plugin I did not want to make.
However, I found I still needed to manually update speaker names (though not as many as before), and eventually wanted to add more features like:
keeping speaker names in some kind of internal state
specifying custom config
using Plover’s “Reconnect” button.
Sound familiar? :) The pain of not having a plugin was too much, and the only way forward from there was to learn how to build the plugin I had been avoiding for so long, and take my first deep dive into Python and its ecosystem. I used to dread having to think about making a plugin, and now I am way more comfy with it.
Hopefully this guide has been able to help lower any barriers you may feel exist between some cool thing you would love to see Plover do, and actually making it real. I look forward to seeing what you make!
The latest version of Python as of this writing is Python 3.12.1. I initially started building Plover plugins using Python 3.11 locally. However, I found out the hard way that some language features I used were introduced in Python versions released after 3.9, like the match statement (added in Python 3.10). This meant that although my plugin code tested fine locally, when I attempted to run it within Plover, it errored out since Python 3.9 has no idea what a match statement is (this problem is not limited to just your own code, but also if your plugin has third-party dependencies that use syntax features add after Python 3.9). Locally developing on your target environment, and tailoring your code to it, is definitely recommended! ↩
It would seem that the naming conventions for project directories is to dasherize them. This is probably to distinguish them from the snake case naming convention used here for modules and packages. ↩
This seems like a good guiding principle for any Plover plugin, rather than a module-based structure, unless you really know upfront that the scope of your plugin is going to be very small, and will always stay that way. If you are able to do this consistently, I would love to be able to borrow your crystal ball! ↩
Setuptools seems to have adopted pyproject.toml files as its preferred configuration standard moving forward. However, I found that attempting to use one with a Plover plugin resulted in its entry mysteriously disappearing from Plover’s Plugin Manager when Plover updated its plugin registry. Even though everything worked as expected during development when using a pyproject.toml config file (all the way through to deploying out to PyPI), it would seem that more development work needs to happen on Plover before its use becomes possible.
Therefore, as of this writing, regardless of whether you see any documentation that says setup.cfg and/or setup.py files are “legacy” (eg pip’s packaging documentation etc), it seems they are currently the only viable option. I would love to be wrong about this, though, so please leave a comment or reach out to me if you have had success with using a pyproject.toml file with your own Plover plugin! ↩
The Plover Plugin Commands documentation shows commands as starting with PLOVER, which is correct: COMMAND (with a preceding colon [:COMMAND]) is a “friendly command alias” for it. Therefore, either PLOVER or COMMAND can be used to define commands, but I tend to use the following rule of thumb with naming in an effort to better communicate a command’s intent:
If the scope of the action the command performs is limited to the Plover application itself, use PLOVER (eg built-in Plover commands like {PLOVER:FOCUS}, {PLOVER:ADD_TRANSLATION} etc)
If the command does anything outside Plover, use COMMAND
Entry points can also be written in uppercase, if that helps you to understand the mapping between the outline and entry point: OPEN_URL = plover_practice_plugin.command:open_url. It would seem to be convention for entry points to be named in lowercase, but when Plover registers a plugin internally, it downcases the name anyway, so you can technically name it in any case you please. ↩
The plover_plugins script is essentially a wrapper around pip, and so the --editable flag here allows you to “install your project without copying any files. Instead, the files in the development directory are added to Python’s import path”. I initially thought that this meant that when we make changes to existing files that we want to test, we only need to restart the Plover application, rather than run the plover_plugins script every time. However, I have found that not to be the case, with every change requiring the script to be re-run. ↩
In order to make the plover command work as-written in the Plover wiki page on my operating system (macOS), I ended up adding the following line to my zsh initialisation file (.zshrc):
alias plover=/Applications/Plover.app/Contents/MacOS/Plover↩
For a more robust implementation of a command plugin, including error handling etc, check out my Plover Run AppleScript plugin. ↩
Looking through the Plover Plugin Guide, you may have also read about Macro plugins, and, if you are like me, been a bit confused as to how they differ from Metas. There seems to be some overlap between their purposes, and I have found they often get lumped together (Plover Last Translation even has both macro and meta versions of its functions that do the same thing).
After looking through how metas and macros are used in different plugins, as well as in Plover itself, my current personal rule of thumb moving forward would be:
“Use metas to output new text, and use macros to change or transform text that has already been output.”
However, there are plenty of exceptions to this “rule”, like Plover Emoji, which converts written text to emojis, being a meta plugin, and Plover’s retro_case and retro_currency plugins being metas, as apposed to all its other retro_ functions being macros.
One factor influencing that, though, could have been that macros were added to Plover in 2017, while metas were added in 2020. Perhaps retro_case and retro_currency were written as metas instead of macros because metas were created to supersede macros, which explains their ability to also change previous output via the prev_replace property of Plover’s _Action class…? I do not know, and have not been able to find a clear answer, so I will stick with my rule of thumb for now. ↩
The naming, purpose, and details of _Context and _Action is something that can be glossed over for purposes of this post (and given their underscored naming, it would seem they are thought of as Plover internal details, even though you interact directly with objects of those classes in your plugin code…). There does not currently seem to be any high level documentation around them, so reading the code is currently your only real reference for gathering any further information about what they do and how they relate to each other. ↩
If the [int(arg) for arg in argument.split(":")] code looks confusing or unfamiliar, check out Python’s documentation on list comprehensions, a data structure used heavily in Python code, and definitely worth familiarising yourself with. ↩
Yes, technically pseudo-random, but the number’s unpredictability is not a critical feature of the plugin, so it will do for our purposes. ↩
I tried a multitude of ways that Python allows you to run a shell command before settling on using os.popen. In order to search for variables, the only way I found in which I was able to successfully reach past Plover’s local environment, and into the user’s environment, was to use the os.popen function, and run the command in interactive mode (-i flag). I would love to hear from you if you were successful using any other method, as this may just be a macOS quirk! ↩
For an example of a plugin that hooks into all of Plover’s Engine Hooks, check out my Plover Steno Engine Hooks Logger plugin (only really potentially useful during plugin development) ↩
The whole join-ing and split-ing in the code was added because running _expand on each env var name in a large list significantly impacted the plugin’s start up time. It is much faster to send a single string containing all the var names to the shell, like "$VAR1,$VAR2,...", and have them all expanded inline at the same time. ↩
For an example of a extension plugin that covers this functionality, but is more thoughtfully architected (separation of plugin-specific logic from Plover-dependent code etc), includes error handling, and contains code quality features like pytest automated tests (where possible for non-Plover-dependent code), pylint static code analysis, and mypy type checking, see my Plover Local Env Var plugin. ↩
I found this out the hard way while developing the Plover Run AppleScript plugin. In order to get automated tests to work in my GitHub CI workflow for it, I changed the OS to be runs-on: macos-latest. When I attempted to apply that to the release workflow, publishing to PyPI errored out with a helpful message instructing me to change the config back to runs-on: ubuntu-latest. ↩
Update Feb 8, 2024: Wouldn’t you know it, there is a better way to do this without needing that conditional: this example just uses on: push: tags: - "v*" config to make sure the job only runs when tags are pushed up that begin with “v”. It also has the benefit of auto-generating a GitHub release, and not needing to skip any jobs. Definitely shop around and check out other people’s plugin GitHub action config for other ways of doing things! ↩
]]>Paul Fioravantipaul@paulfioravanti.comhttps://www.paulfioravanti.comCoding Test Review: Culture Amp2023-12-07T15:10:00+11:002024-01-17T12:24:00+11:00https://www.paulfioravanti.com/blog/coding-test-review-culture-ampCold on the heels of the last coding test review I did, I have decided to write up some thoughts on my attempts at a couple of Culture Amp’s coding tests.
I was originally forwarded Culture Amp’s web developer back end and front end tests a few years ago, so I cannot be certain whether they are still being used at the time of this writing, but I can at least confirm they were a part of their hiring process at one point in time.
In preparation for writing this post, I went back and cleaned out some digital cobwebs on my solutions, including changing continuous integration provider to GitHub Actions, and refactoring code to suit my current sensibilities around what I think “good” code looks like. But, for the most part, the main code structures have stayed the same.
I will review the back end test first, then the front end, and the companion codebases can be found here:
Disclaimer: I am not, nor have ever been, an employee of Culture Amp, nor have I ever applied for employment there, nor is this post some kind of attempt to get them to employ me; I just did their coding tests for my own definition of “fun”.
If you are applying there, or plan to in the future, you may want to stop reading, and consider pretending that this blog post (and all the other solutions people have posted) does not exist, so you can greet their coding tests with fresh eyes.
Thematic Relevance
Before getting started, I would like to call out what I think is one of the strongest features of the tests: they are thematically relevant to the business.
When planning technical tests for candidates to perform, it can be tempting to just get them to do either an existing popular coding test, an example from a coding community like Exercism, or an obscure problem from some for-pay coding assessment platform. Culture Amp chose not to take this route: surveys would seem to be one of the primary mechanisms that their product uses to collect employee engagement feedback and gauge their well-being, and, to their credit, both custom coding tests revolve around them.
Your task is to build a CLI application to parse and display survey data from CSV files, and display the results.
Data Format
Survey Data
Included in the folder example-data are three sample data files defining surveys:
survey-1.csv
survey-2.csv
survey-3.csv
Each row represents a question in that survey with headers defining what question data is in each column.
Response Data
And three sample files containing responses to the corresponding survey:
survey-1-responses.csv
survey-2-responses.csv
survey-3-responses.csv
Response columns are always in the following order:
Email
Employee Id
Submitted At Timestamp (if there is no submitted at timestamp, you can assume the user did not submit a survey)
Each column from the fourth onwards are responses to survey questions.
Answers to Rating Questions are always an integer between (and including) 1 and 5.
Blank answers represent not answered.
Answers to Single Select Questions can be any string.
The Application
Your coding challenge is to build an application that allows the user to specify a survey file and a file for it’s results. It should read them in and present a summary of the survey results. A command line application that takes a data file as input is sufficient.
The output should include:
The participation percentage and total participant counts of the survey.
Any response with a ‘submitted_at’ date has submitted and is said to have participated in the survey.
The average for each rating question
Results from unsubmitted surveys should not be considered in the output.
Other information
Please include a Readme with any additional information you would like to include. You may wish to use it to explain any design decisions.
Despite this being a small command line app, please approach this as you would a production problem using whatever approach to coding and testing you feel appropriate. Successful candidates will be asked to extend their implementation in a pair programming session as a component of the interview, so consider extensibility.
This thinking helped inform how the application architecture evolved, resulting in the responsibilities being split between three main modules:
survey_parser
Responsible for knowing how to open CSV files and read in their data rows. I also decided to slightly expand the scope of an “extractor” by having it take on some of the data transformation responsibilities: making it the bridge between raw data in files, and rich data structures within the application.
report
Responsible for collating all the disparate parts of the rich data together to present a structured report, in plain text, that was ready to be sent to the “loader”.
cli
Responsible for all functionality related to input and output on a terminal emulator. It parses CLI flags and arguments given to it, and prints out the text of survey report tables (or any errors) to the window.
Technical Choices
At the time I received the test, Culture Amp was hiring Ruby developers, so I decided to go with that flow. Ruby has a CSV module built-in to its standard library, meaning that the only application-level external library I chose to leverage was Terminal Table to help me construct the survey report.
I try to make coding test solutions “showcase code”, and for me that means using as many development tools as possible that can help assess and (subjectively) affirm whether I have written code that is “acceptable” within the standards of the chosen language community. For this project, those tools were:
minitest: Although I was more familiar with RSpec, I decided to use minitest due to my newfound affection for more terse syntax during testing, no doubt influenced from using ExUnit in my Elixir projects. No regrets; would use again
SimpleCov: It seems to not be de jour as of this writing to aim for 100% test coverage, but I do anyway. I think if you write code that contains business logic, you should know what it does, and how it acts under a variety of circumstances: coverage gives me a litmus test to make sure I do not miss anything obvious
Rubocop and Reek: I like having these little robots looking over my shoulder, slapping my wrist whenever I write code that could potentially violate the principle of least surprise to other Ruby developers
YARD: Documentation is the most neglected part of many software application projects, so this was a personal challenge to just make sure I grind it out for great justice
With regard to code implementation choices, the following are a couple I think are worth making note of.
Facades
Facades are easily my favourite software design pattern, and you can see five of them in the codebase: wherever there is a “boundary” foo.rb file and a corresponding foo/ directory containing all of the Foo module’s implementation details. The front-facing foo.rb “API” file contains no real logic, and just delegates method calls to its child modules, masking complexity from other modules that call it.
Adapters
Whenever I need to leverage code from third-party libraries, like Terminal Table, I instinctively want to lock down and quarantine its use to a single module with an adapter, rather than have it permeate throughout the codebase. For this application, I would rather only have to change one module if I felt the need to change table libraries, rather than hunt through the codebase to find everywhere it is referenced. Therefore, you will only ever see Terminal::Table referenced inside SurveyTool::Report::Table.
I have even done the same thing with internal methods like good ol’ puts. It may be available everywhere thanks to it being a part of Ruby’s Kernel module, but I have made outputting to the terminal strictly the concern of the CLI module. So, I treat puts like a third party library, and force all code to go through CLI to get to it, in an adapter-like way. Is this too pedantic? Perhaps, but I still like having a single source of truth for specific functionality.
I enjoyed doing this test enough that I wondered how difficult doing a straight port of it to Elixir would be. To the surprise of probably no one who has experience with both Ruby and Elixir, it was fairly straightforward (though this is also likely due to Elixir having changed the way I write Ruby to have a more functional bent), but still a good learning experience.
The general approach and technical choices were mostly the same, with a few necessary tweaks like needing to use an external CSV library this time, and TableRex for the report. I could not get the display of the reports to mimic Terminal Table nicely, so I decided to make them look less table-like.
The flavour of the development stack was similar to the Ruby version as well: ExUnit for tests, ExCoveralls for coverage, Credo for code quality, and ExDoc for documentation.
Further to that, though, Elixir also has a nice Typespec notation that can be used with tools like Dialyzer, which makes for a great extra set of technical documentation (good for showcase code!), and can also help surface some kinds of bugs. So, I leveraged the Dialyxir and Gradient libraries to help keep an eye on my types during development.
Sharing Types
Speaking of types, probably my biggest learning regarding their use in Elixir during this portover was figuring out how to:
surface a type declared in a internal module up to its facade boundary module
have other modules be able to use those surfaced types without knowing some (or any) of their specific implementation details
Let’s illustrate this with an example. SurveyTool.Report.Table, an implementation detail module of SurveyTool.Report, needs to know about the SurveyTool.SurveyParser.Survey type as part of the typespecs of its render/1 function, as well as during pattern matching in its survey_body/2 function:
lib/survey_tool/report/table.ex
defmoduleSurveyTool.Report.Tabledo# ...aliasSurveyTool.SurveyParser.SurveyaliasTableRex.Table@specrender(Survey.t()):::okdefrender(survey)do# ...Table.new()|># ...|>survey_body(survey)enddefpsurvey_body(table,%Survey{participant_count:count})whencount<1dotableenddefpsurvey_body(table,%Survey{questions:questions})do# add questions to table etc...end# ...end
The encapsulation problem here is that SurveyTool.Report.Table is reaching past the SurveyTool.SurveyParser boundary, and into SurveyTool.SurveyParser.Survey, an implementation detail. So, how can we provide the SurveyTool.Report.Table module with the information it needs, at the SurveyTool.SurveyParser level?
Since SurveyTool.SurveyParser.Survey exposes its t() type in the following way…
Now, we can change SurveyTool.Report.Table to bring in the survey() type and use it as its own private type (@typep):
lib/survey_tool/report/table.ex
defmoduleSurveyTool.Report.Tabledo# ...aliasSurveyTool.SurveyParseraliasTableRex.Table@typepsurvey()::SurveyParser.survey()@specrender(survey()):::okdefrender(survey)do# ...Table.new()|># ...|>survey_body(survey)enddefpsurvey_body(table,%survey{participant_count:count})whencount<1dotableenddefpsurvey_body(table,%survey{questions:questions})do# add questions to table etc...end# ...end
After making this change, I did get a warning about variable "survey" is unused, but that can be silenced by changing %survey references to %_survey.
If a module using an external type does not need to know about the type’s implementation details, rather than expose the @type at the boundary, we can use @opaque instead (see survey_parser.ex and question_and_answers.ex in the companion codebase for an example of that).
Let’s now head over to web browser land and check out the front end test!
This repository contains a small number of static JSON files, which represent the responses from an HTTP API that offers access to a database of survey results.
Your task is to build a web front end that displays the data supplied by this API. You must process the survey data and display the results in a clear, usable interface.
Getting Started
We suggest you start by setting up an HTTP server that will serve up these JSON files upon request. This may be the same server that serves your web application to consume the API, but make sure to design your application in such a way that you could easily point it to an arbitrary base URL for the API, somewhere else on the Internet.
One you’ve got the API available, use whatever client-side libraries or frameworks you like to build the application that consumes it.
(Tip: If your application will access the API directly from the browser, using the same server for both your application and the API it consumes will save you having to deal with cross-origin requests. Of course, if you enjoy that sort of thing, feel free to go for it!)
The API
index.json is returned when you send a GET request for the root URL. It returns a list of the surveys that are stored in the database, and high-level statistics for each. For each survey, a URL is included that points to one of the other JSON files.
The remaining JSON files each provide full response data for one of these surveys. Each survey is broken into one or more themes, each theme contains one or more questions and each question contains a list of responses. A response represents an individual user ("respondent_id") answering an individual question ("question_id"). The content of each response represents an agreement rating on a scale of "1" (strongly disagree) to "5" (strongly agree). If you wished, you could obtain all of the responses for a single user by consulting all of the responses with that user’s "respondent_id".
Requirements
Your application should include:
a page that lists all of the surveys and allows the user to choose one to view its results;
a page that displays an individual survey’s results, including:
participation rate as a percentage
the average rating (from 1 to 5) for each question
Responses with an empty rating should be considered non-responses (questions skipped by the survey respondent). These responses should be excluded when calculating the average.
You can deliver a set of static HTML pages that consume the API data with JavaScript, but keep in mind that we need to be able to read your code, so if you’re compiling your JavaScript in any way, please include your source code too. Alternatively, if you want to build an application that runs on its own web server, that’s okay too.
Recommendations
Be creative in considering the right way to display the results.
Feel free to use frameworks and libraries, but keep in mind that we are looking for something that demonstrates that you can write good front-end code, not just wire up a framework.
Static JSON files load pretty quickly, but not all web APIs are so performant. Consider how your application will behave if the API is slow.
Include a README file with clear build instructions that we can follow.
Include in your README any other details you would like to share, such as tradeoffs you chose to make, what areas of the problem you chose to focus on and the reasons for your design decisions.
We like tests.
Beyond meeting the minimum requirements above, it’s up to you where you want to focus. We don’t expect a fully-finished, production-quality web application; rather, we’re happy for you to focus on whatever areas you feel best showcase your skills.
Submitting your solution
Assuming you use Git to track changes to your code, when you’re ready to submit your solution, please use git bundle to package up a copy of your repository (with complete commit history) as a single file and send it to us as an email attachment.
We’re looking forward to your innovative solutions!
Approach
In my experience, back end web developers tend to not need to write that many CLI applications, so these requirements feel more representative of the kind of work a front end web developer actually does on a more regular basis. However, there is no designer handing you a pretty interface to implement, here: you have to muster up your own creativity in determining how to display the data. This put me out of my personal comfort zone, so it was a good test to force me think more about web page design than I usually would.
For the HTTP server, since my head was already in Elixir-land from the back end test, I chose it to serve up the static JSON files. Using a full blown web application framework like Phoenix for this seemed like overkill, so I just used an Elixir application with Plug.Cowboy, which worked out perfectly.
For the web front end, since Culture Amp was actively using Elm at the time I received the test1, I chose it to write a web application. I employed a similar set of design principles and development tools to the back end: elm test and elm-verify-examples for testing, Elm Coverage for test coverage, as well as Elm Analyse and elm-review for code quality control.
Design
Design and writing CSS are some of my weak points, so I decided to leverage a “functional CSS” library to help me out with making things look nice enough for something designed by a developer that leans more to the back of the stack. At the time I wrote the solution, it seemed like Tailwind CSS and Tachyons were battling it out for developer mindshare, and I ended up choosing the latter solely based on a friend’s recommendation.
For the general colour scheme, I started with just basic black, white, and grey, with splashes of the pink colour that Culture Amp (now previously) used for its branding. I kind of like how it turned out, so I did not iterate further on the colours, though that could just be indicative of a lack of creative flair on my part.
The survey list page is a fairly straightforward display of data of the JSON data in a list-like format. Since I was experimenting with Tachyon classes, I added very small flairs of slightly embiggening the item, as well as changing its colours, on mouseover.
This screen shows the success case of actually being able to fetch the JSON data, but when the app is still fetching the data, or the fetching fails, then an appropriate loading or failure page is shown. The Elm code leverages the RemoteData for Elm package to help manage these states.
Survey Detail Page
The survey detail page is presented in a similar way to how the back end app output its data to the terminal: summary data is repeated at the top of the screen, and then all the questions are presented in a table style format.
Use of the word “average” for every score felt a bit repetitive, so I changed it to x. However, if I re-wrote this page again, I would probably reconsider using what may not be a widely known notation for “average”.
Tooltip Histogram
A random Facebook post showing its likes in the form of a tooltip
I believe that displaying the participation percentage, and the average score for each question, technically clears the display requirements. But, I was curious about being able to display the questions in such a way where you could get an idea about how many respondents chose a specific score for a question, and who specifically chose each score. That curiosity led to creation of the tooltip histogram you can see in the screenshot above, which shows when mouseover-ing a score.
Inspired by the way Facebook displays post likes, I decided to shamelessly rip it off to show the respondent histogram. Since the data only contains user IDs, it is limited in what it can display, but I think it is a nice bit of extra functionality, and a good example of what other information can be derived from a data set by doing some folding.
You could say that the result ended up being adjacent to the optional test requirement of “if you wished, you could obtain all of the responses for a single user by consulting all of the responses with that user’s respondent_id”: instead, though, we get “all the users for a single response”.
Internationalisation
Finally, completely out of scope of the requirements (but not something whose addition detracts from anything), is internationalisation, something I value highly in applications.
I added in switchable app-level translations in Italian and Japanese (via a flag menu at the top of the screen), but obviously this does not extend to any information that comes in from the JSON files. You can read more about my adventures with internationalisation in Elm in Runtime Language Switching in Elm.
Overall, I enjoyed doing these tests. I think they both struck a good balance between hard requirements, and freedom to solve problems creatively. Their appropriate business-level theming gave them a sense of being grounded in reality, which, as well as holding the interest of a candidate, can help avoid hiring-side doubts when using generic tests (“well, we know they can write a bogosort, but can they do what we actually need them to do everyday?”).
Personally, when I see that time, effort, and thought has been put into creating new coding tests, it leaves a great first impression on the technical culture of an organisation, and makes me want to leave one as well by submitting the best solution I can. If you, as an organisation, have the time, resources, and ability to create your own custom tests (assuming you do use them, of course), then I would highly recommend it!
As of this writing, Culture Amp has stopped using Elm for new code and is “containing” its usage in their codebases moving forward. Their Director of Engineering, Front End, Kevin Yank, in what I consider to be a stellar example of pragmatic technical leadership, outlined why in On Endings: Why & How We Retired Elm at Culture Amp, and further discussed it on the Elm Town #54 podcast. I highly recommend checking them both out (even though it is sad that Elm lost one of its most high profile early adopter organisations)! ↩
]]>Paul Fioravantipaul@paulfioravanti.comhttps://www.paulfioravanti.comGet on the Same Page as your HID Device2023-10-25T16:25:00+11:002024-08-13T21:30:00+10:00https://www.paulfioravanti.com/blog/same-page-hid-device
Check out steno coding demos of this post’s content in the video above!
I use the Human Interface Device (HID) specification to enable programs I write to communicate back and forth directly with my USB keyboards.
…Which is all great, when it actually works. However, every time I would attempt to make a connection to the Georgi via my “host” program, sometimes it would work, sometimes not. The failures seemed to happen at completely random intervals, making gameplay frustrating. Was the problem with my code? The device? A platform (in my case macOS) related issue? Something else? I had no idea.
Example Host
Let’s illustrate the problem by recreating (and slightly simplifying) the example host program from the HIDAPI README file. It will:
Attempt to read the Georgi’s manufacturer string and print it out
Clean up and exit
host.c
#include<stdio.h> // printf
#include<wchar.h> // wchar_t
#include<hidapi.h> // hid_*enum{VENDOR_ID=0xFEED,PRODUCT_ID=0x1337,MAX_LENGTH=255};intmain(intargc,char*argv[]){// Initialize the hidapi libraryhid_init();// Open the Georgi using the VID, PID.hid_device*handle=hid_open(VENDOR_ID,PRODUCT_ID,NULL);if(!handle){printf("Unable to open device\n");hid_exit();return1;}// Read the Manufacturer Stringwchar_tmanufacturer[MAX_LENGTH];hid_get_manufacturer_string(handle,manufacturer,MAX_LENGTH);printf("Manufacturer String: %ls\n",manufacturer);// Close the devicehid_close(handle);// Finalize the hidapi libraryhid_exit();return0;}
Now, compile the file with gcc (and pkg-config to bring in the HIDAPI library):
And, this was the output of running the host file a few times:
$./host
Manufacturer String: g Heavy Industries
$./host
Unable to open device
$./host
Manufacturer String: g Heavy Industries
$./host
Manufacturer String: g Heavy Industries
$./host
Unable to open device
$./host
Unable to open device
$./host
Unable to open device
$./host
Unable to open device
$./host
Unable to open device
$./host
Manufacturer String: g Heavy Industries
Looks like pretty random failures to me! There is probably not much more we can do with the host file at the moment, so it would seem the next step in getting to the bottom of this problem would be to dive one level deeper, and see what happens when an attempt to open a device is made.
Opening Devices
From the API in the host code, we can see that the hid_open function is responsible for opening devices, so let’s check out the HIDAPI codebase and see what it does:
hid_device*hid_open(unsignedshortvendor_id,unsignedshortproduct_id,constwchar_t*serial_number){structhid_device_info*devs,*cur_dev;constchar*path_to_open=NULL;hid_device*handle=NULL;devs=hid_enumerate(vendor_id,product_id);cur_dev=devs;while(cur_dev){if(cur_dev->vendor_id==vendor_id&&cur_dev->product_id==product_id){// ... serial_number-related code snipped for brevity ...path_to_open=cur_dev->path;break;}cur_dev=cur_dev->next;}if(path_to_open){/* Open the device */handle=hid_open_path(path_to_open);}hid_free_enumeration(devs);returnhandle;}
This code retrieves a list of devices that match the vendor and product IDs (hid_enumerate)2. It then attempts to open the first device it finds in that list where the IDs match (hid_open_path), and returns a handle reference to it. Even if the handle to the device is not NULL, it is unknown at this point whether it can be read from or written to.
This code surprised me because I would have thought that given a set of IDs, that are presumably unique (…but I guess not…?3), there would only ever be one device that would get opened. So, given that the host code works sometimes, it seems that when hid_enumerate is called, the Georgi is sometimes the first device in the returned list (and hence opened successfully), but sometimes not, resulting in the attempted opening of…some other device…?
Regardless, what I do know is that the host code will need to change to reflect the dynamic ordering of the list provided from hid_enumerate, and will need to deal with potentially performing a hid_get_manufacturer_string function call against each device in that list, until it gets back a successful response.
Before starting on those changes, though, how can we find out what devices are actually showing up where we do not expect them? Is there something we can use to show us what HIDAPI is seeing? Thankfully, yes.
Testing the HID API
hidapitester is a command-line tool that can test out every API call in the HIDAPI library. Let’s first use it to get the lay of the device land by asking it to just list the available devices that are on my computer:
$./hidapitester --list05AC/8104: Apple -
05AC/8104: Apple -
05AC/0342: Apple Inc. - Apple Internal Keyboard / Trackpad
05AC/0342: Apple Inc. - Apple Internal Keyboard / Trackpad
0000/0000: Apple -
0000/0000: Apple - Headset
05AC/0342: Apple Inc. - Apple Internal Keyboard / Trackpad
FEED/1337: g Heavy Industries - Georgi
0FD9/0086: Elgato - Stream Deck Pedal
05AC/8104: Apple -
05AC/8104: Apple -
05AC/0342: - Keyboard Backlight
0000/0000: Apple -
0000/0000: APPL - BTM
0000/0000: Apple -
05AC/0342: Apple Inc. - Apple Internal Keyboard / Trackpad
FEED/1337: g Heavy Industries - Georgi
FEED/1337: g Heavy Industries - Georgi
FEED/1337: g Heavy Industries - Georgi
FEED/1337: g Heavy Industries - Georgi
FEED/1337: g Heavy Industries - Georgi
05AC/0342: Apple Inc. - Apple Internal Keyboard / Trackpad
05AC/0342: Apple Inc. - Apple Internal Keyboard / Trackpad
05AC/0342: Apple Inc. - Apple Internal Keyboard / Trackpad
0000/0000: Apple -
Aside from lots of random Apple-related entries, we can see 6 devices that identify as the Georgi with a 0xFEED/0x1337 VID/PID combination, and they seem to be in 2 groupings(?), consisting of 1 and 5 entries. Compare that to the easy-to-distinguish Elgato Stream Deck Pedal, with just a single device detected.
So, which one of these is the “real” Georgi? Let’s further refine the hidapitester command and see if we can print out more details:
./hidapitester --vidpid FEED:1337 --list-detail
FEED/1337: g Heavy Industries - Georgi
  vendorId:      0xFEED
  productId:     0x1337
  usagePage:     0xFF60
  usage:         0x0061
  serial_number:
  interface:     1
  path: DevSrvsID:4294971346

FEED/1337: g Heavy Industries - Georgi
  vendorId:      0xFEED
  productId:     0x1337
  usagePage:     0x0001
  usage:         0x0006
  serial_number:
  interface:     0
  path: DevSrvsID:4294971342

FEED/1337: g Heavy Industries - Georgi
  vendorId:      0xFEED
  productId:     0x1337
  usagePage:     0x0001
  usage:         0x0002
  serial_number:
  interface:     0
  path: DevSrvsID:4294971342

FEED/1337: g Heavy Industries - Georgi
  vendorId:      0xFEED
  productId:     0x1337
  usagePage:     0x0001
  usage:         0x0001
  serial_number:
  interface:     0
  path: DevSrvsID:4294971342

FEED/1337: g Heavy Industries - Georgi
  vendorId:      0xFEED
  productId:     0x1337
  usagePage:     0x0001
  usage:         0x0080
  serial_number:
  interface:     0
  path: DevSrvsID:4294971342

FEED/1337: g Heavy Industries - Georgi
  vendorId:      0xFEED
  productId:     0x1337
  usagePage:     0x000C
  usage:         0x0001
  serial_number:
  interface:     0
  path: DevSrvsID:4294971342
The details have provided us with extra hexadecimal values called “usage page” and “usage”, and a number for an “interface”4.
Since we have five entries with an interface value of 0, and one with 1, that would seem to explain the “groupings” we saw earlier in the device list. But what does this new set of “usage” hexadecimal numbers mean?
HIDAPI Usage
The concept of “usage” and “usage pages” in the context of HIDAPI is, I think, best described in this article:
“An HID usage is a numeric value referring to a standardized input or output. Usage values allow a device to describe the intended use of the device […]. For example, one is defined for the left button of a mouse. Usages are also organized into usage pages, which provide an indication of the high-level category of the device or report.
Hexadecimal numbers are a bit abstract in conveying what this “intended use” really means, but, fortunately for us, we can use the Web HID Explorer to get some more human-readable information:
I guess in the end we can consider the human-readable information “nice to know”, but my main takeaway from all this would be that the usagePage:usage pair feel quite similar to the vid:pid pair, in terms of their hierarchical relationship to each other.
Anyway, it seems we will need to use all four values in the host code in order to make a stable connection to a device. However, there is no real way to know in advance which usage values will successfully open up that connection (even the information above does not hint at that…at least, not that I can see). Therefore, the host code will need to be changed to handle the following scenarios:
Where a usagePage:usage pair are not present, loop over the vid:pid-matching devices, and attempt to make a connection with each one until successful. Also, log out the device details on each attempt, so we can find out which usage values to use on future attempts so that…
Where a usagePage:usage pair are present, loop over the vid:pid-matching devices until a match is found for the usage values, and only attempt to make a connection with that device
Let’s give it a try!
Host with Usage
First, let’s change the host code to make a connection with each device in the list until it is successful, rather than just blindly return the list’s first device. Instead of calling hid_open, let’s adapt its internals to fit our needs:
host.c
// ...intmain(intargc,char*argv[]){// ...hid_device*handle=NULL;structhid_device_info*devices,*current_device;// Enumerate over the Georgi devices using the VID, PID.devices=hid_enumerate(VENDOR_ID,PRODUCT_ID);current_device=devices;while(current_device){unsignedshortintusage_page=current_device->usage_page;unsignedshortintusage=current_device->usage;printf("Opening -- Usage (page): 0x%hX (0x%hX)...\n",usage,usage_page);handle=hid_open_path(current_device->path);if(!handle){printf("Unable to open device\n");current_device=current_device->next;continue;}printf("Success!\n");break;}hid_free_enumeration(devices);// Read the Manufacturer String if handle validif(handle){wchar_tmanufacturer[MAX_LENGTH];hid_get_manufacturer_string(handle,manufacturer,MAX_LENGTH);printf("Manufacturer String: %ls\n",manufacturer);hid_close(handle);}else{printf("Unable to open any devices for 0x%hX:0x%hX\n",VENDOR_ID,PRODUCT_ID);}// Finalize the hidapi libraryhid_exit();return0;}
Compiling and running the changed host file a couple of times gives us the following output:
$./host
Opening -- Usage (page): 0x6 (0x1)...
Unable to open device
Opening -- Usage (page): 0x2 (0x1)...
Unable to open device
Opening -- Usage (page): 0x1 (0x1)...
Unable to open device
Opening -- Usage (page): 0x80 (0x1)...
Unable to open device
Opening -- Usage (page): 0x1 (0xc)...
Unable to open device
Opening -- Usage (page): 0x61 (0xff60)...
Success!
Manufacturer String: g Heavy Industries
$./host
Opening -- Usage (page): 0x61 (0xff60)...
Success!
Manufacturer String: g Heavy Industries
Great! We get a successful connection every time at usage FF60:61, and can confidently say that is our target device. Now, since every connection we open exerts a time cost, let’s change the host code to skip devices that we now know will not give us a successful connection, while still handling the possibility that we may not know the usage values of other devices we may want to connect to:
host.c
// ...enum{// ...// Set usage values to 0 if unknown.USAGE_PAGE=0xFF60,USAGE=0x61};intmain(intargc,char*argv[]){// ...intusage_known=(USAGE_PAGE!=0)&&(USAGE!=0);while(current_device){// ...unsignedshortintusage_page=current_device->usage_page;unsignedshortintusage=current_device->usage;if(usage_known&&(usage_page!=USAGE_PAGE||usage!=USAGE)){printf("Skipping -- Usage (page): 0x%hX (0x%hX)\n",usage,usage_page);current_device=current_device->next;continue;}// ...handle=hid_open_path(current_device->path);if(!handle){printf("Unable to open device\n");if(usage_known){break;}else{current_device=current_device->next;continue;}}// ...}// ...}
Compiling and running these changes a couple of times gives us the following output:
It works! And, if you have been following along (with your own Georgi or other keyboard of choice), you will notice that successful connections are now made much faster, even if you do not hit the target device on the first try!
So, if you ever find yourself writing custom firmware that connects to HID devices, remember to always include the usage values, as well as vendor/product IDs, to ensure you can get a stable connection.
The complete code for the host file is below, but you can also get it from its GitHub repo here:
#include<stdio.h> // printf
#include<wchar.h> // wchar_t
#include<hidapi.h> // hid_*enum{VENDOR_ID=0xFEED,PRODUCT_ID=0x1337,// Set usage values to 0 if unknown.USAGE_PAGE=0xFF60,USAGE=0x61,MAX_LENGTH=255};intmain(intargc,char*argv[]){// Initialize the hidapi libraryhid_init();hid_device*handle=NULL;structhid_device_info*devices,*current_device;// Enumerate over the Georgi devices using the VID, PID.devices=hid_enumerate(VENDOR_ID,PRODUCT_ID);current_device=devices;intusage_known=(USAGE_PAGE!=0)&&(USAGE!=0);while(current_device){unsignedshortintusage_page=current_device->usage_page;unsignedshortintusage=current_device->usage;if(usage_known&&(usage_page!=USAGE_PAGE||usage!=USAGE)){printf("Skipping -- Usage (page): 0x%hX (0x%hX)\n",usage,usage_page);current_device=current_device->next;continue;}printf("Opening -- Usage (page): 0x%hX (0x%hX)...\n",usage,usage_page);handle=hid_open_path(current_device->path);if(!handle){printf("Unable to open device\n");if(usage_known){break;}else{current_device=current_device->next;continue;}}printf("Success!\n");break;}hid_free_enumeration(devices);// Read the Manufacturer String if handle validif(handle){wchar_tmanufacturer[MAX_LENGTH];hid_get_manufacturer_string(handle,manufacturer,MAX_LENGTH);printf("Manufacturer String: %ls\n",manufacturer);hid_close(handle);}else{printf("Unable to open any devices for 0x%hX:0x%hX\n",VENDOR_ID,PRODUCT_ID);}// Finalize the hidapi libraryhid_exit();return0;}
If you are interested in seeing other host code containing more robust error handling, and the reading and writing of custom information to and from a device, check out my HID Hosts GitHub repository.
I’ve written about playing Doom [1993] with steno in Steno Gaming: Doom Typist, but the mechanics around making communication possible between the Georgi, Elgato pedal, and Plover probably warrants its own blog post. If you’re game, you can check out the code specifics in the following GitHub repos: HID Hosts, Steno Tape, and my Georgi firmware. ↩
Vendor IDs are meant to be globally unique, while product IDs are meant to be unique within the scope of a vendor ID. The USB Implementers Forum (USB-IF) is the “authority which assigns and maintains all USB Vendor ID Numbers” (a vendor ID costs US$6000 as of this writing). Also, apparently “unauthorized use of assigned or unassigned USB Vendor ID Numbers is strictly prohibited”. However, a search of popular hobbyist keyboard firmware QMK’s codebase reveals that hundreds of devices aside from the Georgi use 0xFEED as their vendor ID (it seems to be QMK’s arbitrarily assigned default vendor ID). So, we can conclude that:
the 0xFEED vendor ID does not belong exclusively to the Georgi
enforcement of vendor ID uniqueness is lax/non-existent
we cannot rely on the VID/PID combo alone to open a connection to a device: we need more information to target it correctly
Since I could not find any references on the web that describe what an “interface” means within the context of HIDAPI, ChatGPT says that it “can represent a specific device or a group of similar devices that share a common way of communicating with the computer. These interfaces are identified by interface numbers and can have different features, reports, and capabilities depending on the type of HID device”. I am not sure why the Georgi would need multiple ways to communicate with the computer, but I am just going to consider this an implementation detail we do not need to concern ourselves with. Also, as an aside, I cannot believe we are at the stage where I am quoting AI… ↩
After joining my last Ruby on Rails project as a software developer, I wanted to see if I could quickly deliver some easy wins before starting any more difficult work. So, I decided to give my client’s web application a “technical audit”.
I had done this kind of thing before on other Rails projects, but that had been many years ago, and I can barely remember what I coded last week, let alone all the steps on some check-list I wrote in the ancient past.
Luckily, past-me apparently had the enormous foresight to write up all the steps he thought of in a post on a previous employer’s blog: Profile Your Future App.
Some of the content is a bit outdated as of this writing, particularly with regards to a few of the external services it references (which is unsurprising, given the dynamic nature of tech), but I was able to leverage a good deal of the post’s content to improve the quality of the application I was working on, without having to reinvent the wheel (and maybe some other web developer might, too).
So, thanks past-me, ya did good! As you figured stuff out, you wrote it down, and it paid future dividends: a beneficial and repeatable process that anyone can do for themselves.
Now you, the guy writing this sentence: you reckon you can take your own advice and keep this up?
Happy 50th Postiversary
It has only taken over 5 years of writing, at the cracking average speed of less than one post per month, but you are reading this blog’s 50th post. In muted celebration of this extremely modest achievement, I thought I’d mark the occasion with a retrospective.
My initial reasons for attempting to kick-start a blog (after failing once before) were:
Using it as a knowledge repository: get stuff out of my head and persisted somewhere else, so I could “confidently forget” it until (maybe) future-me needed it again
The intrinsic value of being able to share knowledge with others, in hopes that they, too, can benefit from it
Get better at technical writing, and writing English in general
Directly receive reputation-building SEO “link juice” for stuff I write, rather than just give it away for free to other third-party sites (though these days I guess all original content is just info-chum to be ravenously devoured and digested as training data by AIchatbots, so who knows if creators will receive even a sip of whatever ends up substituting for link juice…)
How did all of that go? Below are the results of my Omphaloskepsis Report, though the TL;DR could be summed up with this tweet:
“deeply disgusted to discover that in order to get good at a thing I have to do it badly first” — Meg Elison (@megelison)
I’m going to consider “well” in the subjective: how I generally felt I benefitted from writing the posts up to now. If I was going to attempt to consider what was done well in the objective, then all signs would point toward a complete pivot to only ever writing about Doom on macOS in the future.
Doomguy chugs more than his fair share of SEO juice
I may really like Doom, but I don’t want to do that. So, I’d like to have a list of positives for future-me to look back on: help keep my motivation up to continue writing about potentially niche topics, especially when vanity metrics show low levels of reach and impact for a particular post. Here’s what I came up with.
Certificate of Participation
Framed against a digital wasteland of abandoned blogs, I give myself a light pat on the back for demonstrating enough grit to actually ship fifty posts worth of content to the internet.
There were plenty of times where I just did not want to start, or continue, writing a post. Mustering up the enthusiasm, or summoning enough stubbornness, to persevere in the face of any other reason I could think of, personally beneficial or not, has been tough1.
I don’t advocate continuing to pay sunk costs where there is no benefit, but even if no one reads this, or any of my other posts, I know I get at least some kind of immediate fixed value from finishing a post (even if just a dopamine hit), and then hopefully some kind of variable value in the future (it gets picked up by an aggregator, or future-me re-reads it etc).
Speaking of aggregators, these are the ones that picked up one or more of the previous posts from this one, and provided nice spikes in readership (and some warm fuzzies for me):
Two of the Elixir Weekly links are from the same article, but in different newsletters, giving a hit rate of about 34% of the posts being apparently deemed worthy enough to share widely: not a huge number at all, but I’ll take it over zero!
Idea Pipeline
In order to combat the classic “I don’t know what to write about” problem, that serves as a convenient escape hatch to avoid expending any effort at all, I made sure to create an easily accessible place where ideas could be stored, as close as possible to the time they appear. I use Trello boards and cards for this, but any tool, digital or physical, would work fine.
An idea may just be the title of a post, a theme, keywords, random thoughts, or a fully fleshed out plan: whatever information happens to come to hand, it goes in the idea bucket. I may not action an idea at the time it materialises, or in the next few months, or even ever, but they are there to be referenced whenever it comes time to put text to web page.
Forgetting some ideas, because I did not put them anywhere when they came up, was painful enough that even if I am in the middle of doing something else, I will make sure to put something down to follow up later. So, there is never an issue with what to write about, just the hard stuff about how to allocate the time and effort to actually do the work.
Deep Diving
Writing about certain topics forced me to attempt to really learn about them in detail. No self-imposed deadlines meant I would often happily abseil down every rabbit hole I encountered, and attempt to be as thorough as possible in surfacing information for posts.
This could sometimes make writing a post feel like maintaining a long running Git branch in a codebase. All the voluminous information editing, shuffling, and moulding needed in order to attempt to create a coherent narrative could be taxing, and there were many times where I just wanted a post to hurry up and end so I could finally move on to something else.
However, the goals of making a post a one and done exercise, and future-me’s single point of reference for a topic2, enabled me to keep trudging forward, even when it ended up taking months of preparation. Most importantly, especially given the effort expended, I’m happy overall with the way that the posts have turned out, even the ones that were so niche that their audiences were tiny3.
Stories and Narratives
Many of my posts have revolved around explaining the processes of how to use some kind of technology, show off a thing, or provide some kind of subjective advice. As well as scratching an itch, justifying the time and effort it takes to write these kinds of posts is easy within the context of being relevant to my profession or interests, and helping out future-me.
However, I have also found great benefit in writing posts that just tell a straight story. These posts4 never really get much traction in analytics — I guess they are not considered as “useful” as how-to guides — but as well as being personally fulfilling to write, I believe they have helped lift the narrative quality of other posts.
Obviously, I never set out to write boring or dry content, but I do feel that writing stories has been able to positively influence the structure and word smithing of other more prescriptive posts, and make them more interesting to read (or, at least it has for present-me looking back on them).
So, in an attempt to get better at writing, and improve my blog “voice”, I plan to pepper in more story-based posts to counterbalance the hardcore technical-based ones.
Blog Tinkering
Software nerds love to tinker, and this blog has provided ample opportunities for that. From changing the theme, setting up and integrating a mailing list, and overriding Jekyll templates to get pages looking just the way I want them to.
The (sometimes painful) journeys that making those changes took me on either became posts, or are in my idea pipeline for future posts, creating a virtuous circle of content generation. Jekyll may not be the coolest blog kid on the block, but there are enough people using it that someone out there will have a similar problem to one that a post addresses, making its creation worthwhile.
Guest Posting
Although I mentioned earlier about wanting to keep SEO link juice to myself, there are times where I think it is worth giving it away to get your work in front of an audience you do not have, yet want to reach, in order to accomplish some goal.
Back in 2021, I reached out to ZSA to ask if they would consider supporting QMK stenography keys in their Oryx keyboard configurator. I hoped that by doing so, the barrier to entry to use stenography on their popular keyboards could be significantly lowered, encouraging more people to give it a try.
That whole process was a lot of work, potentially benefitted(?) a for-profit company, no compensation was asked or offered, and, of course, I get no direct link juice (though I did make sure to relevantly link as many of my own posts in it as possible without being spammy [I hope…]). But, getting steno out into the minds and hands of a wider audience than I ever could by myself was the overarching goal, and I think it succeeded there, making the whole exercise worthwhile. I am also proud of the end result, and collaborating with the ZSA team was a really great experience.
I do see doing something like this as the exception, rather than the rule, though. I have been approached by other organisations about writing for-pay articles for their blogs based on what they have read here (which, in itself, is flattering). But, the numbers offered just do not personally justify the sheer amount of effort required for creating what I consider a good technical post (not just the writing, but likely also development of complimenting assets like working software programs and videos etc).
This means I would rather not get paid, and keep a post on my blog in order to maintain ownership, than sell it for some going rate. I definitely consider this a luxury5.
Not everything in the competitive and glamorous world of writing personal blog posts is glowing praise and fawning over your words. Things can go wrong, opportunities are potentially missed, and sometimes unwitting self-sabotage takes place.
Here is a selection of points where I am cognisant of some kind of shortcoming, though I am sure there are more I have just not noticed (feel free to bring any others to my attention).
Cadence and Releasing
I write posts on a very sporadic schedule. Regardless of having an idea pipeline, my urge and ability to write fluctuated significantly: some months I would be blessed with periods of extended flow, and be able to release up to three posts — others, zero (and sometimes that drought could last for many months, like the massive gap between this post and the previous one).
On those months where I was able to write multiple posts, in my rush to get them out the digital door and off my plate, I would sometimes release them on consecutive days, giving the initially-released post no room to “breathe” before the next one barreled through. I do not have any evidence that this resulted in either post losing any short-term readership, but I think there may be the potential for that. Therefore, I do not intend to do releases in quick succession again, unless there is a compelling reason to do so.
Much like I have an inbound idea pipeline that stacks up and waits for me to action them, I now understand that having an outbound post pipeline is just as important, in order to give the impression of having some sort of cadence, and buy me time when flow is in short supply.
Promotion
When I release a post, my next item of business is to try and get people to read it. I currently do this by:
writing out a short message to send to my mailing list members
Different kinds of posts seem to resonate with people on different platforms: tech posts seem to get more traction on Twitter (aggregators are especially more likely to pick them up if they are hashtagged correctly), while personal stories get more interaction on Facebook, where people tend to know me personally.
Promoting to these places has generally been fine, but I wonder whether I am missing out on promotion opportunities by not also aiming at more specific targets like relevant Reddit subreddits, Slack/Discord communities, LinkedIn groups, or maybe even Hacker News.
I am sure many of these communities will have their own rules and etiquette around sharing self-serving content, possibly including being a regularly contributing community member (or maybe they just outright ban it). I do not want to come off as a spammer or leech, so I will have to overcome my laziness and figure out if any avenues are open to me here, and pick ones that seem the most appropriate.
Regarding the mailing list, it is very subtly shown on the page, and although options like having some modal window pop up and shove it in your face are available (something that apparently has been shown to increase conversions), I know I hate them, so I will assume you do as well, and, therefore, that is not something I would consider.
Theming
This blog currently uses a theme: Minimal Mistakes. I have benefitted significantly from having it, as it takes care of all the stuff I am not good at, like design. However, much like all sites that use themes, this blog looks really similar, if not the same, as other sites that also use the same theme.
This issue is not hugely painful for me right now, since I am more focused on just writing content, but it would be nice for this site to have at least a bit more of a unique skin. I do feed myself by creating websites after all, but my viewpoint on this blog using a framework (Jekyll) and theme has been “why re-create the (blog framework/CMS-shaped) wheel when I can leverage the good work of others?”. Maybe I just need to do some more interesting customisations within this sandbox before investing the time and effort in doing a re-write.
Voice
As an experiment, I decided to try adding voice narration to some of my posts. Personally, I got a kick out of doing them, but their YouTube metrics would seem to indicate that they have been greeted mostly with crickets6.
This is not surprising at all, and matches the expectations I had for it. By all accounts it is a failed experiment, but regardless of that, I am going to keep doing it.
Aside from it being fun, I did get some feedback from a non-native English speaking peer, who said they used them for listening practice, which I was thrilled by! It just goes to show that your users will consume your content in ways that you will not expect!
Monetisation
Every time I look at the “Pages and screens” report on Google Analytics, I always see, for every page, a display of “Total revenue: $0.00”.
Googleknows I do not have ads on any of my pages, so it could choose to just not display this information, but it does anyway. Of course, this has the likely intended effect of making me think that Google sees some wasted potential, and perhaps I could make some pocket money from my posts, even if just the Doom for macOS one.
However, consulting my blog bible, Technical Blogging, Second Edition, helped give me some clarity by providing a bunch of tips that brought my monetisation ponderings crashing straight back to earth, including this one that stops me dead in my tracks:
Don’t place ads on your blog until you have at least 10,000 pageviews per month.
My best single page is but a tenth of that, with the rest not even worth a mention. Even if I did reach that goal, the risk/reward ratio of running ads, particularly against a technical audience, would seem to skew heavily towards continuing to blog just for fun, which is fine by me.
After all this reflection, I think the best actions I can take for improvement are the following, in order of priority and immediate impact:
Space out post releases by at least a week
Establish a regular blogging habit, plan for once a month
Attempt to submit a post to at least one social network I have not used before
Increase the ratio of narrative-based posts
Maybe consider revamping the site, if I have nothing better to do…
Here’s hoping that it yields results of some kind. Did I miss anything? I love feedback, so let me know!
This post was started on September 9, 2022, and has been one of the grindiest posts so far: delayed for some good reasons, but also procrastinated on for a bunch of excuses. Self-reflection is quite hard, it would seem. But, I made a pact with myself: I cannot proceed with any other post, no matter how interesting or timely, until this one gets out the door. ↩
Except for the times I would write about the same tech in multiplelanguages… or when some tech went through a major versionupgrade… or when writing about twosides of the same topic… or when the topic was just too big and needed to be split intomultipleparts… so, I made peace with embracing the meta, and allowing the posts to rhyme sometimes. ↩
There were times where I would want to make changes to a post after publishing, from minor typo fixes to more major updates involving significant amounts of content. So, even if I was not happy with a post, just because it is on the internet, does not mean it cannot be iterated on (however, I tend to consider posts with audio narration, like this one, frozen in time upon release so that voice and text always match). Anyone actually interested in seeing what a post looked like on its first release can just trawl through the blog’s commit history. ↩
Which sounds very lofty; more realistically, though, the first-world problem is likely to be that the going rate is just not high enough for me, nor others I know who work in information technology that have their own blogs and share this view. This is also probably reflective of my limitations as a writer: if I was faster at generating content, and could pump out articles easily and naturally, then the time spent to going rate compensation ratio might look more enticing. ↩
As of this writing, the top narration performer has a whopping 7 plays, while the least popular one languishes at 0 plays. ↩
]]>Paul Fioravantipaul@paulfioravanti.comhttps://www.paulfioravanti.comSharing AppleScript Handlers2022-07-05T08:30:00+10:002024-08-23T21:00:00+10:00https://www.paulfioravanti.com/blog/sharing-applescript-handlersBeing able to share code between files is a great way to put programming logic “in its right place”, and prevent single files from containing hundreds or thousands of lines of code.
A very basic example of sharing code in Python could be having a directory called code/, and in it, a file called greetings.py. This file contains very important business logic about how to say “hello”:
code/greetings.py
defhello():print("Hello there!")
Now, say I have a greeter.py file in the same directory, who has no idea how to say “hello”, and wants to leverage the specialised knowledge its neighbour file has on how to do it. It can do so easily by importing the hello function from the greetings file, and using it:
code/greeter.py
fromgreetingsimporthellohello()
Running the greeter program outputs what you would expect:
$python code/greeter.py
Hello there!
The from greetings import hello line is able to find the greetings file thanks to Python’s sys.path, a “list of strings that specifies the search path for modules”, which includes the directory of the script being run: in this case, the code/ directory. Makes sense.
Many programming languages have similar mechanisms to allow sharing code in simple, unobstructive ways. AppleScriptcan share code, but certainly not in an intuitive way like Python. The extra steps required to do so compelled me to make a note of them somewhere, in order to not have to scour the internet to figure this out again.
I have an AppleScript file that performs a keyboard shortcut for a “refresh”.
The most common use case for a “refresh” on a computer would probably be refreshing a browser window, and its keyboard shortcut on macOS is ⌘R (Command-R). Many other applications use the same ⌘R shortcut for their own interpretation of “refresh”, so contextually, it is quite a safe one to use.
However, when I have the very specific use case of using the Vim text editor in an iTerm2 terminal, I need a “refresh” to mean “refresh the ctrlp.vim fuzzy file finder’s cache, so it picks up the existence of any new files”, and the shortcut for that is F5 (Function Key-5).
So, the script needs to figure out what current the “active” application is, and then “press” the appropriate keyboard shortcut (either ⌘R, or F5). Here is what that looks like in my code:
src/actions/refresh.applescript
onrunsetactiveApptogetActiveApp()ifactiveAppis"iTerm2"thenperformiTerm2Refresh()elseperformRefresh(activeApp)endifendrunonperformiTerm2Refresh()setprocessNametogetiTermProcessName()ifprocessNamecontains"vim"thenperformVimRefresh()elsedisplaynotification"Nothing to refresh."withtitle"Error"endifendperformiTerm2RefreshonperformVimRefresh()tellapplication"System Events"totellprocess"iTerm2"# 96 = F5key code96endtellendperformVimRefreshonperformRefresh(activeApp)tellapplication"System Events"totellprocessactiveAppkeystroke"r"using{commanddown}endtellendperformRefreshongetActiveApp()tellapplication"System Events"returnnameoffirstapplicationprocesswhosefrontmostistrueendtellendgetActiveAppongetiTermProcessName()tellapplication"iTerm2"returnnameofcurrentsessionofcurrentwindowendtellendgetiTermProcessName
In this file there are six handlers, with the on run handler at the top being the entry point for when the script is run. The first four handlers contain code that is specific to “refreshing”, but the final two handlers, getActiveApp() and getiTermProcessName(), contain code that is general enough that other scripts could leverage them. Therefore, they are the perfect candidates for extraction into some other file, where they can be shared.
Let’s remove them from refresh.applescript, and put them into a “utilities” file:
Okay, so now the big question: how can refresh.applescript use the code that now lives in util.applescript?
Creating Shared Libraries
AppleScript cannot just reach into neighbouring files with a line like from util import getActiveApp. What needs to occur is the metamorphosis of the utilities script into what AppleScript calls a Script Library, which involves:
Creating a compiled version of the script with the osacompile command line tool (the compiled script will have a .scpt file extension, instead of .applescript)
Putting the compiled script in a designated “Script Libraries” folder, whose locations are numerous (see previous Script Library link), but the one I have seen cited most often, and that did work for me, is in the user Library directory, specifically: ~/Library/Script Libraries/
After those steps are done, we can use the utility handlers again, so let’s give it a shot!
First, create the compiled script:
osacompile -o util.scpt util.applescript
Now, move the newly created util.scpt script to the Script Libraries directory. Since that directory gets used by other programs as well, let’s silo the file in its own directory called steno-dictionaries:
Done! Since Shared Libraries are compiled, this enables us to reference them as a static Property (here named Util), allowing for commands to be sent to it using the possessive syntax ('s).
Shared Libraries at Scale
The example above is all well and good for compiling a single Shared Library, but performing those commands for multiple files gets tiresome quite quickly.
In order to automate this in my steno-dictionaries repo, I wrote some shell scripts (that live in its bin/ directory) that “bootstrap” the process of making the AppleScript code in the repository ready to use after being cloned. They ensure that running one command (./bin/bootstrap) will, in the following order:
Create a ~/Library/Script Libraries/steno-dictionaries directory
Compile all AppleScript files that will become Script Libraries into .scpt files
Move the Script Library .scpt files to ~/Library/Script Libraries/steno-dictionaries
Then, compile all other AppleScript files that reference the Script Libraries (but are not, themselves, Script Libraries) into .scpt files
(I’m assuming that running .scpt files are faster than .applescript files since they are compiled, but I cannot seem to find conclusive evidence to back up that assumption on the internet, which is weird…).
The .scpt scripts are executed by shell commands that run osascript commands, which are contained in steno chord entries in the repo’s src directory. The one that runs the “refresh” script looks like this:
I really wish that sharing code in AppleScript was not as complex as it currently is, but I do not see that changing at all, assuming that AppleScript itself even survives into the future.
The revamped Apple Developer site would seem to ignore AppleScript’s existence altogether (all the documentation links used in this post seem to come from the archive, implying they are now legacy and unmaintained…), but I do not see any alternative candidate language being put forward for macOS system automation programming.
Personally, I would be happy to change everything I have written into Swift, if that was possible. But, for now, I need AppleScript, and if you do too, hopefully this post has been able to serve as some reference.
In the late noughties, I worked for an American software company in Japan.
That period in Tokyo, just pre-Lehman Shock, felt like a mini tech boom: the company had managed to hit the jackpot by selling a colossal software and professional services deal to a huge Japanese company.
Money from sales expense accounts flowed freely, even into the beers of the engineers; all in an attempt to foster goodwill, encourage a successful project implementation, and keep the customer happy.
However, I do not recall anyone on the project ever being happy.
The customer was not happy, because the software and its ecosystem did not work as they expected, for reasons which were obvious to them, but perhaps not to anyone outside Japan1.
The project implementation team were not happy, because the responsibility to bridge the gap on these issues fell directly on them.
During the worst periods, we were working literal 18-22 hour days. There were periods where I had no time to actually go home, and had to get my partner to physically bring me changes of clothes to the office; I had to grab showers, and maybe a couple of hours sleep, at my teammate’s apartment close by.
Many weeks were spent on a schedule of getting an earful of frustration from the customer about the software product during the day (as well as from our own sales staff, who did not want to have their commissions jeopardised), then getting on calls with the US support and development teams throughout the night, in hopes they could create patches for the product. If they could, we would apply them, re-adapt our implementation to account for them, then rinse and repeat this cycle of insanity: we were very figuratively repairing the aeroplane, and replacing its parts, mid-flight.
On one particular night, when I was actually able to make it home, my company-issued BlackBerry summoned me to a 2:00am conference call with one of the US regional offices to discuss the usual product issues found by the customer, which I joined lying flat on the floor.
A lot of the conversation content was out of my depth, since I lacked background context from previous projects. But, when Japan-related questions finally came up, I was able to chime in and attempt to provide something of value, at which point my project teammate said the words that I can still hear clearly to this day:
“Welcome back”
Confused, I asked what he was talking about, and his response impacted like a fireworks display of every red flag I had ignored about this project and the company.
I was duly informed that I had fallen asleep on the call, and our colleagues across the Pacific had decided to broadcast my snoring office-wide on their speakerphone for laughs.
As far as I was concerned, I was fully conscious, alert, and focused on the discussions. But, it would seem that even in my dreams I couldn’t escape this waking nightmare of a project.
Eventually, though, the project did end (“successfully”, so that everyone saved face), and I began formulating an exit strategy.
Not fast enough to beat the start of a new assignment, though, which was shaping up to be even worse than the previous one: the project owner was a horrid person who, among many terrible traits, could not seem to grasp the concept of using a staging environment to preview the current state of a website being actively developed on.
He insisted that every page of the website be printed out on paper periodically, and put in a 3-ring binder for his review, where he would manually mark out “corrections” he wanted with a pen!
I just…yeah, no thanks.
Even without a new employer to join, I knew I was severely burnt out, and just needed to leave immediately. Regardless of my youth, I could not ignore the toll the work took on me physically, and spent the following few months recovering before even thinking of looking for a new job.
The fire of the trenches may have forged some great friendships between myself and former colleagues that still last to this day, but I do regret giving so much to a company, while receiving so comparatively little in return, in order to achieve such an inconsequential objective, that was not appreciated, which then required me to use my own time to heal the damage it caused.
Unlike the software we implemented, which is long gone, the visceral mental rulebook for work that resulted from my experience at the company continues to serve me well (and has collected a few more entries over the years). With regards to overwork, my rules are quite simple:
Do not overwork. It is just not worth it.
Do not violate Rule 1. If you are foolish enough to do so, the incentives received had better take into consideration all the opportunity costs of that extra work time, the impact to physical and mental health, and the time needed to recover: all of which are higher than you likely think, so go check yourself and read Rule 1 again.
What cannot reasonably be done today, can be done tomorrow; work is never “done”. A contract for employment is not an agreement to indentured servitude. Charity is for charities and other good causes, not for-profit organisations.
I hope that you keep your own relationship with work healthy, and can leverage this cautionary tale to avoid ever being “welcomed back”.
Issues that I can specifically remember with the system included:
Display, formatting, and encoding issues related to double-byte character sets and half-width kana (imagine a system that had problems displaying, say, English capital letters…)
Inability to relate furigana readings to kanji, meant ordering of words would be based on their Unicodecode points, rather than their gojūon ordering (imagine a system that couldn’t sort words alphabetically…)
Limited ability to customise the software product for their specific business processes (which smells to me like they were oversold on the software product’s extensibility)
Poorly translated Japanese documentation, if there was any at all
]]>Paul Fioravantipaul@paulfioravanti.comhttps://www.paulfioravanti.comFlexbox Furigana2022-06-25T10:30:00+10:002022-06-28T09:00:00+10:00https://www.paulfioravanti.com/blog/flexbox-furiganaFurigana are annotations used to indicate the Japanese reading, or pronunciation, of Chinese kanji characters.
As a simple example, let’s say we have a character like this1:
車
Furigana for the kanji, written with hiragana2, can be placed above it3:
車
This is all well and good for Japanese speakers, but what if I wanted English-speakers to be able to read along as well? This can be done by adding the character’s pronunciation using Latin script (romaji) as another furigana-style annotation:
車
Okay, but what does this word actually mean? We could put an English translation to the right of the word, or pile on yet another annotation for the English meaning4:
車
For single words, this “full-suite” of annotations could be considered acceptable, but for complete sentences, where the objective is to have a non-Japanese speaker read along phonetically, I think any translation needs its own dedicated section.
I did exactly this in a previous blog post, A Person’s Character (人という字は), where I wanted to show the pronunciation and meaning of some lines of dialogue from the television drama Kinpachi-sensei. The intention was to enable English speakers to follow the Japanese dialogue using the romaji annotations, and then read the translation:
Can I have your attention, please. So, the character for "person" consists of one person holding up and sustaining another person. In other words, it is a "person" precisely because a person and another person are supporting each other. A person gets support from other people and their community, and through that support, grows and develops as a human.
Figuring out the idiosyncrasies of how to mark-up and display all of these annotations in the way I wanted using HTML and CSS, and then developing a way to extract that logic out into functionality that could be shared across multiple Markdown-based blog posts using Liquid, took me far more time than I expected, and became the catalyst for writing this particular blog post.
So, the following is my brain dump on what I learned about using annotations on the web.
Furigana is a type of Ruby character annotation5, and is marked up in HTML using the <ruby> tag.
Searching the internet for how to mark-up <ruby> elements leads to a significant amount of conflicting information. The W3 Ruby Annotation document mentions a selection of markup tags that can appear inside a <ruby> tag:
<rp>: ruby parenthesis (for when a browser does not support ruby annotations and the ruby text gets rendered inline)
<rb>: ruby base (the text that is being annotated)
<rtc>: ruby text container (a container for <rt> elements when markup is “complex”)
<rbc>: ruby base container (a container for <rb> elements when markup is “complex”)
Each of the tag links in the list above is from the Mozilla HTML documentation, a trustworthy source for this kind of information (in my opinion), and they say that the <rb>, <rtc>, and <rbc> tags are deprecated, and should be avoided. In order to future-proof furigana annotations, it would seem that only three tags should be used: container <ruby> tags, along with child <rt> and <rp> tags.
So, for the “car” kanji from the example above, 車, the markup could look like the following:
What are those <rp> tags for? In the event that a browser does not support ruby annotations, the code above will display as:
車(くるま)
I could not find any built-in functionality that would force a modern browser to “pretend” it does not support annotations, but I was able to follow the Inlining Ruby Annotations section of CSS Ruby Annotation Layout Module, and add styling via the browser developer tools to achieve the desired display behaviour:
Given that the HTML spec for the <ruby> element says that a <ruby> tag can contain “one or more <rt> elements”, you may be forgiven for thinking that adding the extra romaji annotation would be a case of perhaps appending it beneath the furigana:
Not great. We can, however, rearrange the <ruby> child elements, and leverage CSS Flexbox styling, to exhert more control over the visuals (we will keep styling inline for demonstration purposes moving forward):
This displays in a similar way to the initial example at the beginning of the post (though the default gap between the kanji and furigana is a bit concerning…). However, I think the meaning behind the child elements of the <ruby> parent tag have become muddled.
What is annotating what? Is 車 annotating kuruma, along with くるま annotating 車? Technically, it seems these semantics are valid, but is there is another way to communicate the desired annotations via markup?
Note, also, that we have headed into exploitation territory for the meaning of the <rp> tag to make sure that we get 車(くるま, kuruma) displayed when annotations are not supported (commas are not parentheses, after all). I do not currently know of a “better” way to mark this up to allow for a similar kind of display.
The code examples in the HTML spec for the <ruby> element show that “a nested <ruby> element” can be used for inner annotations. In our case, this could mean that the markup should indicate that:
くるま annotates 車 (one <ruby> inner nested element)
kuruma annotates the 車 compound (another <ruby> outer nesting element)
Looks acceptable to me, and I think the meaning of the markup is conveyed in a clearer way.
Nesting <ruby> tags like this means we have to give up the ability to display the furigana and romaji together [車(くるま, kuruma)], when annotations are not supported. But, I am prepared to accept this compromise because the fallback display looks good enough for the rare times it will probably ever be viewed:
車(くるま)
kuruma
Before concluding that we have the <ruby> markup and styling to use as a foundation to build with, let’s test it with a few other kanji scenarios.
Single Word, Multiple Kanji
Not every word in Japanese can be written with a single kanji; many require multiple kanji together in a compound. So, let’s test the current markup’s display of kanji compounds by changing the “car” into an “automobile”:
This looks like it displays as expected. However, pedanticism is going to get the best of me here: even though the furigana is correct for the entire word, they don’t quite line up perfectly above the individual characters they are annotating the reading for.
Let’s see if we can fix that by adding more <rt>/<rp> tag sets:
Ah, much better! The difference may be minor, but I think it’s important!
Doing this, unfortunately, “breaks” the <rp> fallback display even more, as the furigana readings are now displayed broken down not by full word, but by character:
自 (じ) 動 (どう) 車 (しゃ)
jidōsha
At this point, I think attempting to handle the fallback display gracefully is going to be prioritised to a distant second compared to getting the furigana displaying well for “normal” modern browser usage.
Single Word, Alternating Kanji and Kana
Compound verbs in Japanese are a good example of words that alternate between kanji and kana in their construction. For example, in the annotations for the word norikomu (乗り込む), meaning “to get into (a vehicle)”, I would expect there to be furigana over 乗 and 込, but not over り or む. As for the romaji, I think a single annotation under the word would suffice.
Let’s see if we can re-use the code from the kanji compound to achieve the effect we want:
Hmm, not quite right: that second furigana positioning is incorrect, and there is an awkward space between 乗り and 込む. Perhaps each half of this word needs to be its own <ruby> element? Let’s give that a try:
The furigana positioning is fixed, but since we now have three child elements under the <ruby> tag, the flex-direction: column styling is displaying them all vertically, which is not the result we want.
In order to get them to display as one set, we will need to wrap a container around the 乗り and 込む <ruby> tags. Yet another <ruby> tag seems like it could be overkill here, so, instead, let’s try a plain old <span> tag, and give it some Flexbox styling as well:
Looks good to me! If we did want to split the romaji, so the annotation was under each part of the word, we have the option of changing the tag nesting around to achieve that effect:
Great! We now know there are options around the display for romaji, for potential readability and/or aesthetic reasons.
Styled Furigana
Speaking of aesthetics, does furigana still display as expected if the CSS font-style changes, like how everything gets italicised on this page when the content is within <blockquote> tags? Let’s find out with the phrase 自 動 車 に 乗り 込む (“to get into the automobile”):
Well, it seems that annotations do not really understand italics; they look a tiny bit off, don’t they? It would be nice to be able to nudge them a bit to the right on an individual character basis.
Luckily, this is a simple matter of just adding in some text-align styling in the <rt> tags:
This looks a tiny bit better, though it seems to be more effective for single character furigana than those for compound characters. Pushing the furigana any further to the right would involve adding some padding-left attributes to the <rt> tag (which could push the kanji into places you may not want), so feel free to experiment on getting the alignment just right for your tastes.
Finally, let’s just confirm the markup works for some exceptional circumstances.
Long and Short Furigana
There are some words in Japanese where up to five syllables can be represented by a single kanji. Let’s use the markup with uketamawaru a word that fits these conditions, and means “to be told” or “to receive (an order)”:
I think this display is okay, given the awkwardness of the furigana to kanji ratio. But, that gap between 承 and る just seems too big to me, and makes me wonder whether allowing for more flexibility in the size of the furigana annotation would make it less unwieldy.
Let’s see what happens if we give the furigana a smaller absolute CSS font-size value:
Much better, I think, and it can be adjusted to preference on a per-character basis.
Now, what about the opposite scenario, when there are more kanji than furigana characters? This will only really happen with so-called Special Readings, which occur frequently with geographical or human names. So, let’s try the markup with a good example of this, the surname Hozumi:
I think this display of ほずみ6 looks fine. The spacing of the furigana may look a bit strange, but since there is no correlation between the annotation and the pronunciation of each individual kanji, having them spread out evenly across the top of the word, or center-aligned, is probably the most logical way to display them.
Markup Reuse
As you can see from the chunky markup blocks above, annotations can take up a lot of coding space. Personally, I do not want to have to manually write <ruby> tags every time I want to insert a Japanese word with any kind of annotation into my blog posts, so I wanted a way to reuse that markup.
Jekyll is the engine that currently powers this blog, and it allows the usage of Liquid, a templating language, which has enabled me to put <ruby> code into functions that take parameters to fine-tune how annotations should display. These functions are littered throughout the code for this blog post, as well as other Japanese language-related posts, and fall into two main groups.
Basic Ruby Tags
These are functions that wrap around <ruby> tags for purposes of general annotation, and are not specific to Japanese (though they can certainly be used that way). Some examples used in this blog post that you may have noticed are:
There are also functions that take in parameters which allow all the fine-tuning customisations to furigana and romaji we have seen in the examples above, and are hence specific for use with Japanese. Under the hood, they all leverage the {% include ruby.html %} function. Some examples used in this post are:
Going through the details of these functions is something I will leave up to the interested reader7. You can find all the code in the _includes/ directory of this blog’s codebase.
Much Ado About Annotations
For such small text, the coding, display, debugging, and refactoring of furigana has taken up a significant amount of my time and brain space. However, I still do not really know if I am doing it “right”.
The developers over at the Japanese Language Stack Exchange, whom I assume are experts at all things Japanese for the web, would seem to eschew <rp> and <rt> tags for <span> tags in order to represent <rt> and <rb> values for their cool furigana pop-ups:
However, NHK Easy Newsdoes use <ruby> and <rt> tags in the same way as the examples in this post. However, they, too, have opted to not use <rp> tags (perhaps they considered them to be legacy/unnecessary…?).
Yahoo News Japan does not support furigana annotations at all, preferring instead to display <rp>-style parenthesised kanji readings inline (perhaps because they are a bit Web 1.0-in-the-tooth, and still want to support browsing on Galápagos phones, which display pages using cHTML, a subset of HTML that does not support <ruby> tags).
Regardless, this post represents everything I think I know about furigana for the web, and now you know it, too. If new information comes up, or the specification for use of <ruby>-related tags changes, I am definitely happy to revise any content. If there is something I have missed, please reach out and let me know!
All Japanese character displays were confirmed to work as expected on Google Chrome. So, if you use another browser, and explanations do not quite match the display, that would be why. ↩
Placed above when the kanji is written left-to-right horizontally (yokogaki), but placed to the right when written right-to-left vertically (tategaki). ↩
Or, you could use a browser extension like Rikaichan or Rikaikun, which display pop-up kanji readings and English translations when you mouse over them, making any lack of annotations irrelevant. For purposes of this post, we’ll pretend they do not exist (I still absolutely recommend using them, though!). ↩
The name of which is from an old British typography type that had a height of 5.5 points, and not to be confused with anything related to the Ruby programming language. ↩
As well as ほずみ , 八月一日 can be read as ほづみ , やぶみ , and はっさく . ↩
It was tough to keep my own interest up with Liquid since I found using it so frustrating, even after changing my mindset to thinking of it as “smart HTML rather than dumb Ruby”. Nevertheless, I got what I wanted in the end after significant trial and error; hopefully, you can save yourself some time and irritation by using the code if you have similar use cases. ↩
]]>Paul Fioravantipaul@paulfioravanti.comhttps://www.paulfioravanti.comAppleScript Records: Strings as Keys2022-06-10T14:30:00+10:002024-08-23T21:00:00+10:00https://www.paulfioravanti.com/blog/applescript-records-string-keysI am a macOS user, and my attempts at creating programs to control my computer have necessitated working with AppleScript. Like every programming language, it has its idiosyncrasies, but one in particular sent me down a rabbit hole, which I hope this post can help you avoid should you find yourself in similar circumstances.
Many programming languages have a built-in key-value data structure, which are known by different names: hashes, maps, objects, dictionaries etc. The AppleScript structure equivalent is called a record, and they look outwardly similar to those of other languages:
{product:"pen",price:2.34}
However, a big difference is that while many other languages will allow you to use any kind of data type as a key (strings, integers etc), record keys can only be Properties, which are “effectively tokens created by AppleScript at compile time”, and essentially act like constants (which also means there’s no chance to, say, “constantize” a string received at run time). Therefore, this kind of record is not legal:
{"product":"pen",5:2.34}
The result of this is that a script must always know in advance what keys it plans to use to look up values in a record: no lookup is possible using, say, some variable that references a string.
This is unfortunate, because I wanted to perform dynamic lookups on a record by fetching values from it based on some string I would receive from the result of a handler (function) call. Here is a code snippet indicating what I attempted to write in order to perform a “zoom in”, which would send different shortcut keystrokes depending on what application was currently in focus:
# Chrome Zoom In keyboard shortcut is ⌘+, while Postman is ⌘=# NOTE: This record will raise a syntax error.propertyzoomInKeys:{"Google Chrome":"+","Postman":"="}tellapplication"System Events"# returns a string like "Google Chrome" for the application currently in focussetactiveApptonameoffirstapplicationprocesswhosefrontmostistrueendtell# Fetch the appropriate "zoom in" value from the record based on the `activeApp` keysetzoomInKeytoactiveAppofzoomInKeys# Perform the keyboard shortcuttellapplication"System Events"totellprocessactiveAppkeystrokezoomInKeyusing{commanddown}endtell
I initially thought that perhaps the reason for the error was because the record key properties follow the rules of Identifiers, which have a limited set of characters they are allowed to use (that do not include spaces). But…
“AppleScript provides a loophole […]: identifiers whose first and last characters are vertical bars (|) can contain any characters”.
So, I figured that changing the record definition to:
would work. Alas, they did not. The workaround for getting this code running correctly was to fall back to a traditional if statement:
tellapplication"System Events"setactiveApptonameoffirstapplicationprocesswhosefrontmostistrueendtellifactiveAppis"Google Chrome"thensetzoomInKeyto"+"elseifactiveAppis"Postman"thensetzoomInKeyto"="elsedisplaynotification"Cannot zoom in"withtitle"Error"returnendif# Perform the keyboard shortcuttellapplication"System Events"totellprocessactiveAppkeystrokezoomInKeyusing{commanddown}endtell
At this point, the sane thing to do is to accept that you now have working code that is fit for purpose, and move on.
But, I could not shake the feeling that there must be a way for string keys to work, even though hours of internet searching turned up nothing. How could every other programming language I know of do this, but not AppleScript? It did not make sense to me.
useAppleScriptversion"2.4"useframework"Foundation"usescriptingadditionspropertyzoomInKeys:{|GoogleChrome|:"+",|Postman|:"="}setzoomInKeysDictto¬
current application's NSDictionary's dictionaryWithDictionary:zoomInKeystellapplication"System Events"setactiveApptonameoffirstapplicationprocesswhosefrontmostistrueendtellsetzoomInKeyto(zoomInKeysDict's valueForKey:activeApp)asanythingtellapplication"System Events"totellprocessactiveAppkeystrokezoomInKeyusing{commanddown}endtell
Now, this code works. But, the shotgun approach of bringing in a whole framework and other random handlers just to solve this small problem, coupled with the awkward readability of some of the APIs (looking at you, dictionaryWithDictionary), means that I think the code is now more difficult to understand, for very negligible benefit. So, if statements it is.
If I wanted to dive even further down the rabbit hole, I could have attempted adapting Takaaki’s other solution to the same problem, which was done in vanilla AppleScript, without using Foundation. But, at this point, I think I’m good.
If you are interested in seeing how I ended up using AppleScript for my own use case of mapping stenography chords to macOS keyboard shortcuts, check out my steno dictionaries GitHub repository.


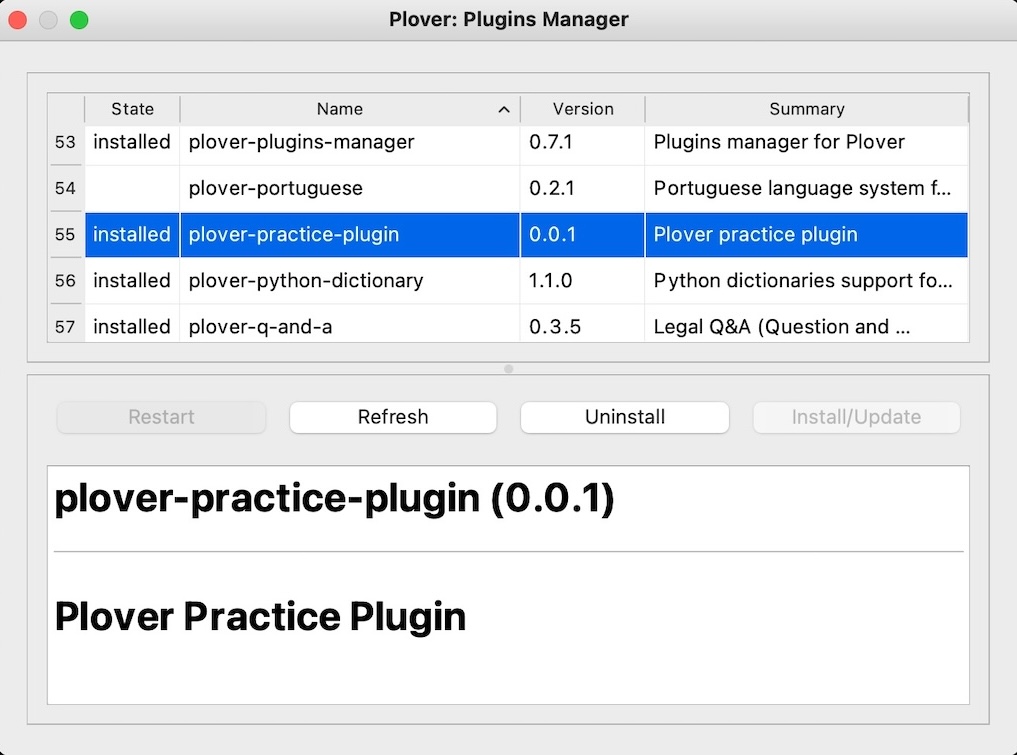
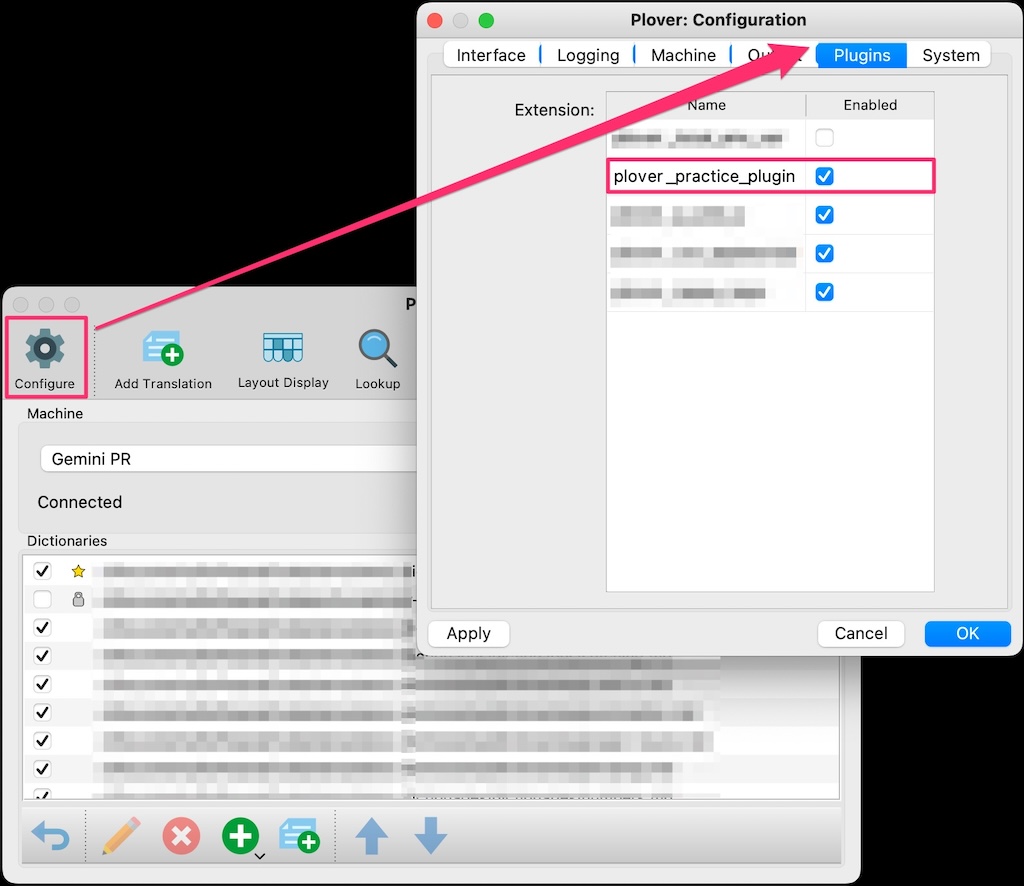
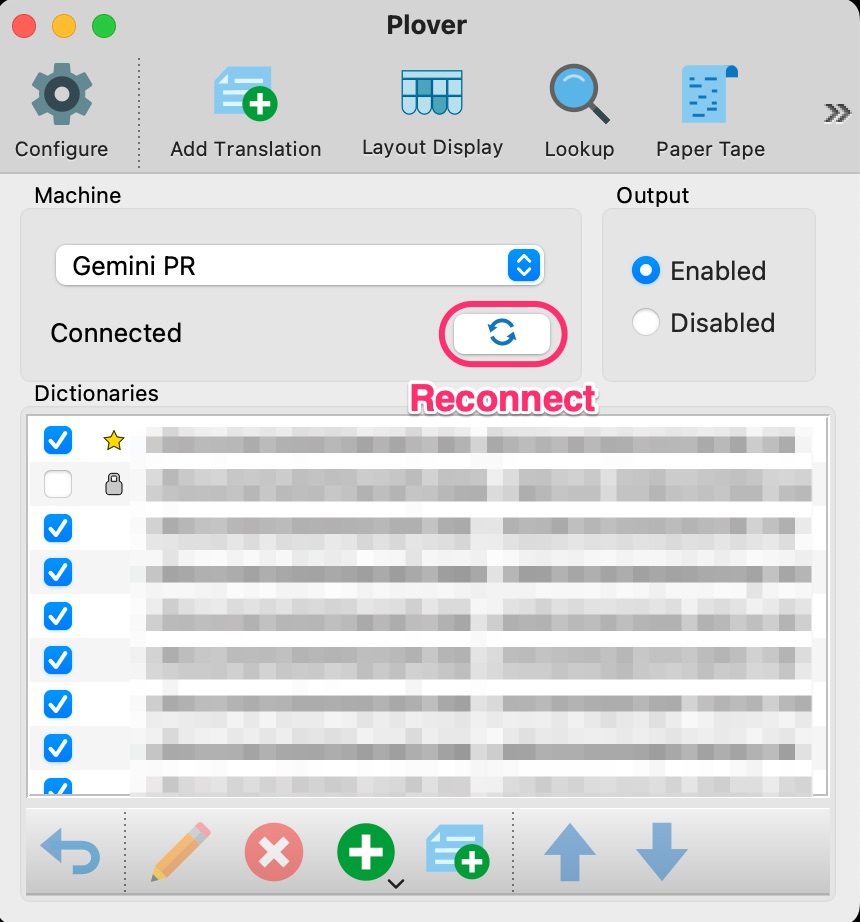
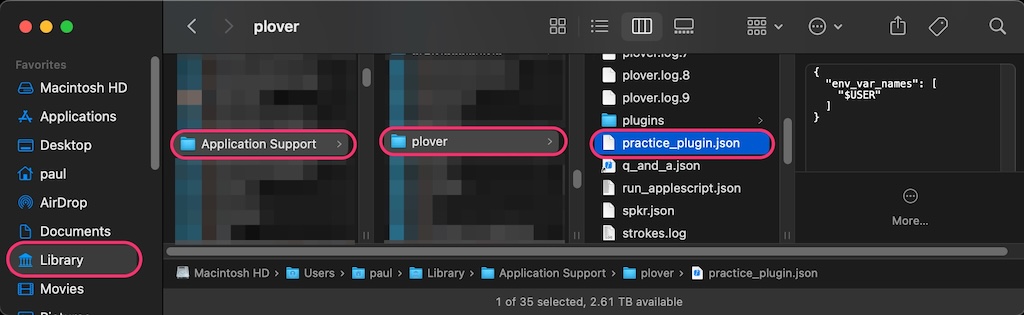
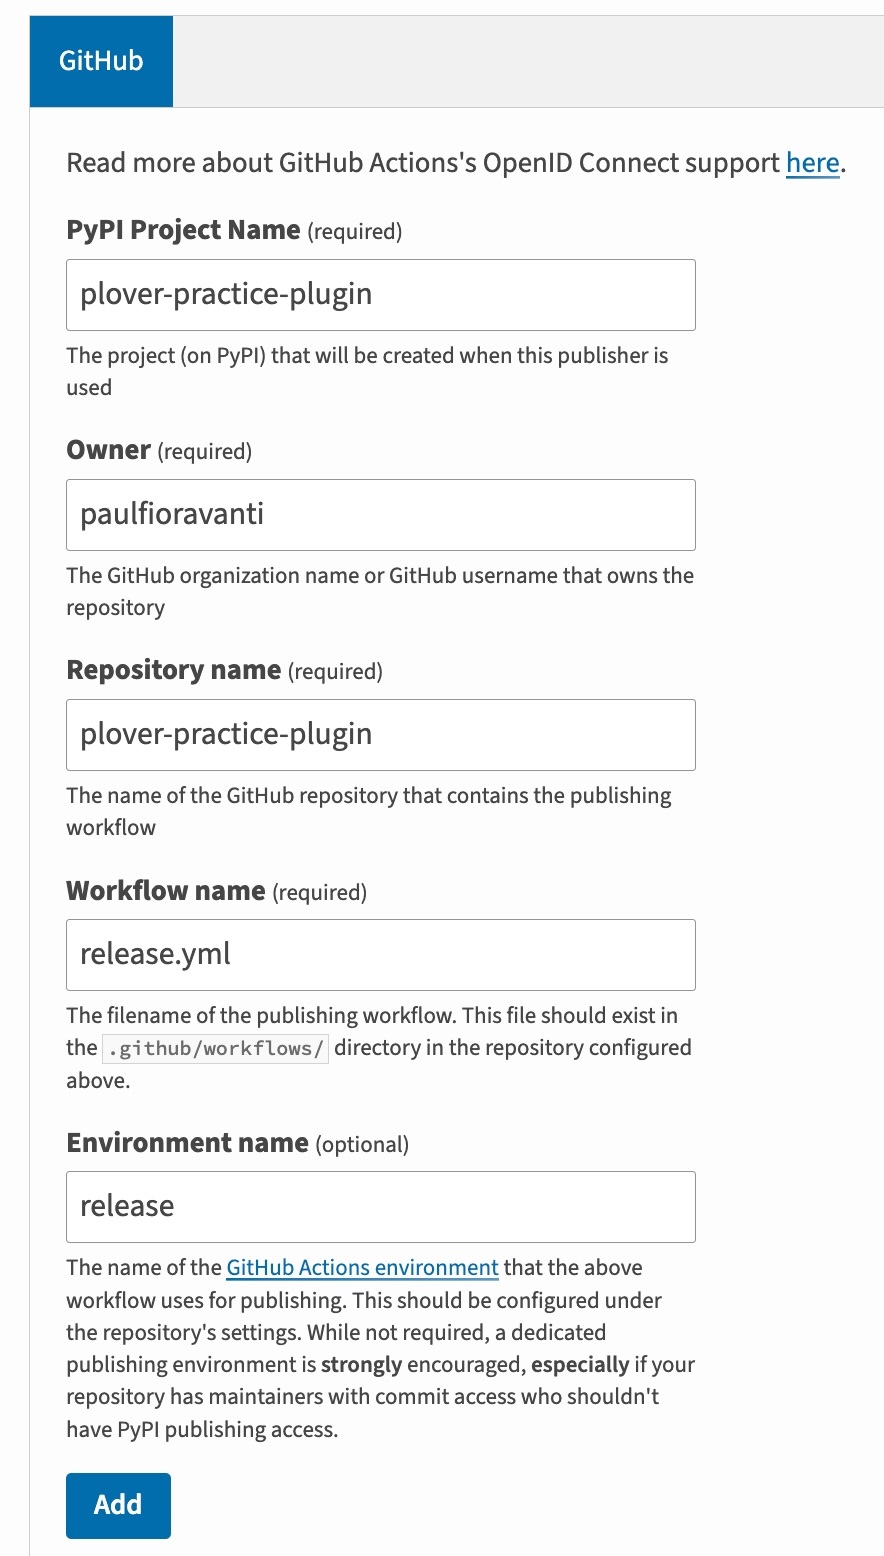
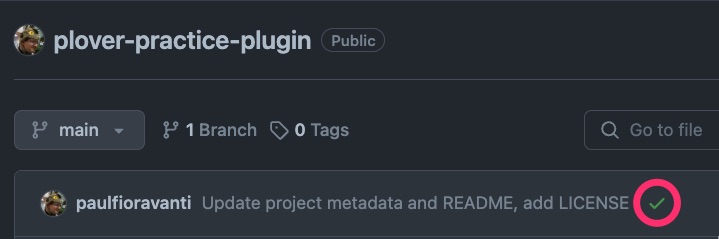


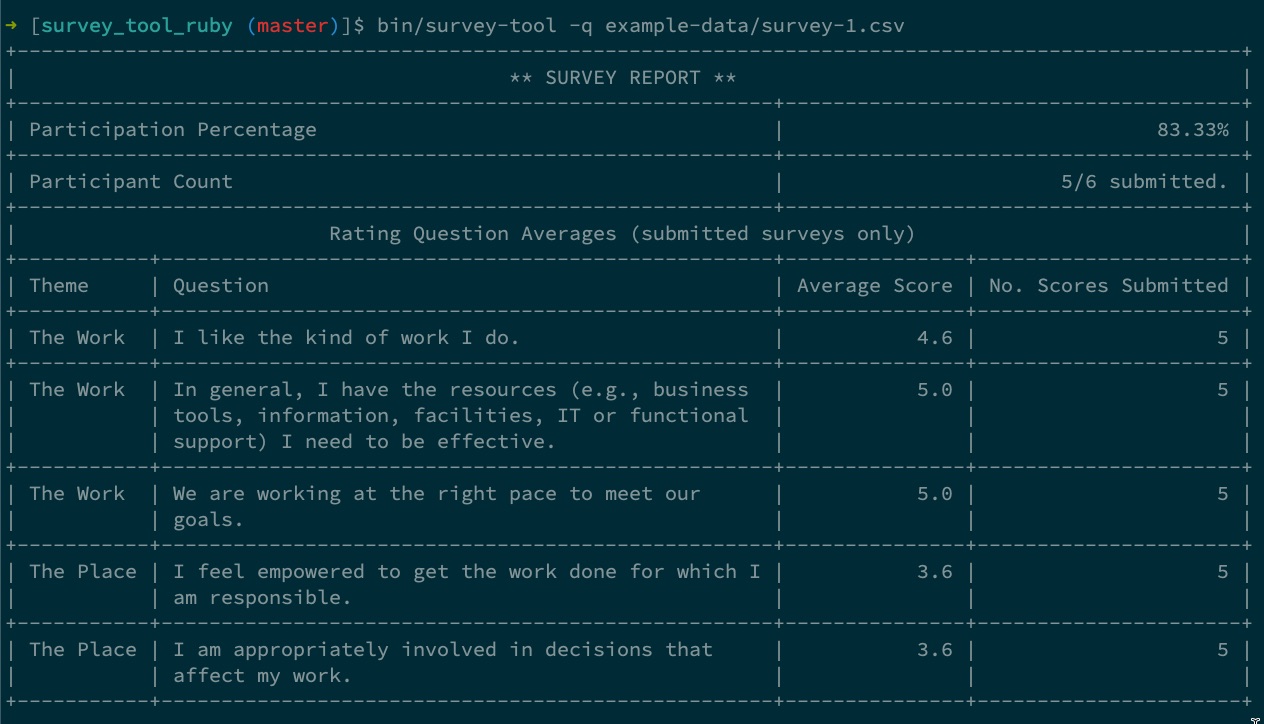

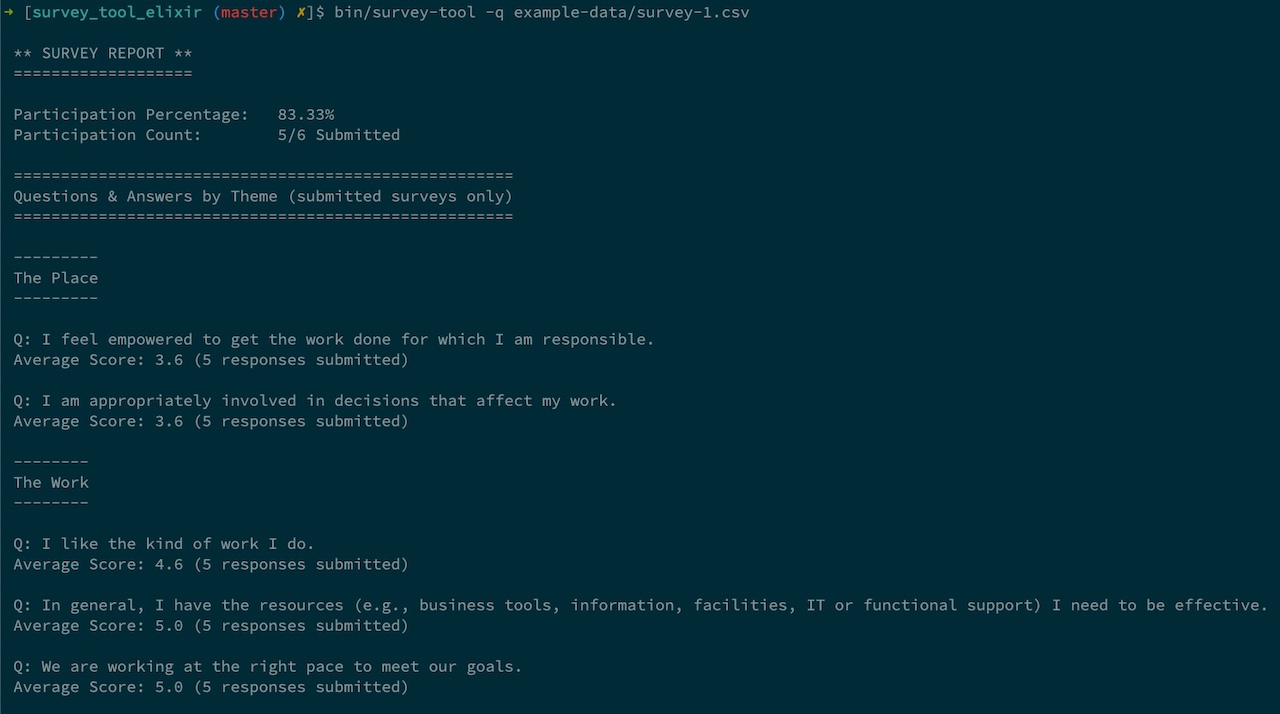

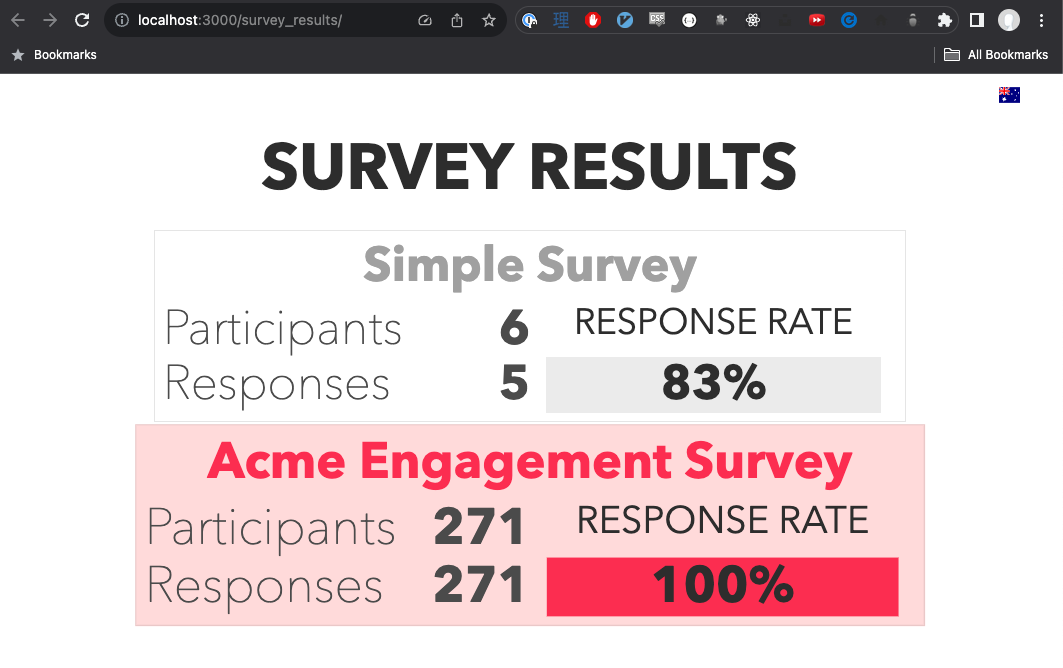
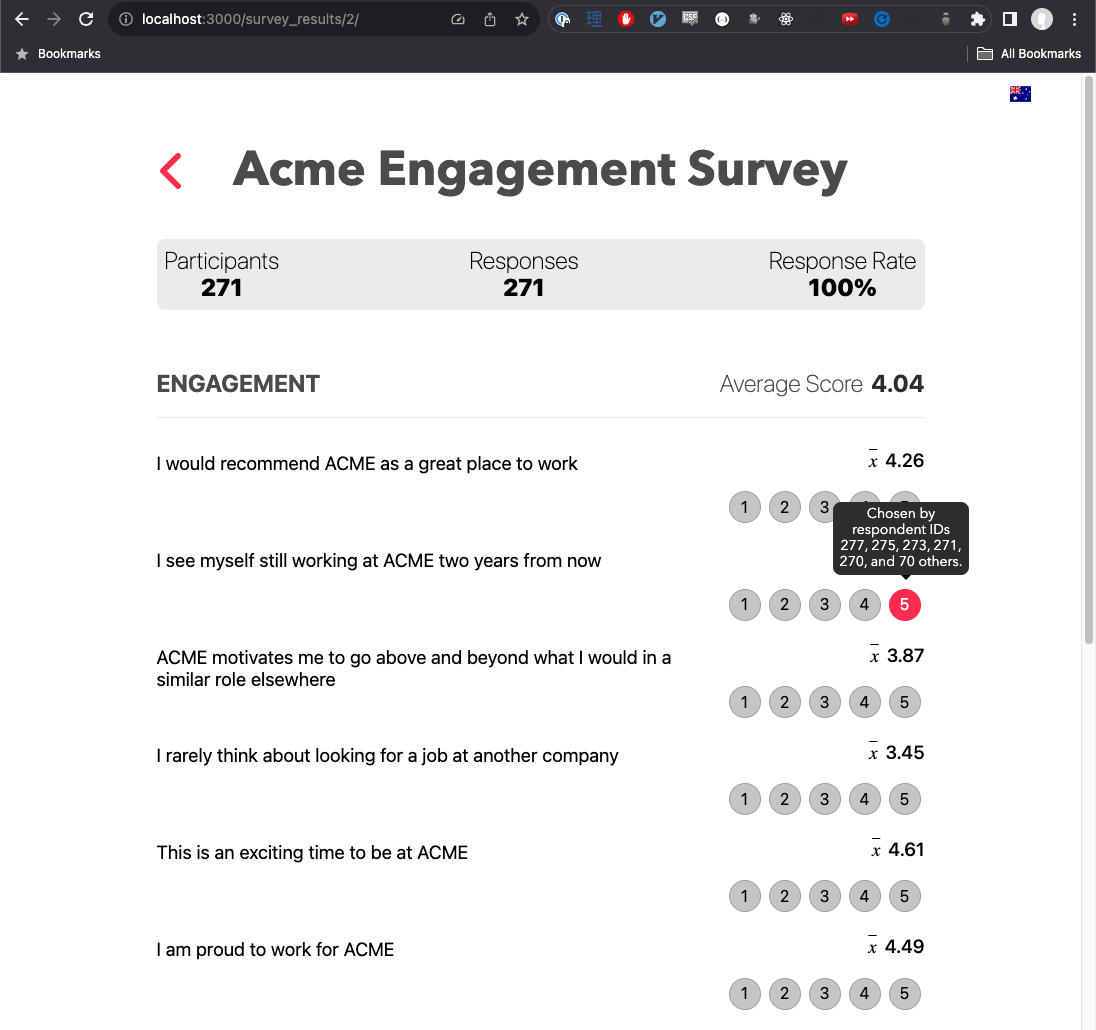
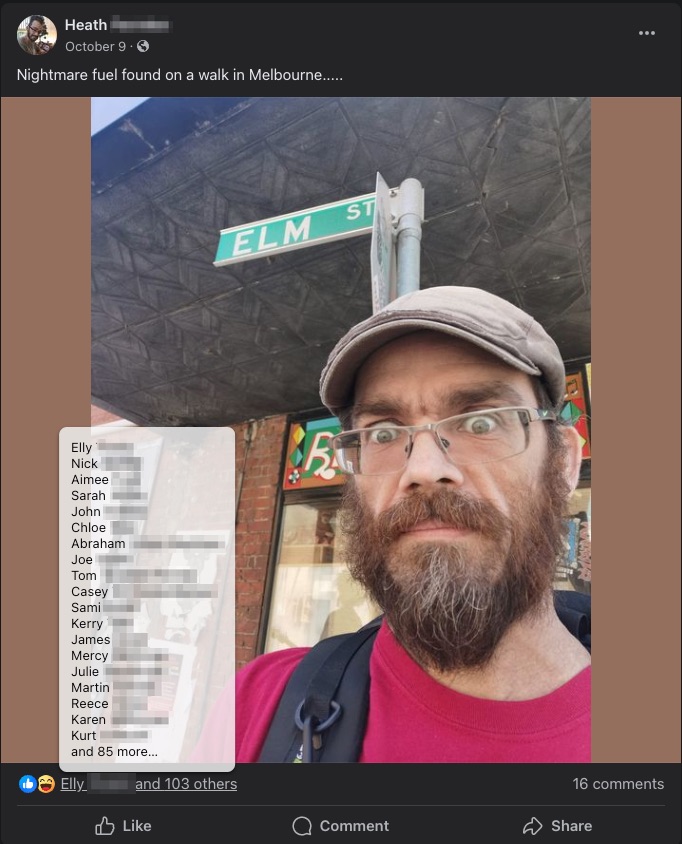
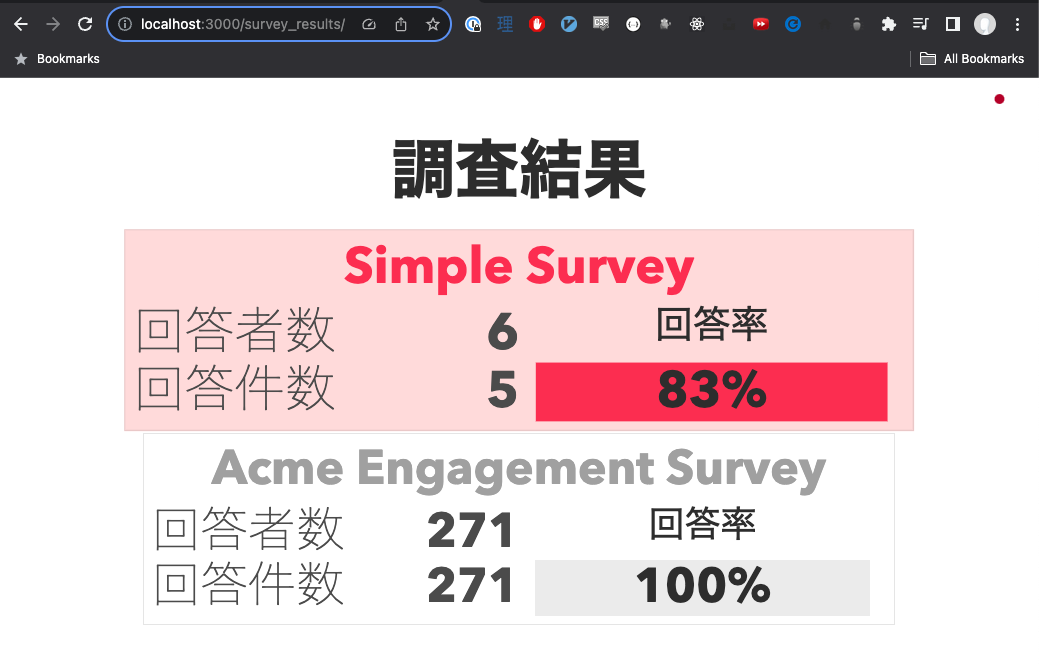


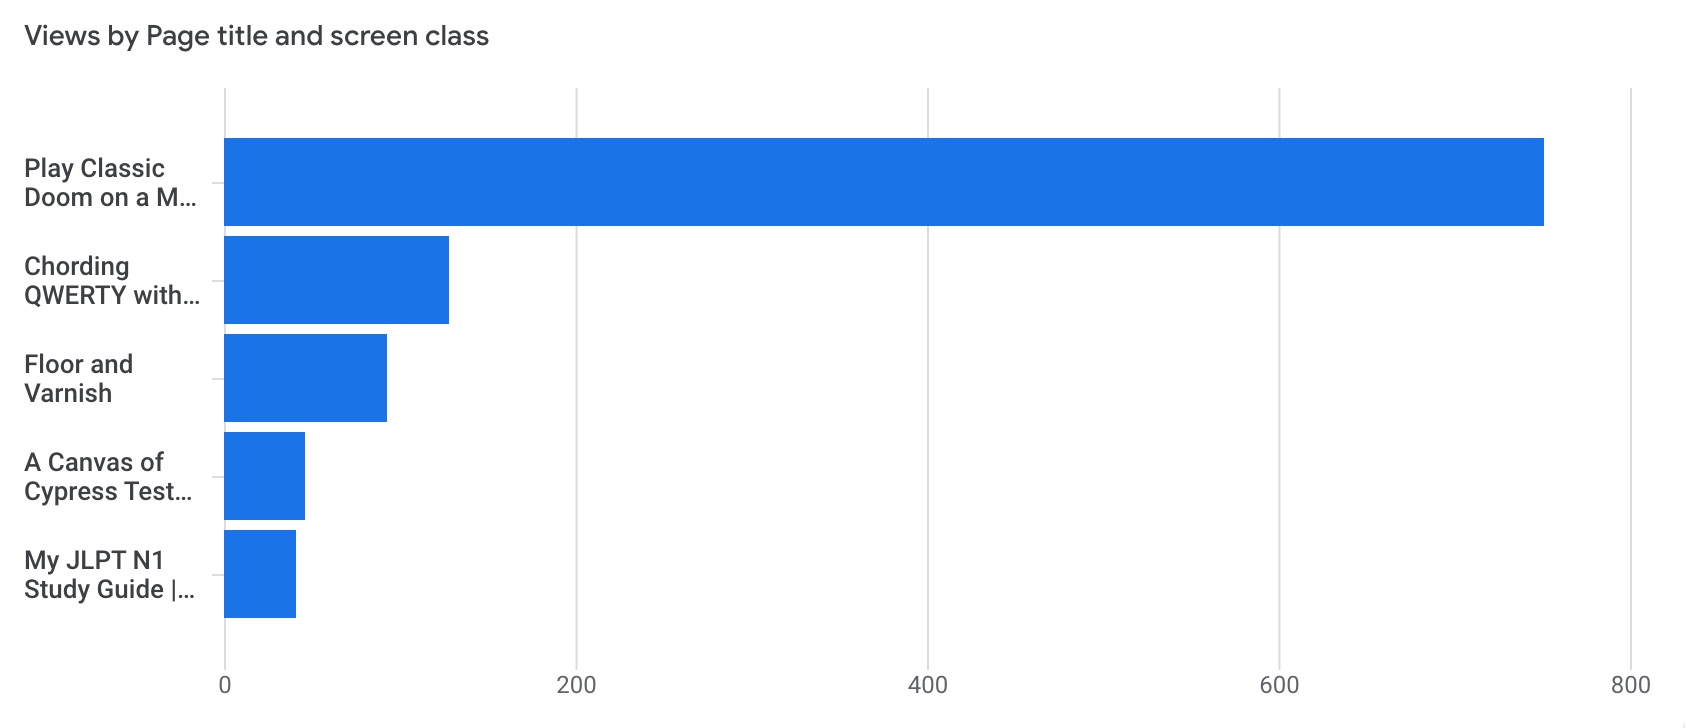


