
Plover stenography enables anyone to write text and perform keyboard shortcuts faster than they could on a traditional keyboard. Its open system architecture also allows you to tap into many of its core functionalities, expanding the possibilities of what you can do with steno, limited only by your imagination!
It does this through the use of plugins, created with Python, the programming language in which Plover itself is written. There are a eight different types of plugins that Plover currently supports, but this post will focus on three specific plugin types that can allow us to use Python to perform some kind of task:
- Commands (Our task: open a URL in a web browser)
- Metas (Our task: output a random number between 1 and 10)
- Extensions (Our task: output, and keep a cache of, values contained in computer environment variables)
One of the best things about creating plugins is being able to share them with fellow Plover users, so we will also go through the steps get them to appear inside everyone’s Plover Plugin Manager.
The final result will be the following codebase: Plover Practice Plugin.
Basically, this post is intended to be the Plover plugin development guide I wish existed when I first started, and hopefully it can be of some reference if you decide to build your own plugins. It is long, and fairly technical in nature, so a basic knowledge of Python or computer programming (or a desire to learn!), is recommended in order to follow along.
Python Environment
Since we are building something that is meant to run inside Plover’s environment, in order to avoid any unexpected errors during development, we need to make sure the code we write is compatible with it.
As of this writing, when you download the Plover application, it comes bundled with Python version 3.91. Therefore, in order to ensure maximum compatibility with Plover, a good choice would be to set your local Python version to use the latest patch version of Python 3.9, which is currently Python 3.9.182.
In order to change your Python version, I would recommend installing a version manager. This will enable you to easily use Plover’s Python version while developing the plugin, but use the latest (or any other) Python version with other projects.
pyenv would seem to be the most popular Python-specific choice, but I personally use asdf (Getting Started documentation, Python plugin) as my one version manager to rule all programming languages3.
When you have chosen, installed, and set up a version manager to work with Python (this may take a bit of time, but you will only do it once, and it is worth doing right), you will be ready to fire up your text editor and move on to some coding.
Setup Plugin Project
We are going to create a plugin project called “Plover Practice Plugin”, using the Initial Setup directions in the official Plover Plugin Guide as our main reference.
Create a directory on your computer called plover-practice-plugin4, and then add the following files underneath it (we will use a package-based structure for the files5):
plover-practice-plugin/
|-- plover_practice_plugin/
|   '-- __init__.py
|-- README.md
|-- setup.cfg
|-- setup.py
The __init__.py file is blank, but it needs to be present within the plover_practice_plugin directory so we can use it like a regular package.
README.md is a Markdown document containing information about the plugin. We will get the Plover Plugin Manager to read in information from here and display it. For now, just give it the bare minimum of a simple heading:
plover-practice-plugin/README.md
# Plover Practice Plugin
The setup.cfg configuration file is used by Setuptools, the packaging library that Plover’s plugin system is built on top of. It defines a package’s metadata, including external library dependencies (which, in our case, include Plover itself). For now, we will specify just enough for our needs during development:
plover-practice-plugin/setup.cfg
[metadata]
name = plover_practice_plugin
description = Plover practice plugin
long_description = file: README.md
long_description_content_type = text/markdown
keywords = plover plover_plugin
version = 0.0.1

[options]
zip_safe = True
install_requires =
    plover>=4.0.0.dev12
setup_requires =
    setuptools>=69.0.0
packages =
    plover_practice_plugin

[options.entry_points]
The final heading above refers to Setuptools’ concept of entry points, that “allow a package to open its functionalities for customization via plugins”. Many of Plover’s core functionalities are, themselves, exposed as entry points, and we will hook into them when we develop our own plugin types, and specify entry points for them under the [options.entry_points] heading.
Finally, Plover needs a minimal setup.py file in order to help read in the configuration we have in setup.cfg, run Setuptools for us when our plugin is installed, and consequently allow the plugin to be included properly in the Plugins Manager6:
plover-practice-plugin/setup.py
#!/usr/bin/env python3

from setuptools import setup

setup()
Initialise Git Repository
Initial setup is now complete, so this is probably a good time to put this project under version control with Git. Once you have installed it, create a .gitignore file in the project to make sure no Python-generated files, or any other computer cruft, finds its way into your repository:
plover-practice-plugin/.gitignore
# Byte-compiled / optimized / DLL files
__pycache__/

# Distribution / packaging
*.egg-info/
build/
dist/

# macOS-specific
.DS_Store

# Language versioning
.tool-versions
Depending on your operating system, there may be other files you may wish to ignore and not track, so feel free to customise this list as needed.
Then, run the following commands on your terminal of choice (or within your text editor, or however you like to use Git) inside the project directory:
git init
git add .
git commit --message="Initial commit"
Since this code will eventually find its way to GitHub, it is definitely worth familarising yourself with some of the core commands of Git itself (if you are not already). Check out the Git reference documentation when you come across an unfamiliar command.
Okay, we are now ready to start coding our first plugin!
Command Plugin
Commands are “fire and forget” functions that do not output any text, nor return any value. They enable you to:
- Interact with Plover to perform an action that is not possible, or easily doable, via its user interface7
- Leverage Python to perform some action
We are going to build a command plugin that opens a given URL in your default web browser, in the style of the Plover Open URL plugin.
In dictionary entries, the command will look like this:
"{:COMMAND:OPEN_URL:https://www.openstenoproject.org/}"
Within curly parentheses, and separated by colons, we define the following:
-
COMMAND- The keyword that tells Plover the outline is a command8 -
OPEN_URL- The name of the command function to run -
https://www.openstenoproject.org/- The argument to pass to the command function. In this case, it is the Open Steno Project URL we want to open, but we should be able to give the same command in other dictionary entries any URL we would like
Now we know what the command should look like, we need to tell Plover where to find it when we invoke it. So, let’s add our first entry point to the setup.cfg file under the [options.entry_points] heading:
plover-practice-plugin/setup.cfg
# ...
[options.entry_points]
plover.command =
    # "{:COMMAND:OPEN_URL:https://www.openstenoproject.org/}"
    open_url = plover_practice_plugin.command:open_url
This entry is saying:
- We are defining a command (
plover.command) - It is called
open_url(OPEN_URLin the outline maps directly to this9) - It links to a function called
open_url, which is found in a module calledcommandwithin theplover_practice_pluginpackage10
We have not created the open_url function yet, so let’s do that now in a new command.py module file:
plover-practice-plugin/plover_practice_plugin/command.py
import webbrowser

def open_url(_engine, argument):
    webbrowser.open(argument)
Command functions are implemented as receiving two parameters:
- a StenoEngine
engine, which is provided automatically by Plover. We have marked it with an underscore to signal that we are ignoring it, since we do not need it to open URLs - an optional
argument, which in this case contains the URL string that gets specified in the command outline
We leverage Python’s webbrowser library to do all the browser-related heavy lifting, and simply pass the URL argument to its open function, effectively creating a wrapper function around it.
Now that our first plugin is complete, let’s deploy it to Plover! Open your terminal, and from inside your project directory, run the following command11:
plover --script plover_plugins install --editable .
The
plovercommand will likely error out for you if you are running it for the first time. Follow the instructions in the Invoke Plover from the command line wiki page for your operating system to get it working12.
You should see output that looks something like the following:
$ plover --script plover_plugins install --editable .
Obtaining file:///path/to/plover-practice-plugin
  Preparing metadata (setup.py) ... done
Requirement already satisfied: plover>=4.0.0.dev12 in ...
...
Installing collected packages: plover-practice-plugin
  Running setup.py develop for plover-practice-plugin
Successfully installed plover-practice-plugin
Now, restart your Plover application, open the Plugins Manager, and you should see the Practice Plugin in the list.
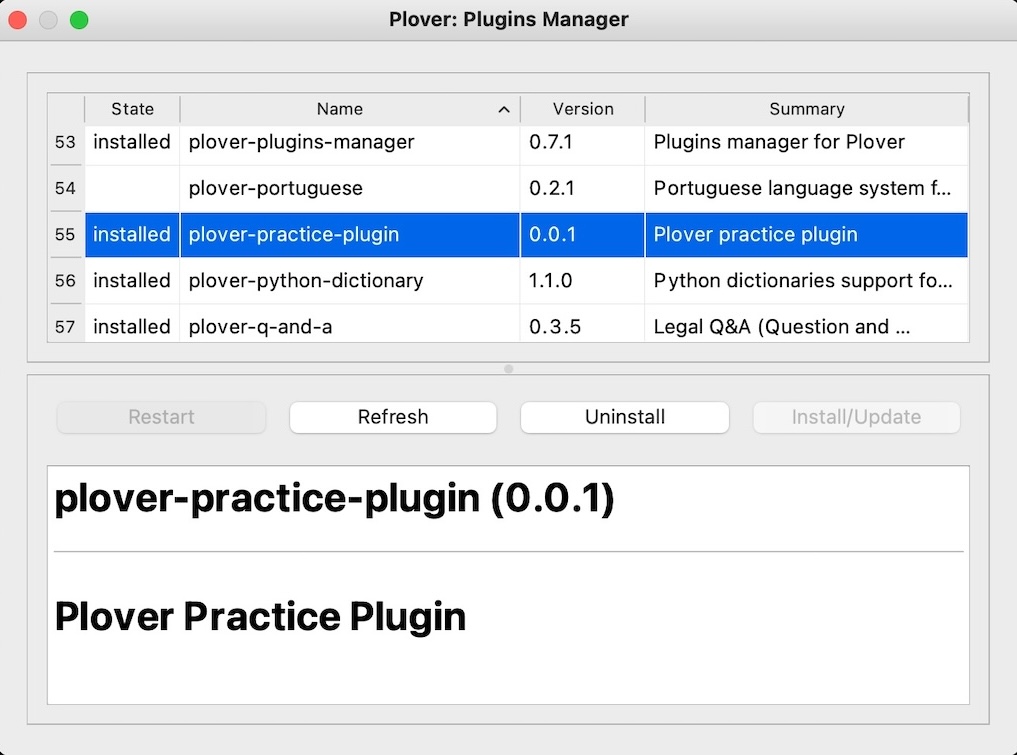
Great! Now, let’s test it out! Create a temporary entry in one of your steno dictionaries that looks something like this:
"*URL": "{:COMMAND:OPEN_URL:https://www.openstenoproject.org/}"
I have overridden Plover’s
*URLoutline here, but use whatever outline you would like.
Now, try chording the outline with your keyboard, and your default web browser should open to the Open Steno Project page!
Want to see if it works for other web pages? We can use the plover command to to do just that, without needing to add another dictionary entry, by sending commands directly to our Plover application. Run the following command in your terminal, and the Plover GitHub page should open:
plover --script plover_send_command OPEN_URL:https://github.com/openstenoproject/plover
Our first plugin is now complete. It is a very minimal implementation, but it works13! Let’s make an entry for it in our git repository before moving forward:
git add .
git commit --message="Add command plugin"
Now, let’s turn our focus to creating a plugin that will help us output some text that we could not just define in a steno dictionary entry.
Meta Plugin
Metas are functions whose primary purpose is to output new text14. You would likely be used to creating your own steno dictionary entries that output text of some kind, but we are going to justify needing a plugin by outputting text that we would be unable to specify in a standard dictionary entry.
Specifically, we are going to build a meta plugin that outputs a random number between 1 and 100.
In dictionary entries, the meta will look like this:
"{:RANDOM_NUMBER:1:100}"
Here, we define the following:
-
RANDOM_NUMBER- The name of the meta function to run -
1:100- The argument to pass to the meta function. In this case, it actually represents two arguments: our low and high number boundaries. It seems to be Plover convention to have all arguments in outlines separated by colons, so we will maintain this for our own parameters as well
Like with the command plugin, let’s first create a new random_number entry point in the setup.cfg file underneath the existing command entry:
plover-practice-plugin/setup.cfg
# ...
[options.entry_points]
plover.command =
    # "{:COMMAND:OPEN_URL:https://www.openstenoproject.org/}"
    open_url = plover_practice_plugin.command:open_url
plover.meta =
    # "{:RANDOM_NUMBER:1:100}"
    random_number = plover_practice_plugin.meta:random_number
Now, let’s go and create the random_number function in a new meta.py module file:
plover-practice-plugin/plover_practice_plugin/meta.py
import random

def random_number(ctx, argument):
    low, high = [int(arg) for arg in argument.split(":")]
    number = random.randint(low, high)

    action = ctx.new_action()
    action.text = str(number)
    return action
Meta functions are implemented as receiving two parameters:
- a Context
ctx, which is provided automatically by Plover. We use it primarily to generate what Plover calls an “action”, which you can think of as a container for the text we want to output15 - an optional
argument, which in this case wesplitin two, converting each into integers withint(), in order to get the low and high boundaries16
We leverage Python’s random library to generate a random number17 by passing the boundary numbers into its randint function. From there, we generate a new action from the context provided by Plover, assign the random number to its text property after converting it to a string (using str()), and return it.
Since we have made some new changes, we need to let Plover know about them by running the Plover plugin install script again:
plover --script plover_plugins install --editable .
Restart your Plover application, and then create a temporary entry in one of your steno dictionaries that looks something like this “rand” outline:
"RA*PBD": "{:RANDOM_NUMBER:1:100}"
Now, try chording the outline, and you should see a different number between 1 and 100 output every time you stroke RA*PBD! Let’s celebrate the addition of this new plugin by making a repository entry for it:
git add .
git commit --message="Add meta plugin"
Since there is no equivalent of the
plover --script plover_send_commandcommand for testing metas, if you wanted to try using different boundary number parameters, just create some more temporary steno dictionary entries that do so.
Next, let’s create our final plugin, that will give us maximum flexibility within Plover’s environment, and do more than just perform one-off actions.
Extension Plugin
Extensions are classes (as opposed to our other function-based plugins) that can:
- execute code in a long-running concurrent process to Plover
- keep their own state
- hook into the life-cycle events of the StenoEngine, and execute code when they occur
These features can seem a bit obtuse or abstract, especially if you are not overly familiar with computer programming, and it can initially seem difficult to understand what benefits an extension plugin can provide over, say, a command or meta plugin.
So, we are going to start with the creation of a new meta plugin, surface some of the pain points around it, and then migrate it over to be an extension plugin to relieve the pain.
Initial Meta Plugin
Our new plugin will enable us to read in and output values stored in environment variables on our computer, in the style of the Plover Local Env Var plugin.
Note that the incantations we will use to get the environment variables are macOS/Linux-focused. If you are following along using Windows, you will likely need to make small changes to your code around
$VAR/$Env:VAR/%VAR%usage, as well as theechoshell command that gets executed. I’m sorry…computers are hard, and I do not have a Windows machine to test on…
In dictionary entries, the meta will look like this:
"{:GET_ENV_VAR:$USER}"
Like the previous plugin, let’s start with the definition of a new meta plugin entry point:
plover-practice-plugin/setup.cfg
# ...
[options.entry_points]
# ...
plover.meta =
    # "{:RANDOM_NUMBER:1:100}"
    random_number = plover_practice_plugin.meta:random_number
    # "{:GET_ENV_VAR:$USER}"
    get_env_var = plover_practice_plugin.meta:get_env_var
Now, let’s go and add the get_env_var function to the existing meta.py module file:
plover-practice-plugin/plover_practice_plugin/meta.py
import os
import random

def random_number(ctx, argument):
    # ...

def get_env_var(ctx, argument):
    shell = os.getenv("SHELL", "bash").split("/")[-1]
    env_var = os.popen(f"{shell} -ic 'echo {argument}'").read().strip()

    action = ctx.new_action()
    action.text = env_var
    return action
We leverage Python’s os module to do the following:
- get Plover’s
$SHELLenvironment variable usinggetenv - get the
argument’s environment variable value from the computer user’s environment usingpopen18
Then, just like the random number meta plugin, we create a new action from the provided Plover context, assign the env_var value to its text, and then return it.
Run the Plover plugin install script again to apply the changes in Plover:
plover --script plover_plugins install --editable .
Restart your Plover application, and then create a temporary entry in one of your steno dictionaries that looks something like this:
"AO*URS": "{:GET_ENV_VAR:$USER}"
I have overridden Plover’s
AO*URSoutline here, but use whatever outline you would like.
Now, try chording the outline, and you should see your computer user name output! This working state seems like a good place to add a repository commit, so let’s do so:
git add .
git commit --message="Add env var meta plugin"
Migrate to Extension
If you chord the outline a few times, though, you will see that there is a noticeable time gap between your chording and the output appearing. This is because making a call out to the shell every time is computationally expensive enough for us to notice the lag. The value in the $USER env var will change rarely, if ever, so making this call out every time just to get back the same information is inefficient (and annoying cause we are all about speed with steno, right?).
Migrating over to an extension plugin can enable us to eliminate the lag, and get this functionality feeling snappy. We can begin that process by removing the get_env_var meta entry point, and replacing it with a plover_practice_plugin extension entry point:
plover-practice-plugin/setup.cfg
# ...
[options.entry_points]
# ...
plover.meta =
    # "{:RANDOM_NUMBER:1:100}"
    random_number = plover_practice_plugin.meta:random_number
plover.extension =
    # "{:GET_ENV_VAR:$USER}"
    plover_practice_plugin = plover_practice_plugin.extension:PracticePlugin
It would seem that entry point names for extensions tend to be named the same as the project itself, so that convention is followed here.
Next, let’s go and create a PracticePlugin class in a new extension.py module file. It gets initialized with a StenoEngine engine (provided by Plover), which we just need to assign to an internal property (we will use it later on…). It also implements two callback functions, start and stop, which get run when the extension is enabled and disabled respectively.
plover-practice-plugin/plover_practice_plugin/extension.py
import os
from plover.registry import registry

class PracticePlugin:
    def __init__(self, engine):
        self._engine = engine

    def start(self):
        registry.register_plugin("meta", "get_env_var", self._get_env_var)

    def stop(self):
        pass

    def _get_env_var(self, ctx, argument):
        shell = os.getenv("SHELL", "bash").split("/")[-1]
        env_var = os.popen(f"{shell} -ic 'echo {argument}'").read().strip()

        action = ctx.new_action()
        action.text = env_var
        return action
Within the start function, we use the Plover Plugin Registry to register a new meta plugin called "get_env_var" (the exact same name as the original meta), whose implementation we will find in a private instance method called _get_env_var (note the underscore prefix). That method contains the code we originally had in the get_env_var meta function (so we do not need the original function anymore, and it can be safely deleted). We do not currently need to do anything when the plugin stops (yet!), so we simply provide the stop function a pass.
Let’s do a quick sanity check to confirm that the initial migration has worked, and run the Plover plugin install script:
plover --script plover_plugins install --editable .
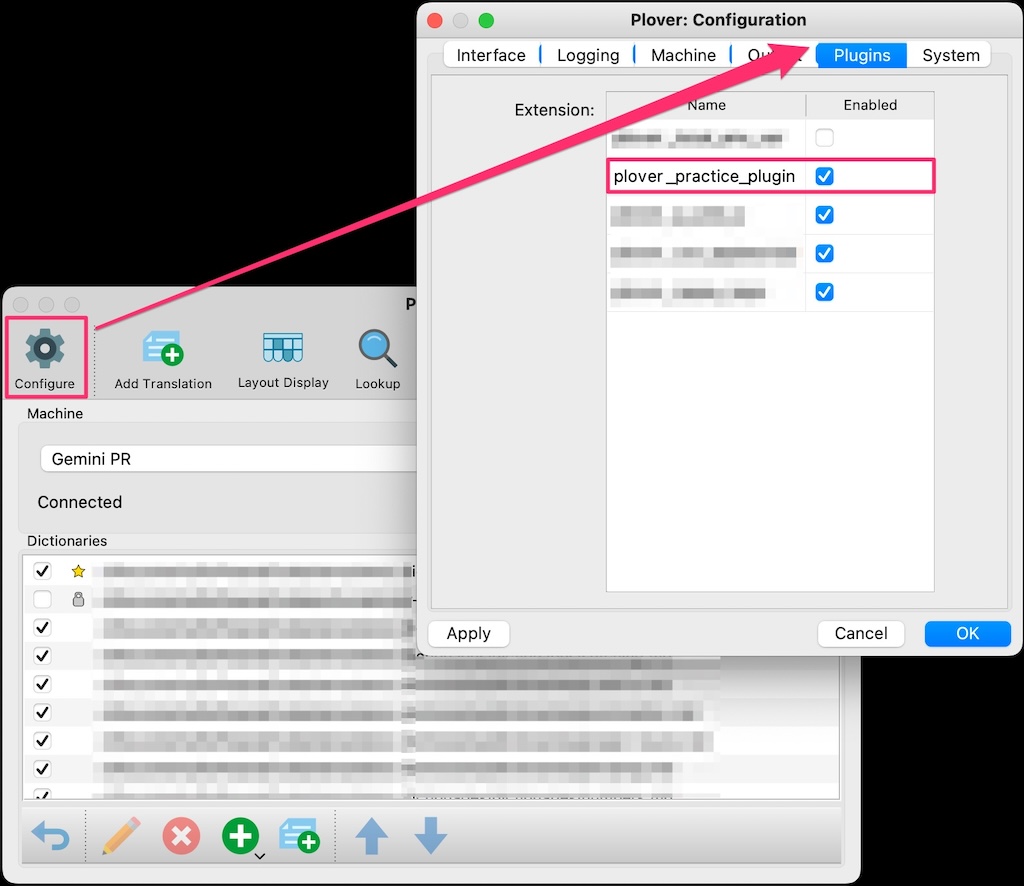
Restart your Plover application, open the Configure screen, and under the Plugins tab, confirm that plover_practice_plugin is in the list, and that its Enabled box is checked.
Now, try chording the "{:GET_ENV_VAR:$USER}" outline again, and if it still works exactly the same as before (including lag), then the meta-to-extension migration has been successful! Let’s quickly make a commit entry before moving forward:
git add .
git commit --message="Migrate env var meta to extension plugin"
Env Var Cache
The first optimisation we want to make is adding a cache, in the form of a Python dictionary, to store environment variable names and values after we fetch them the first time. This will mean we only get lag the first time we fetch the env var, but subsequent fetches will use the cached value, and hence output the text faster. Code-wise, we want to be able to do the following:
- Initialise an empty dictionary to store the env vars when plugin starts
- When attempting to get an env var value, check the cache first for the env var name, and return its value if present
- If no entry is present, run the command to get the env var, and store its name and value in the dictionary
Let’s see how this looks in code:
plover-practice-plugin/plover_practice_plugin/extension.py
import os
from plover.registry import registry

class PracticePlugin:
    def __init__(self, engine):
        self._engine = engine
        self._env_vars = {}

    # ...

    def _get_env_var(self, ctx, argument):
        try:
            env_var = self._env_vars[argument]
        except KeyError:
            shell = os.getenv("SHELL", "bash").split("/")[-1]
            env_var = os.popen(f"{shell} -ic 'echo {argument}'").read().strip()
            self._env_vars[argument] = env_var

        action = ctx.new_action()
        action.text = env_var
        return action
Run the Plover plugin install script again and restart Plover:
plover --script plover_plugins install --editable .
You should find that the first env var retrieval is slow, but subsequent look ups will use the cached version in the dictionary, so the text will output much faster. Chalk up our first optimisation win!
Clearing the Cache
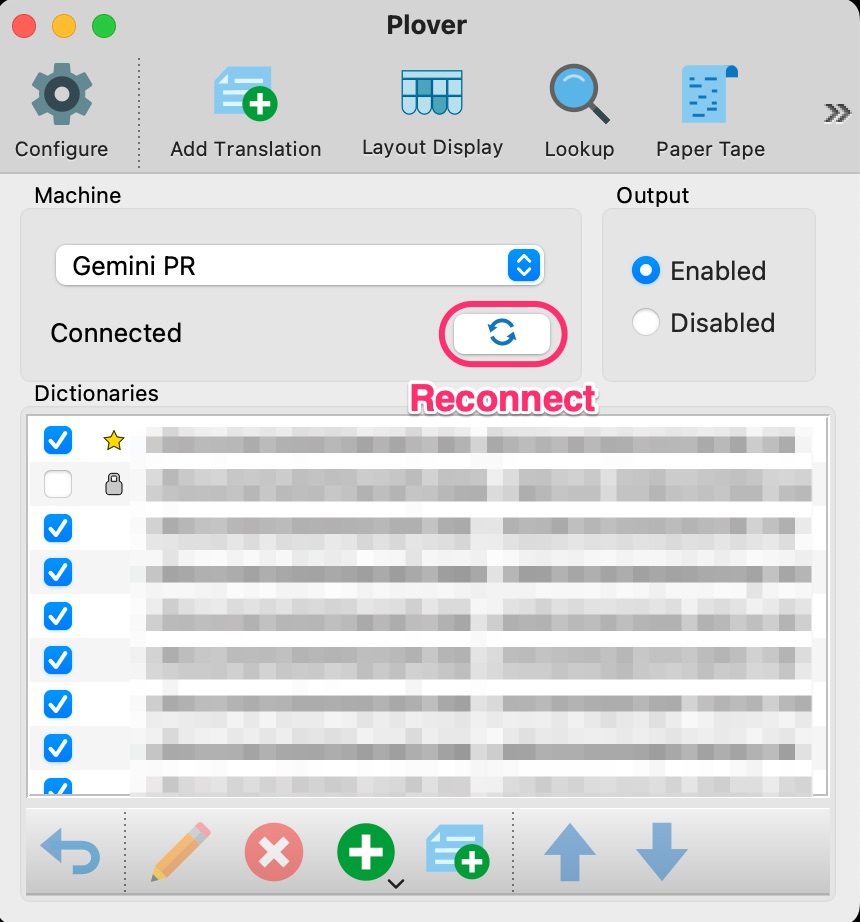
Now, it is nice to use a cache, but what if the value of an env var value changes? The extension will keep using the same cached (and now obsolete) value as long as the env var name is the same. It would be nice to have a way to clear the cache when we want to read in new env var values: say, by pushing the Plover GUI “Reconnect” button.
Luckily, Plover’s StenoEngine contains some hook functions that we can leverage to do just that19. Plover’s steno engine has four states:
- Stopped
- Initializing
- Connected (aka Running)
- Disconnected (aka Error)
When you press the “Reconnect” GUI button, the engine state changes to Stopped, then Initializing, then either Connected or Disconnected, depending on whether Plover can find your steno machine. We can use the machine_state_changed engine hook to check the machine status every time it changes, and if it’s Connected, reset the env var cache:
plover-practice-plugin/plover_practice_plugin/extension.py
import os
from plover.machine.base import STATE_RUNNING
from plover.registry import registry

class PracticePlugin:
    # ...
    def start(self):
        registry.register_plugin("meta", "get_env_var", self._get_env_var)
        self._engine.hook_connect(
            "machine_state_changed",
            self._machine_state_changed
        )

    def stop(self):
        self._engine.hook_disconnect(
            "machine_state_changed",
            self._machine_state_changed
        )

    # ...

    def _machine_state_changed(self, _machine_type, machine_state):
        if machine_state == STATE_RUNNING:
            self._env_vars = {}
Here we are use the steno engine’s hook_connect and hook_disconnect functions to have our new _machine_state_changed private method run every time Plover’s "machine_state_changed" event occurs. The machine_type and machine_state parameters are provided to us by Plover when the event occurs, but we only care about the machine state, and whether it has changed to be Connected (STATE_RUNNING). If it has, empty the cache.
Let’s check and see if cache emptying works. Run the Plover plugin install script again and restart Plover:
plover --script plover_plugins install --editable .
Like before, the first retrieval of the env var should have a lag, but subsequent retrievals should be fast. Now, press the Plover “Reconnect” button, and try the same outline again. You should find that since there is no longer a cache present, the lag will have returned since the env var value is directly fetched again via the command line. However, subsequent retrievals should be fast again as expected. Great, no more stale data for us!
Eradicate Lag with Config
Time to address the final hanging thread in the optimisation story: that initial env var retrieval speed hit. It would be nice to have output of env var values be fast all the time, and we can do this by prefetching them when the plugin starts. This will take the form of:
- using a JSON configuration file to store the names of the env vars whose values we want to cache
- when the extension starts, read in config file, fetch all the env var values, and initialise the dictionary cache for them
- when we encounter an env var that is not in the cache, after fetching its value and adding it to the cache, also add its name to the config file
- where we previously cleared the cache by pressing the “Reconnect” button, instead we will now re-read in the config file and refresh the cache
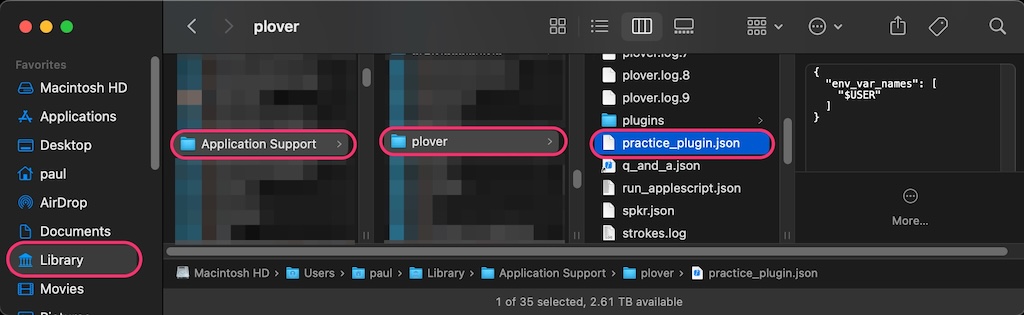
The JSON config file will live in Plover’s designated configuration directory (CONFIG_DIR), which is platform dependent. We will call it “practice_plugin.json”, and it will be created, read, and written to automatically, so it is not something that should need to be edited manually. Its format will look like this:
{
  "env_var_names": [
    "$USER",
    "$ENV_VAR",
    "$SOME_OTHER_ENV_VAR"
  ]
}
First, let’s update the _get_env_var method to save newly fetched env var names out to the config file:
plover-practice-plugin/plover_practice_plugin/extension.py
import json
import os
from pathlib import Path

# ...
from plover.oslayer.config import CONFIG_DIR

_CONFIG_FILEPATH = Path(CONFIG_DIR) / "practice_plugin.json"

class PracticePlugin:
    def __init__(self, engine):
        self._engine = engine
        self._env_vars = {}

    # ...

    def _get_env_var(self, ctx, argument):
        try:
            env_var_value = self._env_vars[argument]
        except KeyError:
            env_var_value = self._expand(argument)
            self._env_vars[argument] = env_var_value
            self._save_config()

        action = ctx.new_action()
        action.text = env_var_value
        return action

    def _expand(self, argument):
        shell = os.getenv("SHELL", "bash").split("/")[-1]
        return os.popen(f"{shell} -ic 'echo {argument}'").read().strip()

    def _save_config(self):
        with _CONFIG_FILEPATH.open("w", encoding="utf-8") as file:
            data = {"env_var_names": sorted(self._env_vars.keys())}
            json.dump(data, file, indent=2)
            file.close()
Here, we have made a small refactor by extracting out os-related code into an _expand method (we will reference it again soon), and then added another _save_config method that creates a new dictionary containing the sorted "env_var_names", and uses Python’s json library to output (dump) it to a JSON config file. We call _save_config after we add any new env var entry to the cache, so we know to read it in again when the plugin starts.
Speaking of that, let’s now add the code that loads in the config, not just when the plugin starts, but also when we want to refresh the env var cache:
plover-practice-plugin/plover_practice_plugin/extension.py
import json
import os
from pathlib import Path

# ...
from plover.machine.base import STATE_RUNNING
from plover.oslayer.config import CONFIG_DIR

_CONFIG_FILEPATH = Path(CONFIG_DIR) / "practice_plugin.json"

class PracticePlugin:
    def __init__(self, engine):
        self._engine = engine
        self._env_vars = {}

    def start(self):
        # ...
        self._env_vars = self._load_config()

    # ...

    def _load_config(self):
        try:
            with _CONFIG_FILEPATH.open(encoding="utf-8") as file:
                data = json.load(file)
                file.close()
        except FileNotFoundError:
            data = {}

        env_var_names = data.get("env_var_names", [])
        env_var_values = self._expand(",".join(env_var_names))
        env_vars = dict(zip(env_var_names, env_var_values.split(",")))

        return env_vars

    def _machine_state_changed(self, _machine_type, machine_state):
        if machine_state == STATE_RUNNING:
            self._env_vars = self._load_config()
Here, you can see that we call a _load_config method when the plugin starts, and when the Plover “Reconnect” button is pressed. It reads in the config file (load), extracts its "env_var_names" list, expands them all, and returns the now-initialised env_vars dictionary cache20.
For completeness’ sake, and for those following along, this is what the full finished extension code looks like:
plover-practice-plugin/plover_practice_plugin/extension.py
import json
import os
from pathlib import Path

from plover.machine.base import STATE_RUNNING
from plover.oslayer.config import CONFIG_DIR
from plover.registry import registry

_CONFIG_FILEPATH = Path(CONFIG_DIR) / "practice_plugin.json"

class PracticePlugin:
    def __init__(self, engine):
        self._engine = engine
        self._env_vars = {}

    def start(self):
        registry.register_plugin("meta", "get_env_var", self._get_env_var)
        self._engine.hook_connect(
            "machine_state_changed",
            self._machine_state_changed
        )
        self._env_vars = self._load_config()

    def stop(self):
        self._engine.hook_disconnect(
            "machine_state_changed",
            self._machine_state_changed
        )

    def _get_env_var(self, ctx, argument):
        try:
            env_var_value = self._env_vars[argument]
        except KeyError:
            env_var_value = self._expand(argument)
            self._env_vars[argument] = env_var_value
            self._save_config()

        action = ctx.new_action()
        action.text = env_var_value
        return action

    def _expand(self, argument):
        shell = os.getenv("SHELL", "bash").split("/")[-1]
        return os.popen(f"{shell} -ic 'echo {argument}'").read().strip()

    def _save_config(self):
        with _CONFIG_FILEPATH.open("w", encoding="utf-8") as file:
            data = {"env_var_names": sorted(self._env_vars.keys())}
            json.dump(data, file, indent=2)
            file.close()

    def _load_config(self):
        try:
            with _CONFIG_FILEPATH.open(encoding="utf-8") as file:
                data = json.load(file)
                file.close()
        except FileNotFoundError:
            data = {}

        env_var_names = data.get("env_var_names", [])
        env_var_values = self._expand(",".join(env_var_names))
        env_vars = dict(zip(env_var_names, env_var_values.split(",")))

        return env_vars

    def _machine_state_changed(self, _machine_type, machine_state):
        if machine_state == STATE_RUNNING:
            self._env_vars = self._load_config()
Moment of truth: let’s see if this works. Run the Plover plugin install script again and restart Plover:
plover --script plover_plugins install --editable .
Now, try chording the "{:GET_ENV_VAR:$USER}" outline. Like before, there will be an initial lag on the first output, with faster subsequent outputs. But! Go and open up your Plover configuration directory, and you should find a practice_plugin.json file with the following contents:
{
  "env_var_names": [
    "$USER"
  ]
}
The plugin now knows that it should go and prefetch the value of the $USER env var. So, if you restart the Plover application now, and try chording the "{:GET_ENV_VAR:$USER}" outline, there should be no lag at all! Try pressing the Plover “Reconnect” button to refresh the cache, and you should still see no output lag.
Looks like we have ourselves a finished extension plugin21, so let’s check our new additions into Git:
git add .
git commit --message="Finish extension plugin"
After showcasing three different examples of Plover plugin types, I think we can put a pin in our project and say that it is “done”. Now, let’s see what is involved in getting this code public, and into the hands of other Plover users.
How to Share
Plover does have a Publishing Plugins page, and I do think it should be your first point of call for official guidance on this topic. However, as of this writing, I needed extra steps to make everything work in an automated and frictionless manner, so consider this a supplementary guide.
I found there were three main steps to complete in order to get plugin code into the Plover ecosystem:
- Get your code in a public Git repository
- Publish your code on PyPI
- Get the name of your plugin included in the Plover Plugin Registry list
Push to GitHub
During the course of development, we have been making commits to a local Git repository on our computer, that can only be seen by us. To share our code with others, we need a public repository where others can access it.
GitHub is probably the most well known code sharing platform22, so we will use it to publish our codebase. If you do not have a GitHub account yet, sign up for one, create a new repository, and name it plover-practice-plugin. No need to worry about any of the optional fields, but just ensure that the repository is set to be Public.
Since we already have a local Git repository, we can follow GitHub’s directions to “push an existing repository from the command line”. They will be personal to your account, and look something like:
git remote add origin git@github.com:<your_username>/plover-practice-plugin.git
git branch -M main
git push -u origin main
Once you have followed your instructions, you should be able to see your plugin code up on GitHub at https://github.com/<your_username>/plover-practice-plugin (you can see mine here).
Publish to PyPI
The Python Packaging and Distributing projects page that Plover’s Publishing Plugins page would seem to (indirectly) reference in its guide to publish to PyPI is marked as “outdated”. The “modern” way to publish would seem to be by using a CI/CD workflow, and Python’s documentation even has a Publishing package distribution releases using GitHub Actions CI/CD workflows page to help out GitHub users.
Based on some information in that guide, some information in the PyPI publish GitHub action documentation, and some experimentation on my part, the following is my guide to automate publishing of a Plover plugin to PyPI from GitHub.
The goal is to be able to perform a git push up to GitHub, and then have a GitHub action handle publishing to PyPI without any further interaction from us. The GitHub action should also be smart enough to only publish to PyPI when we explicitly specify a new version of the plugin (via a git tag), since not all code pushes need to be published immediately.
Create Trusted Publisher
Before going further with code, though, create an account on PyPI if you don’t already have one. Next, in order to allow a GitHub action to publish to PyPI on your behalf, you need to set up a trusted publisher. Open your Publishing page, scroll down to the “Add a new pending publisher” form, and fill it with information similar to this:
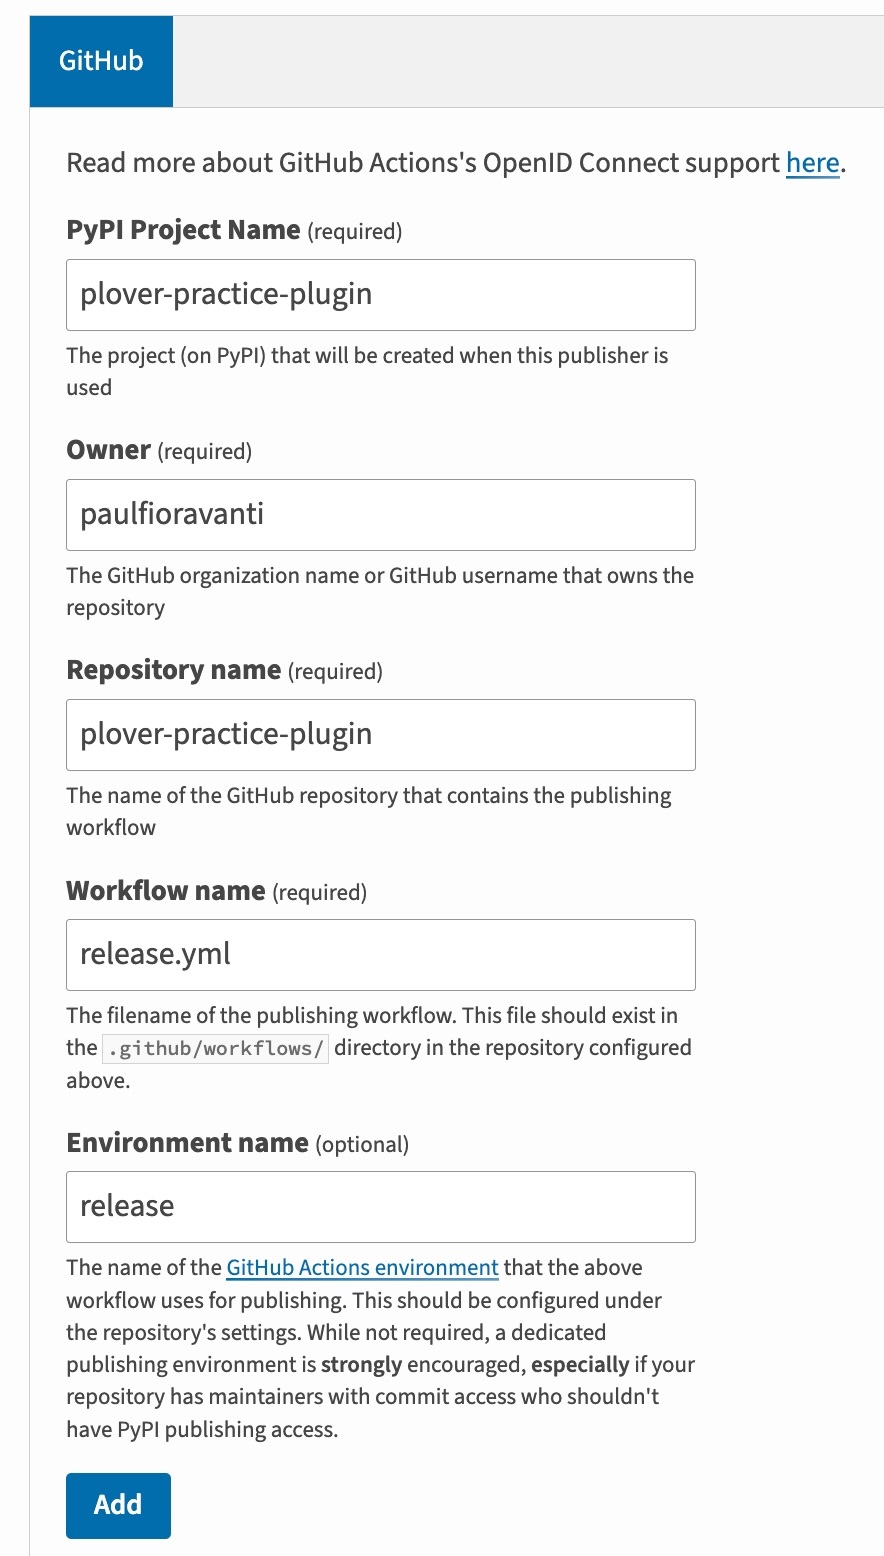
- If you have been building your own
plover-practice-pluginwhile reading this post, and are intending to publish to PyPI, you will have to change the “PyPI Project Name” to something else, sinceplover-practice-pluginwill already be taken by me :) Maybe tryplover-practice-plugin-<your-name>. - The “Owner” and “Repository name” fields come from your plugin GitHub repo
- The information in the “Workflow name” and “Environment” fields are something we will specify soon in the GitHub action configuration. “Release” seems to be a good default name for these, but feel free to choose something else
Once you have added the publisher correctly, it should show up as a “Pending Publisher” on the Publishing page, meaning we are ready to create our GitHub action workflow.
Create GitHub Action WorkFlow
The following is what I consider to be a minimum viable GitHub action workflow configuration for publishing a Plover plugin to PyPI. As per the trusted publisher config above, we will name the workflow file release.yml, and add it to the project in the following specific location:
plover-practice-plugin/.github/workflows/release.yml
name: PyPI Release
on:
  push:
    branches:
      - main
    tags:
      - "*"
jobs:
  # Adapted from: https://github.com/pypa/gh-action-pypi-publish#usage
  pypi-publish:
    if: ${{ startsWith(github.ref, 'refs/tags') }}
    name: Build, Release to PyPI
    runs-on: ubuntu-latest
    environment:
      name: release
      url: https://pypi.org/project/plover-practice-plugin/
    permissions:
      id-token: write
    steps:
      - name: Clone Repository
        uses: actions/checkout@v3

      - name: Set up Python
        uses: actions/setup-python@v4
        with:
          python-version: 3.9

      - name: Install Build
        run: python -m pip install --upgrade build

      - name: Build
        run: python -m build

      - name: Publish to PyPI
        uses: pypa/gh-action-pypi-publish@release/v1
- As per the trusted publisher config, we have specified that the
nameof theenvironmentthis workflow should use isrelease, and that itsurlpoints to the “PyPI Project Name” we specified - As per Plover’s Python version, we make sure to set up the workflow’s environment with
python-version: 3.9 - All GitHub action jobs that use
pypa/gh-action-pypi-publishmust useruns-on: ubuntu-latest, and no other operating system23 - The conditional
if: ${{ startsWith(github.ref, 'refs/tags') }}statement is where we say to only run thepypi-publishjob if the current git commit reference (github.ref)startsWitha tag (refs/tags)24
Before moving forward, let’s add a commit for this new config:
git add .
git commit --message="Add publish to PyPI GitHub action"
You can find further information about the details about this config in the PyPI publish GitHub Action documentation, but aside from what is mentioned above, you should be able to just copy and paste this config into your own plugin project to use as-is.
Update Project Details
Remember at the beginning of this project when we specified a minimal set of project metadata? Now that we are nearly at the point of publishing to PyPI, let’s flesh it out a bit more so we can have more information show up on our project’s PyPI page (feel free to add more and customise as you please. Also, the ordering of this config does not matter; I just used alphabetical here):
plover-practice-plugin/setup.cfg
author = Paul Fioravanti
author_email = paul@paulfioravanti.com
classifiers =
    Development Status :: 4 - Beta
    Environment :: Plugins
    Intended Audience :: End Users/Desktop
    Operating System :: OS Independent
    Programming Language :: Python :: 3
    Programming Language :: Python :: 3.9
description = Plover practice plugin
keywords = plover plover_plugin
license = GNU General Public License v3 or later (GPLv3+)
long_description = file: README.md
long_description_content_type = text/markdown
name = plover_practice_plugin
url = https://github.com/paulfioravanti/plover-practice-plugin
version = 0.0.1

# ...
Since we have specified a license in the metadata (in this case the GPLv3+, similar to Plover’s license), let’s also create a plover-practice-plugin/LICENSE.txt file, and copy-paste the contents from the license link in there. Finally, since we only put minimal content in the README.md, now would also be a good time to update that with more information. You can see what I added in my project GitHub repo.
Let’s now commit all those changes, and push them to GitHub:
git add .
git commit --message="Update project metadata and README, add LICENSE"
git push
Now, if you open your plugin GitHub page, you should see a green check mark next to that last commit, indicating that a GitHub action workflow was run successfully:
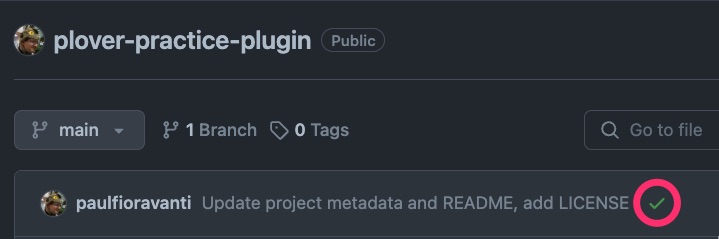
You can watch the job in action or check the status of any past jobs on the repo’s Actions page (see mine).
However, if you click that check mark, you will see that although the workflow was run, the job inside the workflow (pypi-publish) was skipped:

This is what we want! We are now free to push code to the repo, and only publish to PyPI when we are ready…which, at this point, we definitely are.
Our setup.cfg metadata already has a version entry marked as 0.0.1, so let’s tag the repo’s current commit as being v0.0.125. We will then push that tag up to GitHub, where the GitHub action will run, and publish the plugin out to PyPI for us:
git tag v0.0.1
git push origin v0.0.1
When you check the job status this time (for the same commit, since you only pushed up a tag), you should see that it has been successful:

Then, you can open your new plugin page on PyPI to confirm that you are published (for reference, here is Plover Practice Plugin’s PyPI page). When you are ready to release a new version, remember to update both the version number in the setup.cfg file and add a new git tag!
Add to Plover Plugin Registry
We are now down to the last step in this guide. Congratulations for making it this far! The final small (but important!) barrier between your plugin, and making it available in everyone’s Plover application, is its inclusion in the Plover Plugin Registry list. Follow the instructions on the repo README file, and create a pull request that adds the name of your plugin to the registry.json file.
Since the Plover Practice Plugin is only for educational purposes, it does not belong in the registry, and hence we will not be making a pull request for it. However, here is an example of the pull request that added the Plover Q&A plugin to the registry; you would create a similar one for your own plugin.
It can sometimes take a while for pull requests to be approved, so do not get disheartened! As long as your plugin code is in a public git repo, people that really want it immediately can download it from there and install it manually, just like we did during development. So, I would recommend adding instructions on how to do that in your README.md file until your plugin makes it into the registry (example).
When your pull request gets merged, your plugin will appear in everyone’s Plover Plugin list. Well done, and thanks for contributing to Plover’s ecosystem!
Conclusion
My first Plover plugin was Plover Q&A, and it was a plugin I did not want to make.
It started as just a plain old JSON dictionary, but having to constantly change speaker names for multiple entries was painful enough to make me change it into a Plover Python dictionary (thanks to the awesome Plover Python dictionary plugin).
However, I found I still needed to manually update speaker names (though not as many as before), and eventually wanted to add more features like:
- keeping speaker names in some kind of internal state
- specifying custom config
- using Plover’s “Reconnect” button.
Sound familiar? :) The pain of not having a plugin was too much, and the only way forward from there was to learn how to build the plugin I had been avoiding for so long, and take my first deep dive into Python and its ecosystem. I used to dread having to think about making a plugin, and now I am way more comfy with it.
Hopefully this guide has been able to help lower any barriers you may feel exist between some cool thing you would love to see Plover do, and actually making it real. I look forward to seeing what you make!
-
You can confirm this in the GitHub action that Plover uses to build application distributions for its supported platforms (Windows, macOS, Linux). ↩
-
The latest version of Python as of this writing is Python 3.12.1. I initially started building Plover plugins using Python 3.11 locally. However, I found out the hard way that some language features I used were introduced in Python versions released after 3.9, like the
matchstatement (added in Python 3.10). This meant that although my plugin code tested fine locally, when I attempted to run it within Plover, it errored out since Python 3.9 has no idea what amatchstatement is (this problem is not limited to just your own code, but also if your plugin has third-party dependencies that use syntax features add after Python 3.9). Locally developing on your target environment, and tailoring your code to it, is definitely recommended! ↩ -
See also my asdf installation script and asdf zsh config for more asdf setup examples. ↩
-
It would seem that the naming conventions for project directories is to dasherize them. This is probably to distinguish them from the snake case naming convention used here for modules and packages. ↩
-
This seems like a good guiding principle for any Plover plugin, rather than a module-based structure, unless you really know upfront that the scope of your plugin is going to be very small, and will always stay that way. If you are able to do this consistently, I would love to be able to borrow your crystal ball! ↩
-
Setuptools seems to have adopted
pyproject.tomlfiles as its preferred configuration standard moving forward. However, I found that attempting to use one with a Plover plugin resulted in its entry mysteriously disappearing from Plover’s Plugin Manager when Plover updated its plugin registry. Even though everything worked as expected during development when using apyproject.tomlconfig file (all the way through to deploying out to PyPI), it would seem that more development work needs to happen on Plover before its use becomes possible.Therefore, as of this writing, regardless of whether you see any documentation that says
setup.cfgand/orsetup.pyfiles are “legacy” (egpip’s packaging documentation etc), it seems they are currently the only viable option. I would love to be wrong about this, though, so please leave a comment or reach out to me if you have had success with using apyproject.tomlfile with your own Plover plugin! ↩ -
Like the excellent Plover Dict Commands plugin. ↩
-
The Plover Plugin Commands documentation shows commands as starting with
PLOVER, which is correct:COMMAND(with a preceding colon [:COMMAND]) is a “friendly command alias” for it. Therefore, eitherPLOVERorCOMMANDcan be used to define commands, but I tend to use the following rule of thumb with naming in an effort to better communicate a command’s intent:- If the scope of the action the command performs is limited to the Plover application itself, use
PLOVER(eg built-in Plover commands like{PLOVER:FOCUS},{PLOVER:ADD_TRANSLATION}etc) - If the command does anything outside Plover, use
COMMAND
- If the scope of the action the command performs is limited to the Plover application itself, use
-
Entry points can also be written in uppercase, if that helps you to understand the mapping between the outline and entry point:
OPEN_URL = plover_practice_plugin.command:open_url. It would seem to be convention for entry points to be named in lowercase, but when Plover registers a plugin internally, it downcases the name anyway, so you can technically name it in any case you please. ↩ -
More information about this syntax pattern can be found in Setuptools’ Entry Points Syntax documentation. ↩
-
The
plover_pluginsscript is essentially a wrapper aroundpip, and so the--editableflag here allows you to “install your project without copying any files. Instead, the files in the development directory are added to Python’s import path”. I initially thought that this meant that when we make changes to existing files that we want to test, we only need to restart the Plover application, rather than run theplover_pluginsscript every time. However, I have found that not to be the case, with every change requiring the script to be re-run. ↩ -
In order to make the
plovercommand work as-written in the Plover wiki page on my operating system (macOS), I ended up adding the following line to my zsh initialisation file (.zshrc):alias plover=/Applications/Plover.app/Contents/MacOS/Plover↩ -
For a more robust implementation of a command plugin, including error handling etc, check out my Plover Run AppleScript plugin. ↩
-
Looking through the Plover Plugin Guide, you may have also read about Macro plugins, and, if you are like me, been a bit confused as to how they differ from Metas. There seems to be some overlap between their purposes, and I have found they often get lumped together (Plover Last Translation even has both macro and meta versions of its functions that do the same thing).
After looking through how metas and macros are used in different plugins, as well as in Plover itself, my current personal rule of thumb moving forward would be:
“Use metas to output new text, and use macros to change or transform text that has already been output.”
However, there are plenty of exceptions to this “rule”, like Plover Emoji, which converts written text to emojis, being a meta plugin, and Plover’s
retro_caseandretro_currencyplugins being metas, as apposed to all its otherretro_functions being macros.One factor influencing that, though, could have been that macros were added to Plover in 2017, while metas were added in 2020. Perhaps
retro_caseandretro_currencywere written as metas instead of macros because metas were created to supersede macros, which explains their ability to also change previous output via theprev_replaceproperty of Plover’s_Actionclass…? I do not know, and have not been able to find a clear answer, so I will stick with my rule of thumb for now. ↩ -
The naming, purpose, and details of
_Contextand_Actionis something that can be glossed over for purposes of this post (and given their underscored naming, it would seem they are thought of as Plover internal details, even though you interact directly with objects of those classes in your plugin code…). There does not currently seem to be any high level documentation around them, so reading the code is currently your only real reference for gathering any further information about what they do and how they relate to each other. ↩ -
If the
[int(arg) for arg in argument.split(":")]code looks confusing or unfamiliar, check out Python’s documentation on list comprehensions, a data structure used heavily in Python code, and definitely worth familiarising yourself with. ↩ -
Yes, technically pseudo-random, but the number’s unpredictability is not a critical feature of the plugin, so it will do for our purposes. ↩
-
I tried a multitude of ways that Python allows you to run a shell command before settling on using
os.popen. In order to search for variables, the only way I found in which I was able to successfully reach past Plover’s local environment, and into the user’s environment, was to use theos.popenfunction, and run the command in interactive mode (-iflag). I would love to hear from you if you were successful using any other method, as this may just be a macOS quirk! ↩ -
For an example of a plugin that hooks into all of Plover’s Engine Hooks, check out my Plover Steno Engine Hooks Logger plugin (only really potentially useful during plugin development) ↩
-
The whole
join-ing andsplit-ing in the code was added because running_expandon each env var name in a large list significantly impacted the plugin’s start up time. It is much faster to send a single string containing all the var names to the shell, like"$VAR1,$VAR2,...", and have them all expanded inline at the same time. ↩ -
For an example of a extension plugin that covers this functionality, but is more thoughtfully architected (separation of plugin-specific logic from Plover-dependent code etc), includes error handling, and contains code quality features like pytest automated tests (where possible for non-Plover-dependent code), pylint static code analysis, and mypy type checking, see my Plover Local Env Var plugin. ↩
-
I found this out the hard way while developing the Plover Run AppleScript plugin. In order to get automated tests to work in my GitHub CI workflow for it, I changed the OS to be
runs-on: macos-latest. When I attempted to apply that to the release workflow, publishing to PyPI errored out with a helpful message instructing me to change the config back toruns-on: ubuntu-latest. ↩ -
Update Feb 8, 2024: Wouldn’t you know it, there is a better way to do this without needing that conditional: this example just uses
on: push: tags: - "v*"config to make sure the job only runs when tags are pushed up that begin with “v”. It also has the benefit of auto-generating a GitHub release, and not needing to skip any jobs. Definitely shop around and check out other people’s plugin GitHub action config for other ways of doing things! ↩ -
We will just use a lightweight tag for simplicity’s sake, rather than an annotated tag. ↩


Leave a comment